Sony SRF H11 Operating Instructions - Page 2
Installing the, Battery, Improving Radio, Reception, Playing the Radio
 |
UPC - 027242614901
View all Sony SRF H11 manuals
Add to My Manuals
Save this manual to your list of manuals |
Page 2 highlights
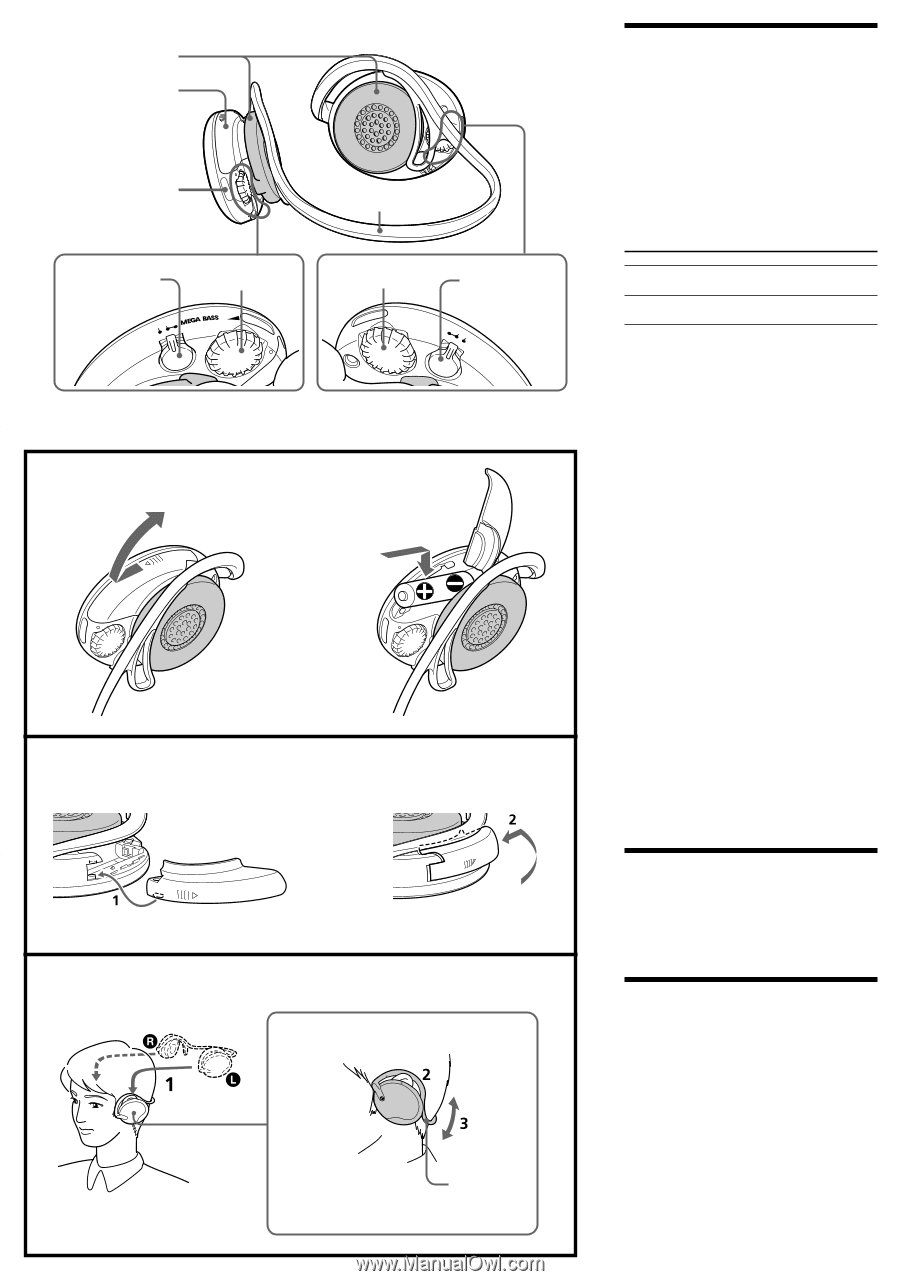
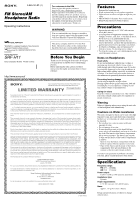
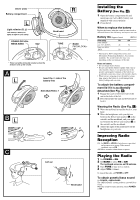
Driver units Battery compartment R L Light reflector (R, L) This reflector reflects car lights at night for your safety. Neck band POWER OFF•ON• MEGA BASS OFF ON POWER VOL* VOL TUNE BAND FM DX/LOCAL• AM FM DX LOCAL AM BAND * There is a tactile dot beside volume to show the direction tune up the volume. A L Insert the # side of the battery first. Size AAA (R03) x 1 g BL C g Left ear Neck band Installing the Battery (See Fig. A) 1 Open the battery compartment lid and install one size AAA (R03) battery (not supplied) with correct polarity. 2 Close the lid. When to replace the battery Replace the battery when the sound becomes weak or distorted. Remove the old battery and insert a new one. Battery life (Approx. hours) When using FM Sony alkaline size AAA (LR03) 42 Sony size AAA (R03) 18 (JEITA*) AM 54 23 * Measured by JEITA (Japan Electronics and Information Technology Industries Association) standards. The actual battery life may vary depending on the circumstance of the unit. Notes on battery • Do not charge the dry battery. • Do not carry the dry battery together with coins or other metallic objects. It can generate heat if the positive and negative terminals of the battery are accidentally come into contact with metallic objects. • When you are not going to use the unit for a long time, remove the battery to avoid damage from battery leakage and corrosion. To attach the battery compart- ment lid if it is accidentally detached (See Fig. B) 1 Engage the catch of the lower half of the unit in the hole of the lid. 2 Press the lid into the unit and downwards to lock it. Wearing the Radio (See Fig. C) 1 Wear the neckband around the back of your head. 2 Wear the headphones with your left ear between the Driver unit (marked L on the outside) and the neckband, and your right ear between the Driver unit (marked R on the outside) and the neckband. 3 Adjust the angle of the neckband to fit the headphones on your ears. Improving Radio Reception FM: Set BAND to LOCAL if interference is prevalent and reception is too strong. Under normal conditions, set it to DX. AM: Move around to obtain better reception. Playing the Radio 1 Set POWER to ON. 2 Set BAND to select FM or AM. The neckband serves as an FM antenna. 3 Turn TUNE to tune in to a station. 4 Adjust VOL (volume). To turn off the radio, set POWER to OFF. To obtain poweful bass sound Set POWER to MEGA BASS. The "MEGA BASS" system produces a poweful bass sound. When the sound becomes distorted, switch POWER to ON.
-
 1
1 -
 2
2
 |
 |