Sony SRF-M73 Operating Instructions - Page 1
Sony SRF-M73 - Sports Walkman AM/FM Stereo Manual
 |
UPC - 027242552128
View all Sony SRF-M73 manuals
Add to My Manuals
Save this manual to your list of manuals |
Page 1 highlights
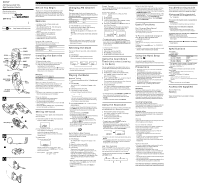
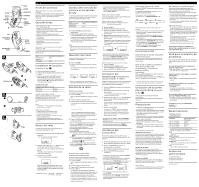
¿ N 3-866-487-11(2) FM Stereo/AM PLL Synthesized Radio Operating Instructions Manual de Instrucciones SRF-M73 WALKMAN is a trademark of Sony Corporation. WALKMAN es marca registrada de Sony Corporation. Sony Corporation ©1999 Printed in China CLOCK MODE TUNE/ TIME SET +/- SCAN 2 VOL MEGA BASS ON/OFF FM SENS DX/LOCAL A HOLD POWER START/STOP LAP/RESET BAND PRESET/ LAP MEMO 1 to 5 Belt Holder R03 (AAA) x 2 1 B a b ≥ 2 C English Before You Begin Thank you for choosing the Sports Walkman radio! It will give you many hours of reliable service and listening pleasure. Before operating the radio, please read these instructions thoroughly and retain them for future reference. Features • FM stereo/AM PLL (Phase Locked Loop) Synthesized radio • Up to 15 stations (10 for FM, 5 for AM) can be preset for one-touch tuning. • Auto Station Scan tuning for speedy locating of stations • Built-in digital clock and stopwatch • Splash-resistant for all-weather use • Countdown timer • Hand strap and belt holder supplied • MEGA BASS for dynamic bass sound Notes on AM tuning step The AM tuning step differs depending on areas. The channel step is factory-set to 10 kHz. Area North and South American countries Other countries Channel step 10kHz 9kHz Installing the Batteries (See Fig. A) 1 Remove the belt holder. 2 Slide and open the lid at the rear of the unit. 3 Insert two R03 (size AAA) batteries (not supplied) with correct polarity. Insert the batteries from the negative } terminal to prevent a short-circuit, and in the order from 1 to 2 as shown in the illustration. Battery life Using R03 (Sony AAA) batteries FM : Approx. 12 hours AM: Approx. 17 hours When to replace the batteries When the batteries become weak, the battery "i" indication will flash in the display. Replace the batteries with new ones. The unit will switch to the clock mode from any other mode. Note • The battery "i" indication in the display does not show the remaining power of the battery. Notes on battery • Insert the batteries with correct polarity. • Do not mix new and used batteries. • The batteries can not be charged. • Remove the batteries when the unit is not to be used for a long time. • Should any battery leakage occur, wipe the battery case well and install new batteries. Setting the Clock The display will flash "12:00" when the batteries are first inserted. 1 Hold down CLOCK for more than 2 seconds. The hour flashes in the display. 2 Press TUNE/TIME SET + or - until the correct hour appears in the display. Each press changes the digit(s) by one. When you keep the button pressed, the digit(s) change rapidly. 3 Press CLOCK. The minute starts to flash. Repeat steps 2 and 3 to set the minute. After setting the minute, press CLOCK again. The clock starts from 0 seconds. • 12-hour system: "AM 12:00" = midnight "PM 12:00" = noon Changing AM Channel Step The channel step of this unit is factory-set to 10 kHz. When needed, change the channel step before listening to the radio. Area North and South American countries Other countries Channel step 10kHz 9kHz 1 Press POWER to turn off the power. 2 While holding down SCAN, keep pressing BAND for more than 5 seconds. The channel step appears in the display for a few seconds. To go back to the original channel step, repeat step 2. Note • When the AM channel step is changed, the clock time and the lap time will be kept but the preset stations will be erased. Selecting the Mode You can use this unit as a clock, radio, stopwatch or timer. 1 Press POWER. 2 Press MODE to select a function mode. Each press changes the display as follows: Radio frequency Stopwatch Countdown timer • When the power is off, the display switches between the clock and the stopwatch. Playing the Radio Manual Tuning 1 Connect the headphones to the 2 (headphones) jack. 2 Press POWER. The "RADIO ON" indication will appear in the display. 3 Adjust the volume using VOL. 4 Press BAND to select the band. Each press changes the band as follows: FM1* FM2* AM * FM1 and FM2 are differenciated only for Preset tuning. For Manual or Auto Station Scan tuning of FM stations, select either band. 5 Press TUNE/TIME SET + or - to tune in to the desired station. • To see the current time while listening to the radio, press CLOCK. The current time will appear for a few seconds and then the display returns to the radio frequency. • To turn off the radio, press POWER. • To improve the radio reception FM :Extend the headphones cord which functions as the FM antenna (See Fig. B-a). AM:Rotate the unit horizontally for optimum reception. A ferrite bar antenna is built-in the unit (See Fig. B-b). • Set FM SENS to LOCAL if interference is prevalent and reception is too strong. Under normal conditions, set it to DX. FM SENS DX LOCAL Auto Station Scan Tuning The Auto Station Scan function locates stations and automatically tunes in to them. 1 Press POWER. The "RADIO ON" indication will appear in the display. 2 Adjust the volume using VOL. 3 Press BAND to select the band. 4 Press SCAN. Scanning will start upward from the current frequency. The "SCAN" indication flashes in the display during scanning. When a station is received, the "SCAN" indication stops flashing and remains in the display for a few seconds. After a few seconds, the radio will scan for another station. • When you have located a station and wish to stop Auto Station Scan, press SCAN once. The "SCAN" indication disappears. • To cancel the Auto Station Scan, press SCAN or TUNE + or -. Preset Tuning You can preset 10 stations in FM (5 in FM1 and 5 in FM2) and 5 stations in AM. Presetting a station Example: To set FM 90 MHz on FM2 onto Preset button 2 1 Press POWER. 2 Press BAND to select FM2. 3 Tune in to FM 90 MHz ( See "Manual Tuning" or "Auto Station Scan Tuning"). 4 Hold down PRESET/LAP MEMO button 2 for more than 2 seconds. The first beep will be followed by two beeps to confirm the setting. The preset number "P2" flashes and then remains in the display. • To preset another station, repeat these steps. • To change the preset station, tune in to the desired station and hold down PRESET/LAP MEMO (1 to 5). The new station will replace the previous station on the preset button. To recall a preset station 1 Press POWER. 2 Adjust the volume using VOL. 3 Press BAND to select the band. 4 Press PRESET/LAP MEMO (1 to 5). Using the Countdown Timer (Only when Listening to the Radio) You can use the built-in countdown timer to turn off the radio automatically after a preset duration. 1 Press POWER to turn on the radio. 2 Press MODE to select the countdown timer. The "TIMER" indication flashes and "2:00" appears in the display. 3 Press TUNE/TIME SET + or - to set the desired countdown duration for the timer. The countdown duration can be set from 1 minutes to 2 hours, in 1-minute increments. 4 Press START/STOP. The "TIMER" indication stops flashing and remains in the display, and countdown starts. After the preset countdown duration, the buzzer sounds and the radio turns off. • To stop the buzzer, press LAP/RESET or POWER. The buzzer will sound for 3 minutes if it is left on. • To turn off the radio before the preset time, press POWER. • To switch to the other modes, press MODE. Using the Stopwatch The stopwatch can time up to 99 hours 59 minutes and 59.99 seconds, in 1/100-second increments. 1 Press MODE to select the stopwatch. The "STPW" indication will appear in the display. 2 Press START/STOP to start. The display shows the elapsed time. 3 Press START/STOP to stop. • To reset to zero, press LAP/RESET when the stopwatch is in the stop status. • The stopwatch comes with two display modes. To switch to the hour-minute-second display, press TUNE/TIME SET +. To switch to the minute-secondsplit second display, press TUNE/TIME SET -. ˜ • To switch to the other modes during counting, press MODE. • To listen to the radio while the stopwatch is running, press POWER. The display will switch to the radio frequency for a few seconds. Lap Time Function Press LAP/RESET while the stopwatch is running. The"LAP" indication will flash, and the current lap time will appear in the display for a few seconds. The lap times are stored automatically onto PRESET/ LAP MEMO 1 to 5. LAP/RESET LAP/RESET LAP/RESET LAP 1 LAP 2 LAP 3 LAP 5 LAP/RESET LAP 4 LAP/RESET Notes on lap time memory • The lap time memory will store the last 5 lap times. Earlier lap times are erased in progressive order. • To display a stored the lap time, press the respective PRESET/LAP MEMO button. • To switch to the hour-minute-second display, press TUNE/TIME SET +. To switch to the minute-secondsplit second display, press TUNE/TIME SET -. • To erase the lap time memory, press LAP/RESET, and then START/STOP. Useful Functions For Enhanced Bass Sound Switch MEGA BASS to ON. The MEGA BASS function intensifies the bass sound for richer quality audio reproduction. To Prevent Accidental Change of the Station Being Received - HOLD Function Press HOLD. "H" appears in the display to indicate all buttons are locked. To cancel HOLD, press HOLD once. "H" disappears in the display. • If HOLD is on when you replace the batteries, it will remain on after the batteries are replaced. Using the Hand Strap (See Fig. C) Use only the supplied hand strap. Attach the hand strap as shown in the illustration. Precautions • Operate the unit only on 3 V DC with two R03 (size AAA) batteries. • Avoid exposure to temperature extremes, direct sunlight, moisture, sand, dust or mechanical shock. Never leave the unit in a car parked in the sun. • Should anything fall into the unit, remove the batteries and have the unit checked by qualified personnel before operating it any further. • To clean the casing, use a soft cloth dampened with a mild detergent solution. • In vehicles or buildings, radio reception may be difficult or noisy. Try listening near a window. Notes on Headphones Road safety Do not use headphones while driving, cycling, or operating any motorized vehicle. It may create a traffic hazard and is illegal in many areas. It can also be potentially dangerous to play your headphones at high volume while walking, especially at pedestrian crossings. You should exercise extreme caution or discontinue use in potentially hazardous situations. Preventing hearing damage Avoid using headphones at high volume. Hearing experts advise against continuous, loud and extended play. If you experience a ringing in your ears, reduce volume or discontinue use. Caring for others Keep the volume at a moderate level. This will allow you to hear outside sounds and to be considerate to people around you. Warning If there is lightning when you are using the unit, take off the headphones immediately. Do not Immerse in Water This product is designed to be splash-resistant, but should not be immersed in water or come in continuous contact with water. • Before installing the battery, be sure to wipe off drops of water on the unit. • The supplied headphones are not meant to be immersed in water or come in continuous contact with water. If they get wet, dry them with a soft cloth. Never use an electric hair dryer while wearing the headphones. Notes on the Clock • The clock's digital display may become dim when exposed to heat. It will recover when the temperature returns to normal. • When exposed to excessively high or low temperature (for example, in a car), the flashing of digits on the clock's display may become slower. • In a poorly lit place, the clock's display may become dim. • Do not put the unit where its clock controls may be depressed accidentally. • Do not leave the clock in temperatures below 0˚C or over 40˚C which may cause it to malfunction. If you have any questions or problems concerning your unit, please consult your nearest Sony dealer. Troubleshooting Guide Should any problem persist after you have made the following checks, consult your nearest Sony dealer. All buttons except HOLD do not operate at all. • "H" is displayed. Press the HOLD button so that "H" disappears. Very weak or interrupted sound, or unsatisfactory reception • Weak batteries • In a vehicle or in a building, listen near a window. Display is dim, or no indication is displayed. • Weak batteries. • The unit is being used in extremely high or low temperatures or in a place with excessive moisture. The station cannot be received when a PRESET/LAP MEMO(1 to 5) button is pressed. • You chose the wrong preset number. • The memory of the station has been erased. Preset the station again. Sound is not heard and "i" flashes in the display. • Weak batteries. Specifications Time display: 12-hour system Frequency range Frequency Channel step FM : 87.5 - 108 MHz 0.1 MHz AM: 530 - 1,710 kHz 10 kHz FM : 87.5 - 108 MHz AM: 531 - 1,710 kHz 0.05* MHz 9 kHz * The frequency display is raised or lowered by steps of 0.1 MHz. (Example: Frequency 88.05 MHz is displayed as "88.0 MHz"). Output 2 jack (stereo minijack), load impedance 16 ohms Power output 20 mW + 20 mW (at 10 % harmonic distortion) Power requirements 3 V DC, two R03 (size AAA) batteries Dimensions Approx. 140.5 x 41 x 60.5 mm (w/h/d) (4 1/8 x 1 5/8 x 2 1/2 inches) incl. projecting parts and controls Mass Approx. 103 g (3.6 oz.) not incl. battery Accessories Supplied Stereo headphones (1) Belt holder (1) Hand strap (1) Design and specifications are subject to change without notice.
-
 1
1 -
 2
2
 |
 |