Sony SRS-X99 Operating Instructions - Page 9
AUDIO IN jack, AC IN terminal
 |
View all Sony SRS-X99 manuals
Add to My Manuals
Save this manual to your list of manuals |
Page 9 highlights
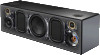
Getting started UPDATE button Indicates the status of the unit's software update. LINK indicator Indicates the status of the network connection of the unit. VOL (volume) -/+ buttons Tap to adjust the volume. The / (on/standby) indicator and reaction indicator flash according to the volume adjustment when tapped. on/standby) button/indicator Tap to turn the power of the unit on and off. Wi-Fi antenna Set upright during Wi-Fi connection as below. Swing the left side of the antenna outwards. Pull out the antenna. Rotate the antenna 90 degrees clockwise. Bring up the antenna. N-Mark If your smartphone is NFC-compatible, touch the smartphone on the N-Mark. The unit will turn on automatically and registering (pairing) and BLUETOOTH connection can be made. AC IN terminal Connect the AC power cord (supplied). AUDIO IN jack Connect to the headphone jack of a portable audio device, etc., using a audio cable (not supplied). WPS button Press and hold when connecting to a WiFi network. Beeps will be heard by pressing and holding the WPS button for 2 seconds, which indicates that the unit is ready to connect to a wireless router. If your wireless router has a WPS button, you can use this button to connect to the network. LAN port Use a LAN cable (not supplied) to connect the PC or the wireless router. USB B port ( B) Connect a PC using a USB cable (not supplied). When connecting a high-resolution supported Walkman®, use the optional High-Resolution Audio USB Adaptor WMPORT Cable. USB A port ( A) Connect a USB flash drive directly. When connecting to an iPhone/iPad/iPod or Walkman®, use the cable supplied with the device. Remote sensor/Reaction indicator When the unit receives signals from the supplied remote control, the reaction indicator (remote sensor) flashes. Also, the indicator flashes according to the volume adjustment of the unit. 9US
-
 1
1 -
2
-
3
-
 4
4 -
 5
5 -
 6
6 -
 7
7 -
 8
8 -
 9
9 -
 10
10 -
 11
11 -
 12
12 -
 13
13 -
 14
14 -
15
-
16
-
17
-
18
-
19
-
20
-
21
-
22
-
23
-
24
-
25
-
26
-
27
-
28
-
29
-
30
-
31
-
32
-
33
-
34
-
35
-
36
-
37
-
38
-
39
-
40
-
41
-
42
-
43
-
44
-
45
-
46
-
47
-
48
-
49
-
50
-
51
-
52
-
53
-
54
-
55
-
56
-
57
-
58
-
59
-
60
-
61
-
62
-
63
-
64
-
65
-
66
-
67
-
68
-
69
-
70
-
71
-
72
-
73
-
74
-
75
-
76
-
77
-
78
-
79
-
80
-
81
-
82
-
83
-
84
 |
 |
