Sony VGC-LV170J User Guide - Page 79
Changing the Display and Sound Settings for the HDMI Input
 |
View all Sony VGC-LV170J manuals
Add to My Manuals
Save this manual to your list of manuals |
Page 79 highlights
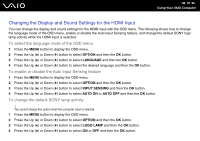
n 79 N Using Your VAIO Computer Changing the Display and Sound Settings for the HDMI Input You can change the display and sound settings for the HDMI input with the OSD menu. The following shows how to change the language mode of the OSD menu, enable or disable the Auto Input Sensing feature, and change the default SONY logo lamp activity while the HDMI input is selected. To select the language mode of the OSD menu 1 Press the MENU button to display the OSD menu. 2 Press the Up (V) or Down (v) button to select OPTION and then the OK button. 3 Press the Up (V) or Down (v) button to select LANGUAGE and then the OK button. 4 Press the Up (V) or Down (v) button to select the desired language and then the OK button. To enable or disable the Auto Input Sensing feature 1 Press the MENU button to display the OSD menu. 2 Press the Up (V) or Down (v) button to select OPTION and then the OK button. 3 Press the Up (V) or Down (v) button to select INPUT SENSING and then the OK button. 4 Press the Up (V) or Down (v) button to select AUTO ON or AUTO OFF and then the OK button. To change the default SONY lamp activity ! You cannot change this option when the computer input is selected. 1 Press the MENU button to display the OSD menu. 2 Press the Up (V) or Down (v) button to select OPTION and then the OK button. 3 Press the Up (V) or Down (v) button to select LOGO LAMP and then the OK button. 4 Press the Up (V) or Down (v) button to select ON or OFF and then the OK button.
-
 1
1 -
2
-
3
-
4
-
5
-
6
-
7
-
8
-
9
-
10
-
11
-
12
-
13
-
14
-
15
-
16
-
17
-
18
-
19
-
20
-
21
-
22
-
23
-
24
-
25
-
26
-
27
-
28
-
29
-
30
-
31
-
32
-
33
-
34
-
35
-
36
-
37
-
38
-
39
-
40
-
41
-
42
-
43
-
44
-
45
-
46
-
47
-
48
-
49
-
50
-
51
-
52
-
53
-
54
-
55
-
56
-
57
-
58
-
59
-
60
-
61
-
62
-
63
-
64
-
65
-
66
-
67
-
68
-
69
-
70
-
71
-
72
-
73
-
 74
74 -
 75
75 -
 76
76 -
 77
77 -
 78
78 -
 79
79 -
 80
80 -
 81
81 -
 82
82 -
 83
83 -
 84
84 -
85
-
86
-
87
-
88
-
89
-
90
-
91
-
92
-
93
-
94
-
95
-
96
-
97
-
98
-
99
-
100
-
101
-
102
-
103
-
104
-
105
-
106
-
107
-
108
-
109
-
110
-
111
-
112
-
113
-
114
-
115
-
116
-
117
-
118
-
119
-
120
-
121
-
122
-
123
-
124
-
125
-
126
-
127
-
128
-
129
-
130
-
131
-
132
-
133
-
134
-
135
-
136
-
137
-
138
-
139
-
140
-
141
-
142
-
143
-
144
-
145
-
146
-
147
-
148
-
149
-
150
-
151
-
152
-
153
-
154
-
155
-
156
-
157
-
158
-
159
-
160
-
161
-
162
-
163
-
164
-
165
-
166
-
167
-
168
-
169
-
170
-
171
-
172
-
173
-
174
-
175
-
176
-
177
-
178
-
179
-
180
-
181
-
182
-
183
-
184
-
185
-
186
-
187
-
188
-
189
-
190
-
191
-
192
-
193
-
194
-
195
-
196
-
197
-
198
-
199
-
200
-
201
-
202
-
203
-
204
-
205
-
206
-
207
-
208
 |
 |