Sony VGC-RB45G VGC-RBxx Series Hard Disk Drive Replacement Instructions - Page 2
VGC-RBxx Series Hard Disk Drive, Replacement Instructions
 |
View all Sony VGC-RB45G manuals
Add to My Manuals
Save this manual to your list of manuals |
Page 2 highlights
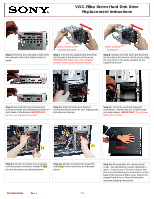
VGC-RBxx Series Hard Disk Drive Replacement Instructions Step 6. Remove the indicated screws from the opposite side of the bracket and set aside. Notice position of the bracket and HDD Step 7. Pull out the original hard drive from the bracket in the direction of the arrow. IMPORTANT! Take note of the original position of the drive inside the bracket. Notice position of the pins Step 8. Gently insert the new hard drive into the bracket in the direction of the arrow. Align the new drive in the same position as the original hard drive. Step 9. Reinstall the four (4) previously removed screws into indicated positions on both sides of the bracket. IMPORTANT! Do not over tighten the screws! Step 10. Slide the hard drive bracket enclosures back inside the unit, making sure all holes are lined up. Step 11. Using the enclosed magnetic screwdriver, reinstall the two (2) previously removed screws . IMPORTANT! Do not over tighten the screws. [2] [1] Step 12. Gently reconnect the previously removed power connector marked P8 [1] into the hard drive as indicated above. Step 13. Gently reconnect the serial ATA cable [2] into the hard drive as indicated above. Step 14. Re-assemble the chassis panel cover. And reinstall the screws removed in step 1. Connect your PC and continue with the recovery following the instructions on the back of the recovery disk's case. Return the original hard drive to Sony following the included shipping instructions. P/N 994630000 Rev. E 2/2
-
 1
1 -
 2
2
 |
 |