Sony VGN-FS620 Help - Page 2
VGN-FSxx Series Hard Disk Drive, Replacement Instructions
 |
View all Sony VGN-FS620 manuals
Add to My Manuals
Save this manual to your list of manuals |
Page 2 highlights
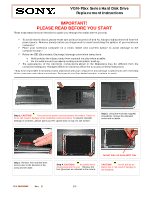
VGN-FSxx Series Hard Disk Drive Replacement Instructions Step 5. Pull with equal force on both sides of plastic tab as shown above. IMPORTANT ! Some force may be required to initiate the removal of the hard drive. Step 6. Gently removethe original hard disk drive as shown. It should be held by the sides . Step 7. Place the new hard disk drive inside the opening. PINS MUST BE ALIGNED Step 8. Make sure both rows of pins are in alignment with the socket. CAUTION! Misalignment of the pins can cause damage to the notebook . Step 9. Hold your notebook securely and slide the hard drive into positionin the direction of the arrow . IMPORTANT! Some force may be required to install the hard disk drive. Step 10. Using the enclosed magnetic screwdriver, reinstall the four (4) previously removed screws, as shown in the picture. IMPORTANT ! Do not over tighten the screws. CAUTION! Be careful not to drop screws into the unit, and be careful to use the correct screws. Step 11. Reinstall the Hard Disk Drive access door removed in step 3, and using the enclosed magnetic screwdriver; reinstall the screw as shown in the picture. Place the battery back into your notebook and continue the recovery process following the instructions on the back of the recovery disk's case. Return the old hard drive to Sony following the included shipping instructions P/N 994630300 Rev. D 2/2
-
 1
1 -
 2
2
 |
 |
