Sony VGX-XL1 VGX-XL1 Welcome Mat - Page 2
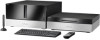
Setting Up Your VGX-XL1 Digital Living System - keyboard
 |
View all Sony VGX-XL1 manuals
Add to My Manuals
Save this manual to your list of manuals |
Page 2 highlights
Setting Up Your VGX-XL1 Digital Living System™ Step 1: Connecting the DLS Computer and Media Changer/Recorder Using the supplied i.LINK® cable, connect one end to an i.LINK connector on the back panel of the DLS computer and the other end to an i.LINK connector on the back panel of the Media Changer/Recorder. i.LINK® Cable (6pin-S400) Step 2: Connecting your TV If your TV has a HDMI™ connector, use the supplied HDMI cable and connect one end to your TV and the other end to the HDMI connector on the back panel of the DLS computer. If your TV has a DVI-D connector, use the supplied HDMI cable and the HDMI to DVI-D adapter. Insert the adapter in the + HDMI connector on the back panel of the DLS computer. Then using the supplied HDMI cable, connect one end of the cable to the adapter and the other end to your TV. If your TV has component connectors (Y, Pb, Pr), use a RCA cable (not supplied) and connect one end to the corresponding components on your TV and on the back panel of the DLS computer. Note: If your TV has a HDMI connector and a DVI-D connector, Sony recommends using the HDMI connector. Note: The HDMI cable carries both video and audio signals. Note: You cannot use HDMI and Component connections at the same time. Step 3: Connecting your Home Theater / Speakers If your sound system has two channels, use the LINE OUT (L) (R) on the back panel of the DLS computer and the LINE IN audio composite connectors on your speakers. If your sound system has more than two channels, use the supplied Optical S/PDIF cable and connect one end to the S/PDIF Optical OUT connector on the back panel of the DLS computer and connect the other end to the OPTICAL IN connecter on your sound system. Note: An optical/coaxial connection will provide a higher quality output than a composite connection. Loading Media Changer 1. Make sure the Media Changer/ Recorder is properly connected to the VGX-XL1A Personal Computer and is turned on. Note: When loading discs, make sure that the label if facing to the right of the slot. 2. To load a single disc, press the Load button once and insert the disc in the slot. or To load multiple discs, press the Load button twice and insert each disc in the slot one at a time. Loading & Unloading Discs Scanning New Discs When loading discs to the Media Changer, the discs must be identified and scanned by Media Center to update your media library before viewing in My Changer. Whenever new discs are loaded into the Media Changer, do the following: 1. Start Media Center. 2. From the Start menu, select More Programs and then select Manage Discs. The Found New Discs message appears on the screen. 3. Click Yes to begin scanning the discs to update your media library with new disc information. It can take up to 30 seconds to scan each disc. Once the discs have been identified and scanned, they can be viewed in My Changer. Note: DVD media can also be identified and scanned by selecting My DVD from the Media Center Start menu. Eject Button Load Button Unloading Media Changer Note: Discs should be physically removed from the Media Changer/Recorder slot as they emerge. To eject discs from Media Center: 1 From the Media Center Start menu, go to More Programs and select Manage Discs. 2 From the list, select the Eject button for each disc you wish to eject. To eject discs manually: 1 Press the Eject button on the Media Changer one time to eject the last inserted disc. or 2 Press the Eject button on the Media Changer two times to eject all discs in the changer slots. Note: This will not eject a disc in the changer's drive. You must go to Media Center, then to More Programs and select Manage Discs. Finally, select the Eject button to eject the disc from the changer's drive. Step 4: Connecting to the Internet Wired Network: Use an RJ-45 connector cable. Connect one end to the Ethernet connector on the DLS computer and the other end to your cable or DSL modem. Wireless Network: Connect WLAN antenna to the system. Launch Marvell Client Utility Application. Select "station" as the operation mode. Then proceed to Windows Wireless Zero Configuration service to set up your connection with your preferred Access Point. Step 5: Turning Power On Make sure all hardware is connected and that power cables are plugged into properly grounded electrical outlets. (three prong outlets) ✔ Turn on the power to the computer, TV, and speakers. Warning: Do not turn on the power to the Media Changer/Recorder at this time. (See Step 6) ✔ Activate Wireless Keyboard Communication 1. Slide the Power button to ON. 2. From the back of the keyboard, slide the Pointing Device button to ON. 3. From the back of the keyboard, and the front panel of the DLS computer, press the Connect buttons simultaneously and hold a few seconds. 4. Test the keyboard to make sure it is functioning properly. Step 6: Software Setup ✔ Microsoft® Windows® operating system Setup The first time you start your computer you will be presented with a series of screens for Windows® XP Setup. Please follow the on-screen instructions. ✔ Sony Registration Please complete all information to register your Sony product. This makes it easier to keep your products updated and obtain technical support, if necessary. Note: Once you complete Windows Setup and Sony Registration, do the following: ✔ Turn power on to the Media Changer/Recorder. ✔ Check the picture quality of your TV or monitor. If it is not correct, go to Step 7 Resolution Setup. If Media Center automatically opens, and you need to adjust your picture quality, minimize Media Center and go to Step 7 Resolution Setup. When complete return to Media Center Setup. ✔ Make sure your Internet connection is working properly. ✔ Media Center Setup The first time Media Center starts, you will be presented with a series of screens that will guide you through Media Center Setup. Please follow all on-screen instructions. Media Center Wireless Network Note: If you have an existing wireless network, and you wish to add the VGX-XL1A personal computer to the network, start Media Center and from Settings, go to General > Media Center Setup > Join Wireless Network. Then follow the on-screen instructions. Step 7: Resolution Setup To set the resolution for your TV or Monitor, do the following: 1. Using the pointing device on your wireless keyboard, right click anywhere on the Windows desktop. 2. From the menu, point to or click NVIDIA® Display. A new menu option opens. The menu option name depends on what TV or monitor is connected to the computer. 3. Click the new menu command. The following screen appears. 4. From the Directory list, click nView Display Settings, if necessary. 5. Click the Device Settings button. 6. From the side menu, click TV Format. Select the appropriate option for your TV from the list. 7. Click the Apply button. 8. Continue with Media Center Setup. Supported media types include: CD-R, CD-RW, DVD±R/RW, DVD+R DL, Double Layer media, Redbook Audio CDs, Movie DVDs (U.S. is default) Unsupported media types include: All other media types (Do not insert Blu-ray, mini-DVDs, odd-shaped discs, etc.) Warning: Do not insert discs backwards into the Media Changer/Recorder. When inserting a disc, the label faces to the right of the slot. Do not insert unsupported media types into the Media Changer/Recorder. Inserting a nonstandard-sized or -shaped disc into a drive that is not designed to accommodate it may damage the drive. The 120 mm round discs are the only size and shape that work with either slot loading or tray loading drives. These discs must be between 1.2 mm and 1.5 mm in thickness. Discs that are thicker than 1.5 mm or thinner than 1.2 mm are not supported and any damage caused will not be covered under your Sony warranty or applicable extended service agreements. Identifying information (Metadata) may not be available for all DVDs and CDs. Do not attempt to move the Media Changer/Recorder if there are discs inside. Remove all discs before moving. VAIO® Support Central Provides you with a single location for all of your support needs and allows you to easily access valuable support and technical information from Sony® and Microsoft®. Keep your VAIO® computer's system software and operating system updated using VAIO Web Support and Microsoft Update. Note: You must be connected to the Internet to access some of the VAIO Support Central features. To access VAIO Support Central, do the following: 1. Using your wireless keyboard w/ integrated pointing device, select Windows Start. 2. From the Start menu, select All Programs. 3. From the All Programs menu, select VAIO Support Central. Note: To access the most updated information available for VGX-XL1 Digital Living System, go to Support Control Central > Documentation and select the VGX-XL1 DLS User Guide. 1 i.LINK is a trademark of Sony used only to designate that a product contains an IEEE 1394 connector. All products with an i.LINK connector may not communicate with each other. ©2005 Sony Electronics Inc. All rights reserved. Reproduction in whole or in part without written permission is prohibited. Sony, Digital Living System, i.LINK, Memory Stick, Memory Stick PRO, VAIO, and like.no.other are trademarks of Sony. Microsoft and Windows are registered trademarks of Microsoft Corporation. All other trademarks are trademarks of their respective owners.
-
 1
1 -
 2
2
 |
 |
