Sony VGX-XL1A VGX-XL1 Welcome Mat - Page 1
Sony VGX-XL1A - Digital Living System Computer Manual
 |
View all Sony VGX-XL1A manuals
Add to My Manuals
Save this manual to your list of manuals |
Page 1 highlights
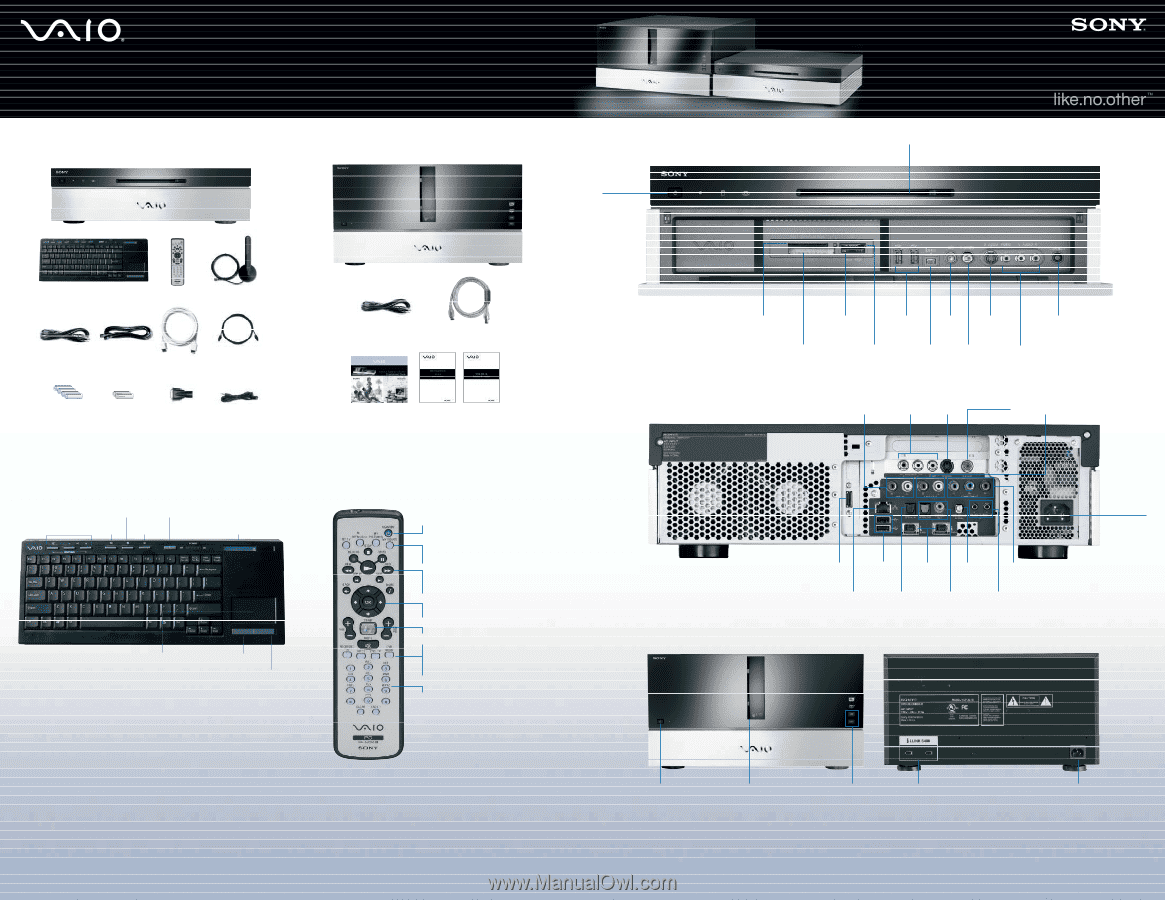
Getting to Know Your VGX-XL1 Digital Living System™ VGX-XL1A Digital Living System Computer VGP-XL1B Media Changer/Recorder VGX-XL1A - Front Inputs & Outputs Power Button CD-RW/ DVD Combo Drive Wireless Keyboard Remote Control WLAN Antenna Power Cord Coaxial Cable HDMI™ Cable Optical S/PDIF Cable Power Cord i.LINK® Cable (6pin-S400) Keyboard (4) AA Batteries Remote (2) AA Batteries HDMI™ to DVI-D Adapter Infrared Blaster Entertainment Guide Legal & Safety Guides Before installation: Please make sure you have all the items shown above. Wireless Keyboard Internet Standby Headphone Volume Email MCE Keyboard Status Point Device/ Touch Pad Left Button Right Button Setting Up Keyboard Insert the Batteries ✔ On the back of the keyboard, remove the battery compartment cover. ✔ Insert four (4) Alkaline AA batteries oriented as shown in the battery compartment. (Supplied) ✔ Replace the battery compartment cover. Activate Wireless Keyboard Communication Before using the keyboard, you must activate communications between the DLS computer and the wireless keyboard w/integrated pointing device. Please see Step 4 Activate Wireless Keyboard Communications on back. 2-652-535-01 Remote Control Standby Puts your computer into standby mode My Media Links directly to your TV, Music, Pictures, & Videos. Playback Play, Record, Stop, Pause, Rewind, Fast Forward, Replay, & Skip for TV, Music, Pictures & Video. Navigation Move through Menus Media Center Recorded TV Guide Live TV DVD Menu Channel # and Data Input Setting Up Remote Insert the Batteries ✔ On the back of the remote control, remove the battery compartment cover. ✔ Insert two (2) Sony Super Mangan Alkaline AA batteries oriented as shown in the battery compartment. (Supplied) ✔ Replace the battery compartment cover. Note: When using the VAIO® remote control, remember to point the remote at the VGX-XL1A personal computer, not at the TV or monitor. SmartMedia™ (SM) xD-Picture Card™ Memory Stick Pro/Duo™ USB 2.0 x2 MIcrophone S-Video Connect Keyboard/Pointing Device CompactFlash® Secure Digital (SD) & & Microdrive™ MultiMediaCard™ (MMC) i.LINK® (4 pin) Headphone/ Line-out Volume Composite Audio/Video IN VGX-XL1A - Rear Inputs & Outputs Line IN (L/R) Audio/Video S-Video Antenna/Cable IN IN Line OUT (L/R) Power Cord VGP-XL1B - Front Controls HDMI™ USB 2.0 x2 i.LINK® x2 Wireless LAN Antenna Component Video OUT (480i/480p/720p) Ethernet Optical Optical S/PDIF OUT & 10/100/1000baseT S/PDIF IN Coaxial S/PDIF OUT Infrared Transmitter OUT x2 VGP-XL1B - Inputs/Outputs Power Button Optical Drive Slot Load & Eject Buttons i.LINK® S400 x2 Power Cord Note: There are two i.LINK®1 ports on the back of the VGP-XL1B; however, you cannot connect this device to two different computers or a second changer. The second i.LINK®1 port functions as a normal 1394 port, with one exception: DO NOT connect a second 1394 device on the second port of the changer while the device is being used (burning, ripping, or playing back any type of discs). Note: Once a new device is plugged into the second i.LINK®1 port of the VGX-XL1B, both the changer and the second device are re-enumerated by the OS, which could interrupt the current process running on the changer drive. The VGP-XL1B Media Changer/Recorder is a Class 1 Laser Product. See back for setup instructions.
-
 1
1 -
 2
2
 |
 |