Sony VPL CS5 Operating Instructions - Page 14
MS SLIDE key VPL-CX5 only - vpl cx5 manual
 |
UPC - 027242598867
View all Sony VPL CS5 manuals
Add to My Manuals
Save this manual to your list of manuals |
Page 14 highlights
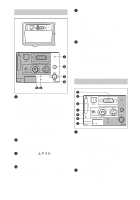
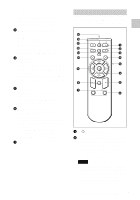
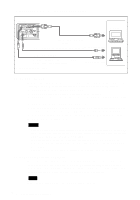
• You can cancel the adjustment by pressing the APA key again while "Adjusting" appears on the screen. • The picture may not be adjusted properly depending on the kinds of input signals. • Adjust the items "Dot Phase," "H Size" and "Shift" in the INPUT SETTING menu when you adjust the picture manually. 3 PIC MUTING key Used to mute the picture temporarily. Press again to restore the picture. 4 ENTER key 5 Keys emulate a mouse Functions like a mouse of a computer connected via USB with the projector. a) L Click key (Rear): Functions as the left button on a mouse. b) Joystick c) R Click key: Functions as the right button on a mouse. Note These keys function as mouse buttons of a computer only when the projector is connected to the computer using the USB cable. For details, see "To control the computer using the supplied Remote Commander" on page 25. 6 FUNCTION 1, 2 keys (VPL-CX5 only) When you connect the projector with a computer, you can open a file on the screen by just pressing the FUNCTION key. This will enhance your presentation. To use this function, allocate a file to the FUNCTION key by using the supplied application software. For details, see the README file and the HELP file supplied with the application software. Note Connect a computer to the projector using the USB cable to activate the FUNCTION keys. For details, see "To connect an IBM PC/ AT compatible computer" on page 18". 7 RESET key Resets the value of an item back to its factory preset value or returns the enlarged image back to its original size. This key functions when the menu or a setting item is displayed on the screen. 8 D ZOOM (Digital Zoom) +/- key Enlarges the image at a desired location on the screen. +: Pressing the + key once displays the icon. This icon indicates the point you want to enlarge. Use an arrow key (M/ m/
-
 1
1 -
2
-
3
-
4
-
5
-
6
-
7
-
8
-
 9
9 -
 10
10 -
 11
11 -
 12
12 -
 13
13 -
 14
14 -
 15
15 -
 16
16 -
 17
17 -
 18
18 -
 19
19 -
20
-
21
-
22
-
23
-
24
-
25
-
26
-
27
-
28
-
29
-
30
-
31
-
32
-
33
-
34
-
35
-
36
-
37
-
38
-
39
-
40
-
41
-
42
-
43
-
44
-
45
-
46
-
47
-
48
-
49
-
50
-
51
-
52
-
53
-
54
-
55
-
56
-
57
-
58
-
59
-
60
-
61
-
62
-
63
-
64
-
65
-
66
-
67
-
68
-
69
-
70
-
71
-
72
-
73
-
74
-
75
-
76
-
77
-
78
-
79
-
80
-
81
-
82
-
83
-
84
-
85
-
86
-
87
-
88
-
89
-
90
-
91
-
92
-
93
-
94
-
95
-
96
-
97
-
98
-
99
-
100
-
101
-
102
-
103
-
104
-
105
-
106
-
107
-
108
-
109
-
110
-
111
-
112
-
113
-
114
-
115
-
116
-
117
-
118
-
119
-
120
-
121
-
122
-
123
-
124
-
125
-
126
-
127
-
128
-
129
-
130
-
131
-
132
-
133
-
134
-
135
-
136
-
137
-
138
-
139
-
140
-
141
-
142
-
143
-
144
-
145
-
146
-
147
-
148
 |
 |