Sony VPL CX85 Operating Instructions - Page 28
Other Functions, Switching from the Intelligent Auto-setup Function to Manual Adjustments - service manual
 |
UPC - 027242644274
View all Sony VPL CX85 manuals
Add to My Manuals
Save this manual to your list of manuals |
Page 28 highlights
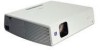
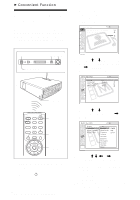
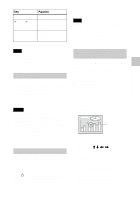
4 Turn the main power off and disconnect the AC power cord. The security lock is set to on, then it becomes effective. The screen for entering the password is displayed when the power is turned on the next time. Security certification When the screen for entering the password is displayed, enter the password that was set. If you fail to enter the correct password after three tries, the projector cannot be used. In this case, press the I / 1 key to turn off the power. To cancel the security lock 1 Press the MENU key, then turn off the "Security Lock" setting in the INSTALL SETTING menu. 2 Enter the password. Enter the password that was set. Note If you call the customer service center because you have forgotten the password, you will need to be able to verify the projector's serial number and your identity. (This process may differ in other countries.) Once your identity has been confirmed, we will provide you with the password. Other Functions Switching from the Intelligent Auto-setup Function to Manual Adjustments You can switch the following functions of the Intelligent Auto-setup to manual adjustments using the menu. • V Keystone correction (correction of trapezoidal distortion) Set "V Keystone" in the INSTALL SETTING menu to "Manual." GB 28 Other Functions • Smart APA (Auto Pixel Alignment) Set "Smart APA" in the SET SETTING menu to "Off." • Auto Input Search Set "Auto Input Search" in the SET SETTING menu to "Off." For details on the menu operations, see "Using the MENU" on page 31. Controlling the Computer Using the Supplied Remote Commander (When Using the USB Cable) When you connect a computer to the projector by using the USB cable, you can control the mouse of the computer using the Remote Commander. The R/L CLICK keys and joystick function as follows. Key and joystick R CLICK (front) L CLICK (rear) Joystick Function Right button Left button Corresponds with the movements of the mouse For details on USB connection, see "To connect a computer" on page 20. Note Make sure that nothing obstructs the infrared beam between the Remote Commander and the remote control detector on the projector. Controlling the Computer Using the Supplied Presentation Tool (When Using the Air Shot) When you are using the Air Shot to project the picture from a computer, you can perform some operations for a slide show using the supplied presentation tool. The following keys on the presentation tool are usable.
-
 1
1 -
2
-
3
-
4
-
5
-
6
-
7
-
8
-
9
-
10
-
11
-
12
-
13
-
14
-
15
-
16
-
17
-
18
-
19
-
20
-
21
-
22
-
 23
23 -
 24
24 -
 25
25 -
 26
26 -
 27
27 -
 28
28 -
 29
29 -
 30
30 -
 31
31 -
 32
32 -
 33
33 -
34
-
35
-
36
-
37
-
38
-
39
-
40
-
41
-
42
-
43
-
44
-
45
-
46
-
47
-
48
-
49
-
50
-
51
-
52
-
53
-
54
-
55
-
56
-
57
-
58
-
59
-
60
-
61
-
62
-
63
-
64
-
65
-
66
-
67
-
68
-
69
-
70
-
71
-
72
-
73
-
74
-
75
-
76
-
77
-
78
-
79
-
80
-
81
-
82
-
83
-
84
-
85
-
86
-
87
-
88
-
89
-
90
-
91
-
92
-
93
-
94
-
95
-
96
-
97
-
98
-
99
-
100
-
101
-
102
-
103
-
104
-
105
-
106
-
107
-
108
-
109
-
110
-
111
-
112
-
113
-
114
-
115
-
116
-
117
-
118
-
119
-
120
-
121
-
122
-
123
-
124
-
125
-
126
-
127
-
128
-
129
-
130
-
131
-
132
-
133
-
134
-
135
-
136
-
137
-
138
-
139
-
140
-
141
-
142
-
143
-
144
-
145
-
146
-
147
-
148
-
149
-
150
-
151
-
152
-
153
-
154
-
155
-
156
-
157
-
158
-
159
-
160
-
161
-
162
-
163
-
164
-
165
-
166
-
167
-
168
-
169
-
170
-
171
-
172
-
173
-
174
-
175
-
176
-
177
-
178
-
179
-
180
-
181
-
182
-
183
-
184
-
185
-
186
-
187
-
188
-
189
-
190
-
191
-
192
 |
 |