Sony VPL ES5 User Manual - Page 36
Lamp off, Standby, Front & Rear, Front, Selects the Power Saving mode. - replacement lamp
 |
UPC - 027242737310
View all Sony VPL ES5 manuals
Add to My Manuals
Save this manual to your list of manuals |
Page 36 highlights
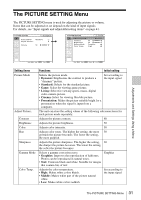
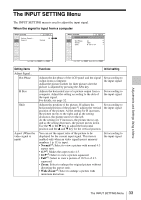
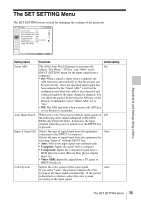
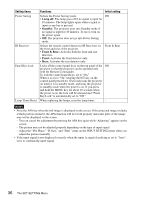
Setting items Power Saving IR Receiver Panel Key Lock Lamp Timer Reset Functions Initial setting Selects the Power Saving mode. Off • Lamp off: The lamp goes off if no signal is input for 10 minutes. The lamp lights again when a signal is input or any key is pressed. • Standby: The projector goes into Standby mode if no signal is input for 10 minutes. To use it, turn on the power again. • Off: The projector does not go into Power Saving mode. Selects the remote control detectors (IR Receiver) on the front and rear of the projector. • Front & Rear: Activates both the front and rear detectors. • Front: Activates the front detector only. • Rear: Activates the rear detector only. Front & Rear Locks all the control panel keys on the top panel of the Off projector so that the projector can be operated only with the Remote Commander. To lock the control panel keys, set to "On." When it is set to "On," keeping the ?/1 key on the control panel pressed for 10 seconds turns the projector on when it is in standby mode, and turns the projector to standby mode when the power is on. If you press and hold the MENU key for about 10 seconds when the power is on, the lock will be released and "Panel Key Lock" is automatically set to "Off." When replacing the lamps, reset the lamp timer. - Notes • Press the APA key when the full image is displayed on the screen. If the projected image includes a black portion around it, the APA function will not work properly and some parts of the image may not be displayed on the screen. - You can cancel the adjustment by pressing the APA key again while "Adjusting" appears on the screen. - The picture may not be adjusted properly depending on the type of input signal. - Adjust the "Dot Phase," "H Size," and "Shift" items on the INPUT SETTING menu when you adjust the picture manually. • If the input signal is not displayed correctly when the input A signal classifying is set to "Auto", set it to conform the input signal. 36 The SET SETTING Menu
-
 1
1 -
2
-
3
-
4
-
5
-
6
-
7
-
8
-
9
-
10
-
11
-
12
-
13
-
14
-
15
-
16
-
17
-
18
-
19
-
20
-
21
-
22
-
23
-
24
-
25
-
26
-
27
-
28
-
29
-
30
-
 31
31 -
 32
32 -
 33
33 -
 34
34 -
 35
35 -
 36
36 -
 37
37 -
 38
38 -
 39
39 -
 40
40 -
 41
41 -
42
-
43
-
44
-
45
-
46
-
47
-
48
-
49
-
50
-
51
-
52
-
53
-
54
-
55
-
56
-
57
-
58
-
59
-
60
-
61
-
62
 |
 |
