Sony VRD-VC30 Quick Start Guide - Page 1
Sony VRD-VC30 Manual
 |
View all Sony VRD-VC30 manuals
Add to My Manuals
Save this manual to your list of manuals |
Page 1 highlights
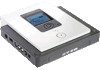
VRD-VC30 P/N 7819901753 Recording from an HDD Handycam® with the DVD BURN button Usable discs : Simply press the "DVD BURN" button on your HDD Handycam and automatically transfer new video recorded since the last DVD burn. 1 2 3 Recording from an HDD or DVD Handycam® Usable discs : Record the entire video contents of your HDD or DVD Handycam (8-cm DVD disc) onto a DVD disc. 1 2 3 TM Quick Start Guide Recording from an HDD Handycam® with the DVD BURN button Recording from an HDD or DVD Handycam® Recording from a DV camcorder Video recording Connect the AC adapter and AC power cord, and press to turn on the DVDirect. 4 Press to insert a disc. 60min USB SELECT DVD BURN PictBridge PRINT HDD END 5 Turn on the HDD camcorder. 6 Connect the HDD camcorder and DVDirect with a USB cable (not supplied). Press the [DVD BURN] button on the camcorder, or touch [DVD BURN] on the camcorder's LCD screen. The DVDirect starts recording and controls the HDD camcorder automatically. Recording is completed automatically. Press to eject the disc. Connect the AC adapter and AC power cord, and press to turn on the DVDirect. Press to insert a disc. 4 60min USB SELECT DVD BURN PictBridge PRINT HDD END 60min USB SELECT END 5 Turn on the HDD or DVD camcorder, and switch to PLAY/EDIT mode. [DVD camcorder] Be sure to insert the 8-cm DVD disc containing the video into the camcorder. 6 7 Connect the camcorder and DVDirect with a USB cable (not supplied). [HDD camcorder] Touch [HDD] on the camcorder's LCD screen. [DVD camcorder] Touch [ COMPUTER] on the camcorder's LCD screen. Preparation for USB connection may differ depending on your camcorder. Refer to the operating instructions for your camcorder. Press until [FULL DUBBING] appears in the DVDirect's display window. Press to start recording. The DVDirect controls the camcorder for the whole process. The DVDirect ejects the disc automatically after recording is completed.
-
 1
1 -
 2
2
 |
 |
