Sony WAHT-SA10 Operating Instructions - Page 2
Operations, Troubleshooting, Messages, Specifications - s air
 |
UPC - 027242744837
View all Sony WAHT-SA10 manuals
Add to My Manuals
Save this manual to your list of manuals |
Page 2 highlights
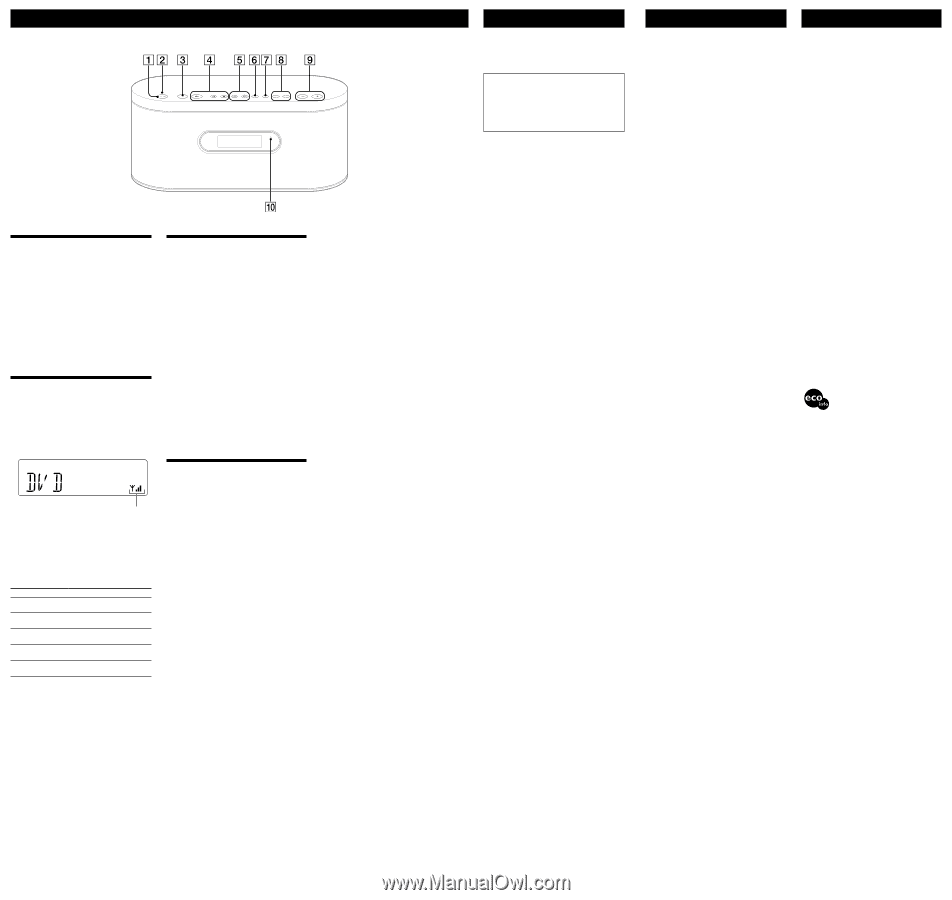
Operations Unit (AIR-SA10/Wireless Speaker System) Setting the clock 1 Turn on the unit. Press 2 Select the clock set mode. Press CLOCK/TIMER MENU . If the current mode appears on the display, press repeatedly to select "CLOCK," and then press CLOCK/TIMER ENTER . 3 Set the time. Press repeatedly to set the hour, and then press CLOCK/TIMER ENTER . Use the same procedure to set the minute. The clock settings are lost when you disconnect the power cord or if a power failure occurs. Listening to the sound of the connected S-AIR main unit You can use the S-AIR function to listen to the sound of an S-AIR main unit in a remote location. 1 Perform the procedure described in "Preparing the unit" and check that the S-AIR indicator is lit. 2 Press S-AIR CH repeatedly to select the desired function of the S-AIR main unit. Wireless strength The functions that can be selected depend on the S-AIR main unit. For details, refer to the Operating Instructions supplied with the S-AIR main unit. 3 Press VOLUME +/ to adjust the volume. To operate the S-AIR main unit from the unit You can perform the following operations using the buttons on the unit. Press PRESET +/ To Start playback of a CD/DVD, etc. Stop playback of a CD/DVD, etc. Pause playback of a CD/DVD, etc. Select a track, file or chapter of a CD/DVD, etc. Select a preset station when listening to the radio. Depending on the connected S-AIR main unit, the operation may differ. Refer to the Operating Instructions of the S-AIR main unit. To listen with headphones Connect headphones (not supplied) to the (headphone) jack located on the rear of the unit. Note The elapsed playing time or remaining playing time of the CD/DVD, etc. being played on the S-AIR main unit may not be displayed on this unit. In this case appears. Tip You can listen to the sound even when the connected S-AIR main unit is in standby mode. For details, refer to the Operating Instructions supplied with the S-AIR main unit. Changing the display To change the information on the display while the unit is on Press DISPLAY . Each time you press the button, the display changes as follows: When the unit is connected to an S-AIR main unit: Information of the connected S-AIR main unit1) Model name of the connected S-AIR main unit2) Clock2)3) ... When the unit is not connected to an S-AIR main unit: "S-AIR" "UNLINKED"2) Clock2)3) ... To turn off the display You can turn off the clock display to minimize the amount of power consumed when the unit is off (Power Saving Mode). Press DISPLAY . Each time you press the button, the display changes as follows: No display (Power Saving Mode) Clock3) ... 1) The displayed information depends on the connected S-AIR main unit. 2) Displayed for about 8 seconds. 3) Displayed only when the clock is set. Note The STANDBY indicator lights up when the unit is off. Using the Timers The unit offers two timer functions. If you use the Play Timer with the Sleep Timer, the Sleep Timer has priority. Sleep Timer: You can fall asleep to music. This function works even if the clock is not set. Press SLEEP repeatedly. Note Even if you set the timer, no sound is output from the unit if playback on the connected S-AIR main unit ends within the set time period or if communication with the S-AIR main unit is cut off. Play Timer: You can wake up to the sound of the connected S-AIR main unit at a preset time. Make sure you have set the clock. 1 Prepare the sound source on the S-AIR main unit. For details, refer to the Operating Instructions supplied with the S-AIR main unit. Press VOLUME +/ to adjust the volume. 2 Press CLOCK/TIMER MENU . 3 Press repeatedly to select "PLAY SET," then press CLOCK/TIMER ENTER . "ON TIME" appears, and the hour indication flashes. 4 Set the time to start playing. Press repeatedly to set the hour, and then press CLOCK/TIMER ENTER . The minute indication flashes. Use the procedure above to set the minute. 5 Use the same procedure as in step 4 to set the time to stop playing. Troubleshooting 1 Make sure the power cord is correctly and firmly connected. 2 Find your problem in the checklist below, and take the indicated corrective action. If the issue persists, contact your nearest Sony dealer. When bringing this unit in for repairs, be sure to bring in the entire system (this unit, the S-AIR main unit, and wireless transceivers). This product is a system product, and the entire system is needed to determine the location requiring repair. 6 Press repeatedly to select the desired option. AUTO: Sound from the connected S-AIR main unit is output. However, an alarm sounds in the following cases. When communication with the S-AIR main unit is cut off. When no sound is output from the S-AIR main unit or the audio signal level is too low. When the S-AIR main unit is not ready for playback at the set start time. Note that the alarm continues to sound even if the S-AIR main unit becomes ready after the start time has passed. ALARM: An alarm is output. S-AIR: Sound from the connected S-AIR main unit is output. However, sound from the S-AIR main unit is not output in the following cases. An alarm does not sound. When communication with the S-AIR main unit is cut off. When no sound is output from the S-AIR main unit or the audio signal level is too low. When the S-AIR main unit is not ready for playback at the set start time. Note that sound from the S-AIR main unit is output once the SAIR main unit is ready for playback even after the start time has passed. 7 Press CLOCK/TIMER ENTER . The display shows the timer settings. 8 Press (on/standby) to turn off the unit. The unit turns on about 40 seconds before the preset time. If the unit is on at the preset time, the Play Timer will not play. To stop the alarm Press any button. To activate or check the timer again 1 Press CLOCK/TIMER MENU . "SELECT" flashes in the display. 2 Press CLOCK/TIMER ENTER . 3 Press repeatedly to select "PLAY SEL." 4 Press CLOCK/TIMER ENTER . To cancel the timer 1 Press CLOCK/TIMER MENU . "SELECT" flashes in the display. 2 Press CLOCK/TIMER ENTER . 3 Press repeatedly to select "OFF." 4 Press CLOCK/TIMER ENTER . To change the setting Start over from step 1. Tip The Play Timer setting remains as long as the setting is not canceled manually. If the STANDBY indicator flashes Immediately unplug the power cord, and check the following item. Is anything blocking the ventilation holes on the rear of the unit? After the STANDBY indicator stops flashing, reconnect the power cord, and turn on the unit. If the issue persists, contact your nearest Sony dealer. Connecting the unit and S-AIR main unit is not possible. (The S-AIR indicator flashes.) If you use another S-AIR main unit, place it more than 8 m (26 1/4 feet) away from the S-AIR main unit you are using. Confirm the S-AIR IDs of the unit and the S-AIR main unit. The unit is paired with another S-AIR main unit. Pair the unit with the desired S-AIR main unit. The unit is paired with another S-AIR main unit. Cancel pairing. Place so that the unit and the S-AIR main unit are separated from other wireless devices. Stop using any other wireless devices. The S-AIR main unit is turned off. Make sure the AC power cord (mains lead) is connected and turn on the S-AIR main unit. There is no sound. If you use another S-AIR main unit, place it more than 8 m (26 1/4 feet) away from the S-AIR main unit you are using. Confirm the S-AIR IDs of the unit and the S-AIR main unit. Check the pairing setting. Place so that the unit and the S-AIR main unit are closer. Stop using any equipment that generates electromagnetic energy such as a microwave oven. Place so that the unit and the S-AIR main unit are separated from other wireless devices. Stop using any other wireless devices. Change the S-AIR ID settings of the unit and the S- AIR main unit. Turn off the unit and S-AIR main unit and then turn them on again. Check that the power cord is connected securely and the unit is turned on. Check that headphones are not connected to the (headphone) jack on the rear of the unit. Increase the volume of the unit. There is noise or the sound skips. If you use another S-AIR main unit, place it more than 8 m (26 1/4 feet) away from the S-AIR main unit you are using. Place so that the unit and the S-AIR main unit are closer. Stop using any equipment that generates electromagnetic energy such as a microwave oven. Place so that the unit and the S-AIR main unit are separated from other wireless devices. Stop using any other wireless devices. Change the S-AIR ID settings of the unit and the S- AIR main unit. Do not place a mobile phone near the unit, as this may result in noise. To reset the unit to factory settings If the unit still does not operate properly, reset the unit to factory settings. 1 Disconnect and reconnect the power cord, and then turn on the unit. 2 Press , DISPLAY and at the same time. All user-configured settings, such as timer, clock, etc. are deleted. Messages CANCEL : Time out without pairing. COMPLETE : Pairing is completed. ID A : Sets the S-AIR ID to "A." ID B : Sets the S-AIR ID to "B." ID C : Sets the S-AIR ID to "C." LINKED : The unit is connected to the S-AIR main unit. PAIRING : Pairing is in progress. S-AIR : Displayed from the point power of the unit is turned on until connection with the S-AIR main unit is established. TIME NG : The Play Timer start and end times are set to the same time. UNLINKED: Displayed when the connection with the S-AIR main unit is cut off. Specifications Amplifier section U.S.A. model: AUDIO POWER SPECIFICATIONS POWER OUTPUT AND TOTAL HARMONIC DISTORTION: With 3 ohm loads, both channels driven, from 300 20,000Hz; rated 4 watts per channel minimum RMS power, with no more than 10% total harmonic distortion from 250 milliwatts to rated output. Other models: Continuous RMS power output (reference): 4 + 4 W (3 ohms at 1 kHz, 10% THD) Output (stereo mini jack): Accepts headphones with an impedance of 8 ohms or more Speaker section Speaker system: Full range, bass-reflex type Speaker units: 65 mm, cone type (2) Nominal impedance: 3 ohms Wireless transceiver (EZW-RT10) Communication System: S-AIR Specification version 1.0 Output: 12.0 mW Frequency band: 2.4000 GHz 2.4835 GHz Modulation method: DSSS Power requirements: DC 3.3 V, 350 mA Dimensions (w/h/d): 50 mm × 13 mm × 60 mm (2 × /17 32 × 2 3/8 in) Mass: 24 g (1 oz) General Power requirements: North American model: 120 V AC, 60 Hz Oceanian model: 230 240 V AC, 50/60 Hz Power consumption: 15 W Dimensions (w/h/d): Approx. 300 × 136 × 115 mm (11 7/8 × 5 3/8 × 4 5/8 in) Mass: Approx. 2.2 kg (4 lb 14 oz) Supplied accessories: Wireless transceiver EZW-RT10 (1) Design and specifications are subject to change without notice. Standby power consumption: 1.0 W Halogenated flame retardants are not used in the certain printed wiring boards. Halogenated flame retardants are not used in cabinets (Except for the U.S.A. model).
-
 1
1 -
 2
2
 |
 |