Sony WM-EX670 Operation Guide - Page 1
Sony WM-EX670 Manual
 |
View all Sony WM-EX670 manuals
Add to My Manuals
Save this manual to your list of manuals |
Page 1 highlights
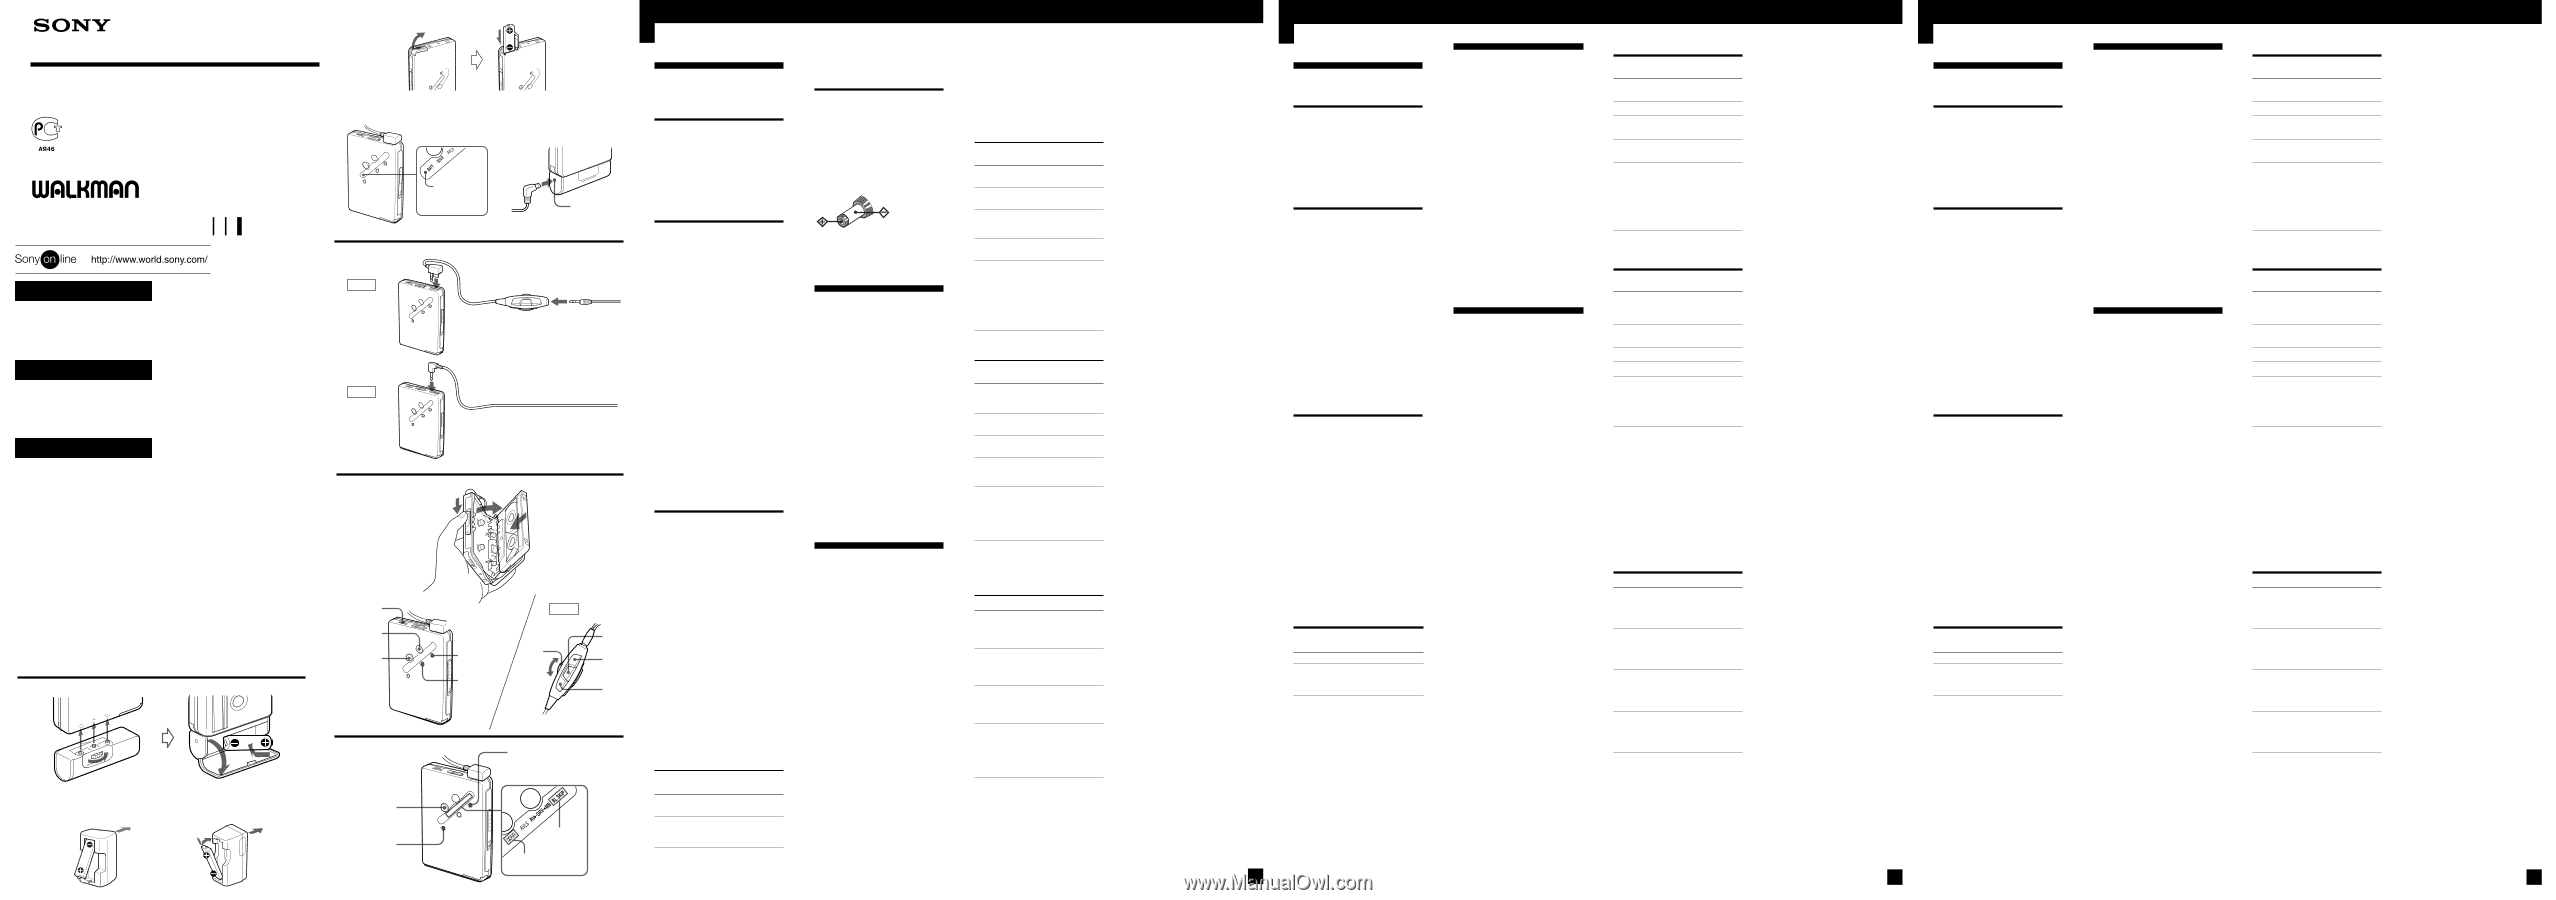
Cassette Player Manual de instrucciones xxxxx xxxxxx 3-864-886-71(1) (Esta marca solamente es válida para la versión para Rusia.) xxxxxx xxxxxxx WM-EX672/EX670 WALKMAN es marca registrada de Sony Corporation. xxxxxxxx xxxxxxxxx Sony Corporation © 1999 Printed in Malaysia c d ADVERTENCIA Para evitar incendios o descargas eléctricas, no exponga la unidad a la lluvia ni a la humedad. ADVERTENCIA Para evitar incendios o descargas eléctricas, no exponga la unidad a la lluvia ni a la humedad. ADVERTENCIA Para evitar incendios o descargas eléctricas, no exponga la unidad a la lluvia ni a la humedad. Las instrucciones de este manual son para el WM-EX672 y el WM-EX670. Antes de comenzar la leerlas, compruebe el número de su modelo. El WM-EX672 es elk modelo utilizado para fines de ilustración. Cualquier diferencia en la operación se indicará claramente en el texto, por ejemplo, "EX672 solamente" y "EX670 solamente". Las instrucciones de este manual son para el WM-EX672 y el WM-EX670. Antes de comenzar la leerlas, compruebe el número de su modelo. El WM-EX672 es elk modelo utilizado para fines de ilustración. Cualquier diferencia en la operación se indicará claramente en el texto, por ejemplo, "EX672 solamente" y "EX670 solamente". Las instrucciones de este manual son para el WM-EX672 y el WM-EX670. Antes de comenzar la leerlas, compruebe el número de su modelo. El WM-EX672 es elk modelo utilizado para fines de ilustración. Cualquier diferencia en la operación se indicará claramente en el texto, por ejemplo, "EX672 solamente" y "EX670 solamente". A a B EX672 EX670 C a b VOL œ•REPEAT p D b Modelo para el Reino Unido xxxx xxxxx Para otros países xxxxxx xxxxxx p FUNCTION e Lámpara BATT xxxxx xxxxx DC IN 1.5 V EX672 FF•AMS REW•AMS VOL œ•p FF REW FF•AMS BL SKIP a NR Español zPreparativos Elección de una fuente de alimentación Pila (consulte la Fig. A-a) Fije la caja de pila suministrada, y después inserte una pila R6 (tamaño AA) con la polaridad correcta. Nota • Para obtener el máximo rendimiento, se recomienda utilizar una pila alcalina Sony. Batería (consulte la Fig. Ab) 1 Inserte la batería (NC-6WM) suministrada en el cargador con la polaridad correcta. 2 Enchufe el cargador en un tomacorriente de la red. Modelo para U.S.A: La carga completa tardará unas 2,5 horas. Modelo para Corea: La carga completa tardará de acuerdo con la tensión de la red. 110 V: 10 horas 220 V: 2,5 horas Modelo para otros países: La carga completa tardará de acuerdo con la tensión de la red. 120 V: 10 horas 220-240 V: 2,5 horas Si el enchufe no encaja en el tomacorriente de la red, fíjele el adaptador de enchufe de CA suministrado. 3 Inserte la batería completamente cargada en el compartimiento para la misma (consulte la Fig. A-c). Usted podrá cargar la batería unas 300 veces. Cuándo reemplazar la pila/cargar la batería (consulte la Fig. A-d) Cuando la pila/batería se debilite, parpadeará la lámpara BATT y la reproducción de la cinta se volverá inestable y ruidosa, y después la cinta se parará. Cuando parpadee la lámpara BATT, reemplace la pila o cargue la batería. Notas • Cuando extraiga o inserte una batería, la lámpara BATT puede encenderse temporalmente incluso aunque le quede un poco de energía. Después de ello, la lámpara BATT comenzará a parpadear. • La lámpara BATT puede parpadear temporalmente o apagarse cuando haga que la cinta avance rapidamente o la rebobine, o cuando utilice la unidad a temperaturas extremadamente bajas. Duración de la pila/batería (Horas aproximadas) (EIAJ*) Batería NC-6WM 12 completamente cargada Pila alcalina 39 LR6 (WM) Sony Batería NC-6WM y 50 pila alcalina LR6 (WM) juntas * Valor medido según las normas de EIAJ (Electronic Industries Association of Japan). (Utilizando un cassette de la serie HF Sony) Nota • La duración de la pila/batería puede acortarse dependiendo de la operación de la unidad. Corriente de la red (consulte la Fig. A-e) Extraiga la batería, si está insertada, y fije la caja de pila. Conecte un adaptador de alimentación de CA AC-E15HG (no suministrado) a la toma DC IN 1.5V y a un tomacorriente de la red. No utilice ningún otro adaptador de alimentación de CA. Polaridad de la clavija Las especificaciones del ACE15HG varían de acuerdo con la zona. Antes de adquirirlo, compruebe la tensión local y la forma del enchufe. Conexión de unos auriculares con casco/auriculares (consulte la Fig. B) 1 Conecte firmemente la miniclavija en el controlador remoto (EX672 solamente). 2 Conecte los auriculares con casco/auriculares en 2REMOTE. 3 Colóquese el lado marcado con "L" en el oído izquierdo, y el marcado con "R" en el derecho. Si los auriculares con casco/ auriculares no encajan en sus oídos, ajústelos hasta que encajen firmemente en los mismoss. z Utilización del Walkman Reproducción de una cinta (consulte la Fig. C-a) 1 Abra el portacassette e inserte un cassette. 2 Cerciórese de que la función de bloqueo (HOLD) esté desactivada. Si está activada, deslice el interruptor HOLD para desactivarla. 3 Presione œ•REPEAT de la unidad principal o, si está utilizando el controlador remoto (EX672 solamente), presione œ (reproducción)•p (parada). Ajuste el volumen con VOL. Para ajustar el volumen en la unidad principal (EX672 solamente) Ajuste el control VOL del controlador remoto al máximo. Para ajustar el volumen del controlador remoto (EX672 solamente) Ajuste el control VOL de la unidad principal a alrededor de 6. Nota sobre el portacassette Antes de abrir el portacassette de la unidad principal, cerciórese de que la cinta esté parada, y después deslice el interruptor OPEN. Si abriese el portacassette mientras la cinta estuviese moviéndose, es posible que ésta se aflojase o dañase. Operación con la unidad principal Para Presione (consulte la Fig. C-b) Reproducir la otra cara* œ•REPEAT durante la reproducción Parar la p reproducción Hacer que la cinta avance rápidamente** FF•AMS durante el modo de parada Rebobinar la cinta** REW•AMS durante el modo de parada Repetir la canción actual (Función de repetición de una sola canción) œ•REPEAT 2 segundos o más durante la reproducción Para parar la reproducción de una sola canción, vuelva a presionarla Operación con el controlador remoto (EX672 solamente) Para Reproducir la otra cara* Parar la reproducción Fast forward** Hacer que la cinta avance rápidamente** Repetir la canción actual (Función de repetición de una sola canción) Presione (consulte la Fig. C-b) œ•p 2 segundos o más durante la reproducción œ•p una vez durante la reproducción FF durante el modo de parada REW durante el modo de parada œ•p dos veces durante la reproducción Pra parar la reproducción de una sola canción, œ•p unavez Otras operaciones de la cinta En el controlador remoto, presione FF o REW (EX672 solamente). Para Presione Reproducir la cara FF•AMS una vez/ siguiente/9 canciones repetidamente siguientes desde el durante la comienzo (AMS***) reproducción Reproducir la canción REW•AMS una actual/8 canciones vez/repetidamente anteriores desde el durante la comienzo (AMS***) reproducción Reproducir la otra FF•AMS 2 cara desde el segundos o más comienzo (Función de durante el modo de inversión con salto) parada Reproducir la misma REW•AMS 2 cara desde el segundos o más comienzo (Función de durante el modo de reproducción parada automática con rebobinado) * La reproducción cambiará automáticamente la cara opuesta cuando finalice la cinta de la cara actual. ** El avance rápido/rebobinado se parará automáticamente cuando finalice la cinta. Si presiona œ•p del controlador remoto (EX672 solamente) durante el avance rápido o el rebobinado, el Walkman cambiará a reproducción. *** Automatic Music Sensor: Sensor automático de canciones Para saltar un espacio largo entre canciones (Función BL SKIP) (consulte la Fig. D) Manteniendo pulsada FUNCTION, presione FF•AMS. Aparecerá la indicación BL SKIP y usted oirá un pitido corto. (La indicación desaparecerá cuando suelte FUNCTION.) Para cancelar la función de BL SKIP, vuelva a repetir el procedimiento. La indicación BL SKIP desaparecerá y usted oirá dos pitidos cortos. Para confirmar el estado, presione FUNCTION. Cuando active la función, aparecerá la indicación BL SKIP. Notas sobre el sensor automático de canciones (AMS), la repetición de una sola canción, y el salto de espacios en blanco (BL SKIP) • Para utilizar las funciones del sensor automático de canciones y de repetición de una sola canción, entre las canciones tendrá que existir un espacio en blanco de 4 segundos o más. Para la función de salto de espacios en blanco, tendrá que existir un espacio en blanco de 12 o más segundos. Por lo tanto, si entre las canciones existe ruido, estas funciones no trabajarán. De forma similar, si el nivel de grabación es moderadamente bajo dentro de una canción, estas funciones pueden trabajar sin precisión. • Usted tendrá que dejar un espacio de 10 segundos o más al comienzo de cada cara del cassette. De lo contrario, es posible que no se reprodujese la primera canción desde el comienzo. Para reproducir una cinta grabada con el sistema de reducción de ruido Dolby* B (consulte la Fig. D) Manteniendo pulsada FUNCTION, presione p. Aparecerá la indicación a NR y usted oirá un pitido corto. (La indicación desaparecerá cuando suelte FUNCTION. Para cancelar la función de reducción de ruido Dolby, repita el mismo procedimiento. La indicación a NR desaparecerá y usted oirá dos pitidos cortos. Para confirmar el estado, presione FUNCTION. Cuando active la función, aparecerá la indicación a NR. * Reducción de ruido Dolby fabricado bajo licencia de Dolby Laboratories Licensing Corporation. DOLBY y el símbolo de la D doble a son marcas de Dolby Laboratories Licensing Corporation. Nota • Los ajustes de BL SKIP y a NR permanecerán almacenados mientras no reemplace la pila/ batería. (dé la vuelta) English zGetting Started Choosing a Power Source Dry Battery (see Fig. A-a) Attach the supplied battery case, and then insert one R6 (size AA) battery with correct polarity. Note • For maximum performance we recommend that you use a Sony alkaline battery. Rechargeable Battery (see Fig. A-b) 1 Insert the supplied rechargeable battery (NC6WM) into the charger with correct polarity. 2 Plug in the charger to the house current (mains). UK model: Full charging takes about 3.5 hours. European Continent model: Full charging takes about 2.5 hours. 3 Insert the fully charged battery into the rechargeable battery compartment (see Fig. A-c). You can charge the battery about 300 times. When to replace/charge the battery (see Fig. A-d) When the battery weakens, the BATT lamp will flash and tape playback will become unstable and noisy. Replace or charge the battery when the BATT lamp flashes. Notes • When you remove and reinsert a rechargeable battery, the BATT lamp may light up temporarily even if it has little battery power left. After a while, the BATT lamp will start to flash. • The BATT lamp may temporarily flash or go off when used in extremely low temperatures. Battery life (Approx. hours) (EIAJ*) Rechargeable NC-6WM 12 fully charged Sony alkaline LR6 (WM) 39 Rechargeable NC-6WM 50 Sony alkaline LR6 (WM) used together * Measured value by the standard of EIAJ (Electronic Industries Association of Japan). (Using a Sony HF series cassette tape) Note • The battery life may shorten depending on the operation of the unit. Connecting the Headphones / Earphones (see Fig. B) 1 Connect the stereo mini plug firmly to the remote control (EX672 only). 2 Connect the headphones/ earphones to 2REMOTE. 3 Wear the "L" marked side to the left ear and the "R" marked side to the right ear. If the earphones do not fit to your ears or the sound is unbalanced, adjust the earphones to fit to your ears firmly. z Operating the Walkman Playing a Tape (see Fig. C-a) 1 Open the cassette holder and insert a cassette. 2 Make sure the HOLD function is turned off. If it is on, slide the HOLD switch to turn it off. 3 Press œ•REPEAT on the main unit or if using the remote control (EX672 only), press œ (play)•p (stop). Adjust the volume with VOL. When adjusting the volume on the main unit (EX672 only) Set the VOL control on the remote control at maximum. When adjusting the volume on the remote control (EX672 only) Set the VOL control on the main unit to around 6. Note on the cassette holder When opening the cassette holder on the main unit, make sure the tape is stopped, then slide the OPEN switch. If the cassette holder is opened when the tape is running, the tape may loosen and be damaged. Operation on the main unit To Play the other side Press (see Fig. C-b) œ•REPEAT during playback Stop playback Fast forward p FF•AMS during stop Rewind REW•AMS during stop Repeat the current track (Repeat Single Track function) œ•REPEAT 2 seconds or more during playback To stop a single repeat, press it again. Operation on the remote control (EX672 only) Press (see Fig. To C-b) œ•p 2 seconds Play the other side* or more during playback Stop playback œ•p once during playback Fast forward** Rewind** Repeat the current track (Repeat Single Track function) FF during stop REW during stop œ•p twice during playback To stop a single repeat, press œ•p once. * Playback will switch automatically to the opposite side when the tape reaches the end of the side. ** Fast forward/rewind will stop automatically when the tape reaches the end of the side. If œ•p on the remote control (EX672 only) is pressed during fast forward or rewind, the Walkman switches to playback. Other Tape Operations On the remote control, press FF or REW (EX672 only). Press To FF•AMS once/ Play the next track/ succeeding 9 tracks repeatedly during playback from the beginning (AMS***) REW•AMS Play the current track/previous 8 tracks from the once/ repeatedly during playback beginning (AMS***) FF•AMS Play the other side from the beginning (Skip Reverse 2 seconds or more during stop function) REW•AMS Play the same side from the beginning (Rewind Auto Play 2 seconds or more during stop function) *** Automatic Music Sensor To skip a long space between tracks (BL SKIP function) (see Fig. D) While holding down FUNCTION, press FF•AMS. The BL SKIP indication lights up and you will hear a short beep. (The indication goes off when you release FUNCTION.) To cancel the BL SKIP function, repeat the procedure again. The BL SKIP indication goes off and you will hear two short beeps. To confirm the status, press FUNCTION. The BL SKIP indication lights up if the function is activated. Notes on AMS, Repeat Single Track and BL SKIP • To operate the AMS and the Repeat Single Track functions, you need a blank of 4 seconds or longer between the tracks. For the BL SKIP function, you need a blank of 12 seconds or longer. Therefore, if there is noise between the tracks, these functions will not detect the blank and will not operate. Likewise, if the recording level is moderately low within a track, these functions may operate inaccurately. • You need a blank of 10 seconds or longer at the beginning of each side of the cassette. Otherwise, the first track may not be played back from the beginning. To play a tape recorded with the Dolby*B NR system (see Fig. D) While holding down FUNCTION, press p. The a NR indication lights up and you will hear a short beep. (The indication goes off when you release FUNCTION.) To cancel the Dolby NR function, repeat the procedure again. The a NR indication goes off and you will hear two short beeps. To confirm the status, press FUNCTION. The a NR indication lights up if the function is activated. * Dolby noise reduction manufactured under license from Dolby Laboratories Licensing Corporation. "DOLBY" and the double-D symbol a are trademarks of Dolby Laboratories Licensing Corporation. Note • The BL SKIP and a NR settings are stored as long as the battery is not replaced. (turn over) English zGetting Started Choosing a Power Source Dry Battery (see Fig. A-a) Attach the supplied battery case, and then insert one R6 (size AA) battery with correct polarity. Note • For maximum performance we recommend that you use a Sony alkaline battery. Rechargeable Battery (see Fig. A-b) 1 Insert the supplied rechargeable battery (NC6WM) into the charger with correct polarity. 2 Plug in the charger to the house current (mains). UK model: Full charging takes about 3.5 hours. European Continent model: Full charging takes about 2.5 hours. 3 Insert the fully charged battery into the rechargeable battery compartment (see Fig. A-c). You can charge the battery about 300 times. When to replace/charge the battery (see Fig. A-d) When the battery weakens, the BATT lamp will flash and tape playback will become unstable and noisy. Replace or charge the battery when the BATT lamp flashes. Notes • When you remove and reinsert a rechargeable battery, the BATT lamp may light up temporarily even if it has little battery power left. After a while, the BATT lamp will start to flash. • The BATT lamp may temporarily flash or go off when used in extremely low temperatures. Battery life (Approx. hours) (EIAJ*) Rechargeable NC-6WM 12 fully charged Sony alkaline LR6 (WM) 39 Rechargeable NC-6WM 50 Sony alkaline LR6 (WM) used together * Measured value by the standard of EIAJ (Electronic Industries Association of Japan). (Using a Sony HF series cassette tape) Note • The battery life may shorten depending on the operation of the unit. Connecting the Headphones / Earphones (see Fig. B) 1 Connect the stereo mini plug firmly to the remote control (EX672 only). 2 Connect the headphones/ earphones to 2REMOTE. 3 Wear the "L" marked side to the left ear and the "R" marked side to the right ear. If the earphones do not fit to your ears or the sound is unbalanced, adjust the earphones to fit to your ears firmly. z Operating the Walkman Playing a Tape (see Fig. C-a) 1 Open the cassette holder and insert a cassette. 2 Make sure the HOLD function is turned off. If it is on, slide the HOLD switch to turn it off. 3 Press œ•REPEAT on the main unit or if using the remote control (EX672 only), press œ (play)•p (stop). Adjust the volume with VOL. When adjusting the volume on the main unit (EX672 only) Set the VOL control on the remote control at maximum. When adjusting the volume on the remote control (EX672 only) Set the VOL control on the main unit to around 6. Note on the cassette holder When opening the cassette holder on the main unit, make sure the tape is stopped, then slide the OPEN switch. If the cassette holder is opened when the tape is running, the tape may loosen and be damaged. Operation on the main unit To Play the other side Press (see Fig. C-b) œ•REPEAT during playback Stop playback Fast forward p FF•AMS during stop Rewind REW•AMS during stop Repeat the current track (Repeat Single Track function) œ•REPEAT 2 seconds or more during playback To stop a single repeat, press it again. Operation on the remote control (EX672 only) Press (see Fig. To C-b) œ•p 2 seconds Play the other side* or more during playback Stop playback œ•p once during playback Fast forward** Rewind** Repeat the current track (Repeat Single Track function) FF during stop REW during stop œ•p twice during playback To stop a single repeat, press œ•p once. * Playback will switch automatically to the opposite side when the tape reaches the end of the side. ** Fast forward/rewind will stop automatically when the tape reaches the end of the side. If œ•p on the remote control (EX672 only) is pressed during fast forward or rewind, the Walkman switches to playback. Other Tape Operations On the remote control, press FF or REW (EX672 only). To Play the next track/ succeeding 9 tracks from the beginning (AMS***) Play the current track/previous 8 tracks from the beginning (AMS***) Play the other side from the beginning (Skip Reverse function) Play the same side from the beginning (Rewind Auto Play function) Press FF•AMS once/ repeatedly during playback REW•AMS once/ repeatedly during playback FF•AMS 2 seconds or more during stop REW•AMS 2 seconds or more during stop *** Automatic Music Sensor To skip a long space between tracks (BL SKIP function) (see Fig. D) While holding down FUNCTION, press FF•AMS. The BL SKIP indication lights up and you will hear a short beep. (The indication goes off when you release FUNCTION.) To cancel the BL SKIP function, repeat the procedure again. The BL SKIP indication goes off and you will hear two short beeps. To confirm the status, press FUNCTION. The BL SKIP indication lights up if the function is activated. Notes on AMS, Repeat Single Track and BL SKIP • To operate the AMS and the Repeat Single Track functions, you need a blank of 4 seconds or longer between the tracks. For the BL SKIP function, you need a blank of 12 seconds or longer. Therefore, if there is noise between the tracks, these functions will not detect the blank and will not operate. Likewise, if the recording level is moderately low within a track, these functions may operate inaccurately. • You need a blank of 10 seconds or longer at the beginning of each side of the cassette. Otherwise, the first track may not be played back from the beginning. To play a tape recorded with the Dolby*B NR system (see Fig. D) While holding down FUNCTION, press p. The a NR indication lights up and you will hear a short beep. (The indication goes off when you release FUNCTION.) To cancel the Dolby NR function, repeat the procedure again. The a NR indication goes off and you will hear two short beeps. To confirm the status, press FUNCTION. The a NR indication lights up if the function is activated. * Dolby noise reduction manufactured under license from Dolby Laboratories Licensing Corporation. "DOLBY" and the double-D symbol a are trademarks of Dolby Laboratories Licensing Corporation. Note • The BL SKIP and a NR settings are stored as long as the battery is not replaced. (turn over)
-
 1
1 -
 2
2
 |
 |