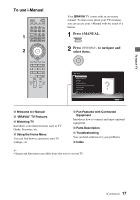
Sony XBR-60LX900 Setup Guide (Operating Instructions) - Page 18
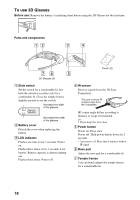
To use 3D Glasses, Before use, Parts and components, Slide switch, Battery cover, LED indicator
 |
UPC - 027242784543
View all Sony XBR-60LX900 manuals
Add to My Manuals
Save this manual to your list of manuals |
Page 18 highlights
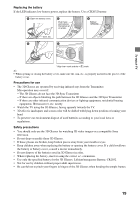
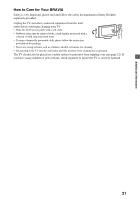
To use 3D Glasses Before use: Remove the battery's insulating sheet before using the 3D Glasses for the first time. Parts and components Pouch (2) 3D Glasses (2) 1 Slide switch Set the switch for a comfortable fit. Set both the switches on either side for a comfortable fit. Close the temple frames slightly inwards to set the switch. Increases the width of the glasses Decreases the width of the glasses 2 Battery cover Detach the cover when replacing the battery. 3 LED indicator Flashes one time every 3 seconds: Power on Flashes three times every 3 seconds: Low battery. Battery capacity is almost running out. Flashes three times: Power off 4 IR sensor Receive signals from the 3D Sync Transmitter. This part receives IR (infrared rays) from the Transmitter. IR's entry angle differs according to distance or usage environment. ~ • Please keep this face clean. 5 Power button Power on: Press once Power off: Hold power button down for 2 seconds * Auto power off: More than 5 minutes without IR signal 6 Nose pad Adjust the nose pad for a comfortable fit. 7 Temple frames You can bend (adjust) the temple frames for a comfortable fit. 18
-
 1
1 -
2
-
3
-
4
-
5
-
6
-
7
-
8
-
9
-
10
-
11
-
12
-
 13
13 -
 14
14 -
 15
15 -
 16
16 -
 17
17 -
 18
18 -
 19
19 -
 20
20 -
 21
21 -
 22
22 -
 23
23 -
24
 |
 |
