Sub-Zero WS-30 Wine Storage Installation Instructions - Page 31
Model WS-30 Installation, Site Preparation
 |
View all Sub-Zero WS-30 manuals
Add to My Manuals
Save this manual to your list of manuals |
Page 31 highlights
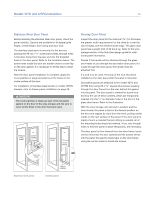
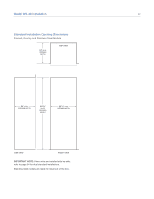
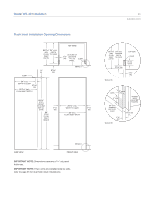
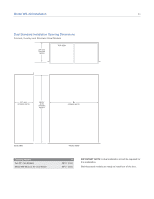
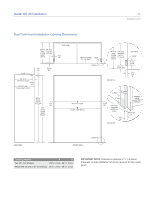
Model WS-30 Installation 31 subzero.com Site Preparation Make sure that the finished rough opening where the wine storage unit is being installed is properly prepared. Refer to installation specifications on the following pages. These specifications are identical for the framed, overlay and stainless steel applications. Installation specifications are different for the flush inset application, whether you are using custom panels or Sub-Zero accessory flush inset panels. If you are installing two models WS-30, or a model WS-30 and a built-in unit side by side in the framed, overlay, flush inset or stainless steel application, a filler strip is recommended. Add the filler strip width to the finished rough opening dimension. For installation of two units side by side without a filler strip, a dual installation kit will be necessary. IMPORTANT NOTE: To operate properly, the door must open a minimum of 90°. Use a minimum 3" (76) filler in corner installations to assure a 90° door opening. Allow enough clearance in front of the unit for full door swing. IMPORTANT NOTE: Make sure the floor under the unit is level with the surrounding finished floor. TOOLS AND MATERIALS REQUIRED: • Appliance dolly able to support 700 lbs (317 kg) and adequate manpower to handle the weight of the unit. • Phillips and slotted screwdrivers. • Torx drive screwdriver set. • Allen, standard and crescent wrenches. • Various sized pliers. • 3/8" hex bolt nut driver • Cordless drill and assorted drill bits. • Level-2' (.6 m) and 4' (1.2 m) recommended. • Masonite, plywood, pressed fiberboard, cardboard or other suitable material to protect finished flooring. • Appropriate materials to cover and protect the home and furnishings during installation. Do not load wine into the wine storage unit until the installation is complete.
-
 1
1 -
2
-
3
-
4
-
5
-
6
-
7
-
8
-
9
-
10
-
11
-
12
-
13
-
14
-
15
-
16
-
17
-
18
-
19
-
20
-
21
-
22
-
23
-
24
-
25
-
 26
26 -
 27
27 -
 28
28 -
 29
29 -
 30
30 -
 31
31 -
 32
32 -
 33
33 -
 34
34 -
 35
35 -
 36
36 -
37
-
38
-
39
-
40
-
41
-
42
-
43
-
44
-
45
-
46
-
47
-
48
-
49
-
50
-
51
-
52
-
53
-
54
-
55
-
56
 |
 |