Sunbeam Manual User Manual - Page 2
Speciales De La
 |
View all Sunbeam Manual manuals
Add to My Manuals
Save this manual to your list of manuals |
Page 2 highlights
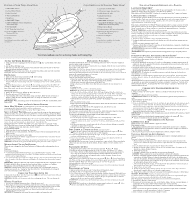
FEATURES OF YOUR TURBO STEAM® IRON 7 1. SPRAY MIST® Release 8 2. Covered Water Fill Hole 3. Fabric Select Dial 4. Wait / Ready Indicator 5. Steam Lever 6 5 6. SPRAY MIST® Trigger 7. SHOT OF STEAM® / Vertical Steam Button (select models only) 4 3 8. Soft Grip Handle 9. 360° Tangle-Free Swivel Cord 2 10. See-Through Water Reservoir / Maximum Fill Line 1 11. Self Clean Button 12. Soleplate Anti-Calcium System (select models only) (not shown) CARACTERÍSTICAS DE SU PLANCHAS TURBO STEAM® 1. Accionador de SPRAY MIST® 9 2. Orificio para Cargar Agua con Tapa 3. Perilla Selectora de Telas 4. Indicador Espera/Listo 5. Palanca de vapor 6. SPRAY MIST® Accionador 7. Botón SHOT OF STEAM® / Vapor Vertical (modelos seleccionados únicamente) 8. Mango con Asa Blanda 9. Cordón giratorio a 360° para evitar enredos. 10 10. Reservorio de Agua Transparente / Linea de Llenar Máxima 11. Botón de autolimpieza 12. Base Sistema Antisarro (modelos seleccionados únicamente) (no se ilustra) 11 12 Visit www.sunbeam.com for an Ironing Guide and Ironing Tips TO FILL THE WATER RESERVOIR (use tap water) 1. Make sure the iron is unplugged. Set the Steam Lever to (Dry) and the Fabric-Select Dial to OFF. 2. Lift the Water Fill Hole Cover. 3. Fill water cup with tap water and pour water into iron water reservoir. Do not fill water reservoir beyond maximum fill level. WARNING: To prevent the risk of burns, be careful when filling a hot iron with water. Hot metal parts, hot water and steam can cause injuries. DRY IRONING 1. Make sure the Steam Lever is turned to the (Dry) setting. 2. Plug the cord into a 120-Volt AC outlet. 3. Turn the large Fabric Select Dial to the fabric setting you desire. Allow the iron to heat for 2 minutes. While the iron is heating, make sure it is sitting on its heel rest on a stable, protected surface. Note: While the Steam Lever is turned to the (Dry) setting, you may still use the SHOT OF STEAM® or SPRAY MIST® feature, as long as the Fabric Select Dial is set to wool, cotton, or linen. Please make sure the water reservoir is approximately 1/4 full of water. STEAM IRONING 1. Follow the instructions for "Filling the Water Reservoir." 2. Plug the cord into a 120-Volt AC outlet. 3. Turn the Fabric Select Dial to the fabric setting you desire. Allow the iron to heat for 2 minutes. While the iron is heating, make sure it is sitting on its heel rest on a stable, protected surface. IMPORTANT: When not ironing, always set the Steam Lever to (Dry) and the Fabric Select Dial to OFF. USING THE IRON'S SPECIAL FEATURES SPRAY MIST® FEATURE is a powerful water spray mist that dampens the fabric to aid in removing wrinkles from heavy fabrics and for setting creases. TO USE THE SPRAY MIST® FEATURE: Press Spray Mist ® trigger firmly. SHOT OF STEAM® FEATURE provides an extra burst of steam for deep penetration of stubborn wrinkles. You can use this feature while Dry or Steam ironing, as long as the Fabric Select Dial is set to wool, cotton, or linen. The water reservoir must be approximately 1/4 full of water. TO USE THE SHOT OF STEAM® FEATURE: Place the iron on top of the wrinkle and press the Shot of Steam® button each time you would like an extra burst of steam. The Shot of Steam ® feature may be used continuously in approximately 3-second intervals. VERTICAL STEAM (select models only) allows your iron to function as a garment steamer. Tip: When using vertical steam on clothing, hang the clothing on a clothes hanger for best results. Hanging curtains and drapes may also be steamed. TO USE VERTICAL STEAM: 1. Make sure that the iron has heated up (2 minutes). 2. Hold the iron in a vertical position, with the iron close to but not touching the fabric you want to steam. 3. With your other hand, pull the fabric tight. 4. Press the Shot of Steam® button in approximately 3-second intervals as you move the iron across the wrinkled area. WARNING: To prevent the risk of burns, keep your hand away from the area being steamed. WARNING: DO NOT steam garments while wearing them; this may result in injuries. MOTION SMART® AUTO-OFF FEATURE When the iron is plugged in, the Power Indicator will light steadily, indicating that there is power to the iron. IF YOU LEAVE THE IRON: • in a horizontal position without moving it, or accidentally tip the iron over, it will automatically stop heating after 30 seconds. The Power Indicator will blink to let you know that the iron has stopped heating. • in a vertical position (on its heel rest) without moving it, the iron will automatically turn off after 15 minutes. The Power Indicator will blink to let you know that the iron has stopped heating. IMPORTANT: The Power Indicator will continue to blink until the iron is unplugged or reset. TO RESET THE IRON: Move the iron back and forth and allow it to reheat for 2 minutes. The indicator will stop blinking and the iron will start heating again. WARNING: Motion Smart® Auto-Off is a safety feature, not a recommended means for turning your iron off. See "Caring for Your Iron After Use" for information on turning off your iron and storing it safely between use. CARING FOR YOUR IRON AFTER USE TURNING OFF YOUR IRON: Turn the Steam Lever to (Dry) and Fabric Select Dial to Off and unplug the iron from the power source. WARNING: NEVER yank the power cord when unplugging the iron. This can damage the cord. STORING YOUR IRON 1. Turn off iron following instructions above. Allow the iron to cool. 2. If you do not use your iron on a daily basis, empty the water reservoir after each use for a longer iron life. To do so, unplug the iron, turn the iron upside down, open the fill hole cover, and allow water to flow from the fill hole. Shake the iron gently to remove trapped water drops. 3. If your iron does not have a retractable cord, loosely loop the power cord around the heel rest and store the iron on its heel rest. IMPORTANT: Wrapping the cord around the iron too tightly can damage the cord. MAINTAINING YOUR IRON CLEANING THE SOLEPLATE: Turn off iron following instructions above. Clean the soleplate if starch or other residue accumulate. TO CLEAN THE SOLEPLATE: Do not immerse the iron in liquids. Allow the iron to cool and then wipe it with a soft, damp cloth. WARNING: DO NOT use abrasive cleansers, scouring pads or vinegar to clean the soleplate. This will damage the finish. Run the iron over an all-cotton cloth to remove any residue. USING THE SELF-CLEANING FEATURE: You should use the Self-Cleaning feature once a month to maintain the optimal performance of your iron. TO USE THE SELF-CLEANING FEATURE: Turn off iron following instructions above. 1. Move the Steam Lever back and forth several times to remove debris and minerals from the Steam Valve. This keeps water flowing into the steam chamber. 2. Fill the water reservoir with tap water to the MAX line. 3. Plug in the iron, set the Fabric Select Dial to Linen and allow the iron to heat for 2 minutes. 4. Unplug the iron. 5. Hold the iron over a sink in a horizontal position. WARNING: Be careful not to touch the iron's hot surfaces. 6. Press the Self-clean Button and hold. Water will begin dripping from the steam vents. Slowly rock the iron side to side and front to back for 30 seconds. When rocking the iron, dip the nose of the iron slightly below the rear of the iron to make certain the water circulates completely. Release the Self-clean Button after one minute. 7. Open the fill cap, turn the iron upside down, and allow the remaining water to flow out of the fill hole. 8. Dry the soleplate with a towel. 9. Plug in the iron and set the Fabric Select Dial to Linen. Let the iron heat for 2 minutes to dry out the iron completely. 10. Set the Fabric Select Dial to the Off, unplug the iron, and allow it to cool. ANTI-CALCIUM SYSTEM (select models only) The iron houses an anti-calcium filter in the reservoir, which eliminates impurities from the water. This is a permanent system located inside the water reservoir. TO PROLONG THE EFFICIENCY OF THIS FILTER, FOLLOW THESE STEPS OCCASIONALLY: 1. Unplug the iron and allow it to cool. 2. Locate the water cup that accompanied the iron. Fill it with water ¾ full. Add 1 teaspoon of salt to water and fill the water reservoir with this solution. 3. Leave the solution in the water reservoir for 15 minutes, shaking occasionally, and then empty it. 4. Fill the water reservoir a second time with the salt water solution, shaking occasionally and empty it again after 15 minutes. 5. Fill the tank with fresh water to rinse and empty. PARA LLENAR EL TANQUE DE AGUA (use agua de grifo) 1. Asegúrese de que la plancha esté desenchufada. Ponga la palanca de vapor en (Dry) ( [Seco]) y la perilla de selección de telas en Off (Apagado). 2. Levante la Tapa del Orificio del Tanque de Agua. La tapa se puede retirar y se puede volver a colocar cuidadosamente en las ranuras. 3. Llene la taza con agua. Vierta el agua en el tanque de agua de la plancha. No llene el tanque de agua más allá del nivel máximo de llenado. ADVERTENCIA: Para prevenir el riesgo de quemaduras, tenga cuidado al llenar una plancha caliente con agua. Las partes de metal calientes, el agua caliente y el vapor pueden causar lesiones. PLANCHANDO EN SECO 1. Asegúrese de que la palanca del vapor esté en la posición (Dry) ( [Seco]). 2. Enchufe el cable en un tomacorriente de CA de 120 voltios. (En México, 127 voltios.) 3. Gire el Disco Selector de Tela (Fabric Select) en la posición deseada para planchando en seco y deje que la plancha se caliente durante 2 minutos. Mientras la plancha se está calentando, asegúrese de que esté apoyada sobre su talón de apoyo, encima de una superficie estable y protegida. Nota: Mientras que la Palanca de Vapor esté en la posición (Dry) ( [Seco]), Disco Select o de Telas este fijo en lana, algodón, o lino usted. todavía puede usar las funciones SHOT OF STEAM® o SPRAY MIST.® Por favor asegúrese que el reservorio de agua sea approximadamente 1/4 de lleno de agua. SUGERENCIA: Consulte la Guía de Planchado para conocer el nivel de temperatura adecuado para su tela. PLANCHANDO AL VAPOR 1. Siga las instrucciones de la sección "Cómo Llenar el Depósito de Agua". 2. Enchufe el cable en un tomacorriente de CA de 120 voltios. 3. Gire el Disco Selector de Telas a la posición deseada (Synthetic [sintética], Silk [seda] Linen [lino], Cotton [algodón] o Wool [lana}). Deje que la plancha se caliente durante 2 minutos. Mientras la plancha se está calentando, asegúrese de que esté apoyada sobre su talón de apoyo, encima de una superficie estable y protegida. SUGERENCIA: Consulte la Guía de Planchado para conocer el nivel de temperatura adecuado para su tela. IMPORTANTE: Cuando no esté planchando, siempre ponga la palanca de vapor en (Dry) ( [Seco]) y la perilla de selección de telas Off (Apagado). USO DE LAS FUNCIONES ESPECIALES DE LA PLANCHA LA FUNCIÓN SPRAY MIST® La función Spray Mist®es una poderosa niebla de agua que humedece la tela para ayudar a eliminar las arrugas de las telas gruesas y para marcar los dobleces. PARA USAR LA FUNCIÓN SPRAY MIST®: Presione el accionador Spray Mist ® trigger con firmeza. LA FUNCIÓN SHOT OF STEAM® La función Shot of Steam® brinda un chorro de vapor adicional para penetración profunda en arrugas rebeldes. Puede usar esta función cuiando plancha en seco o con vapor, mientras el Disco Selector de Telas este fijo en lana, algodón, o lino. El reservorio de agua de estar approximadamente 1/4 del lleno de agua. PARA USAR LA FUNCIÓN SHOT OF STEAM®: Ponga la plancha sobre la arruga y presione el botón Shot of Steam® cada vez que desee aplicar un chorro adicional de vapor. La función Shot of Steam® se puede usar en forma continua o a intervalos de approximadamente 3 secundos. VAPOR VERITICAL (modelos seleccionados únicamente) La función vapor vertical permite que su plancha funcione como vaporizador para prendas. Consejo: Cuando use el vapor vertical sobre las prendas, cuélguelas de una percha para obtener mejores resultados. También se puede usar en cortinas y cortinados colgados. Para usar el vapor vertical: 1. Asegúrese de que la plancha se haya calentado (2 minutos). 2. Sostenga la plancha en posición vertical, con la plancha cerca de la tela que desea vaporizar pero sin tocarla. 3. Con la otra mano, mantenga tensa la tela. 4. Presione el botón Shot of Steam® a intervalos de aproximadamente 3 segundos a medida que mueve la plancha por la zona arrugada. ADVERTENCIA: Para prevenir el riesgo de quemaduras, mantenga la mano alejada de la zona que está vaporizando. ADVERTENCIA: NO vaporice las prendas mientras las tenga puestas ya que esto puede provocar lesiones. FUNCIÓN DE APAGADO AUTOMÁTICO MOTION SMART® Cuando la plancha está enchufada, el indicador de encendido quedará encendido todo el tiempo para señalar que llega energía eléctrica a la plancha. SI DEJA LA PLANCHA: • en posición horizontal sin moverla, o la vuelca accidentalmente, automáticamente dejará de calentar al cabo de 30 segundos. El indicador de encendido titilará para hacerle saber que la plancha ha dejado de calentar. • en posición vertical (sobre su talón de apoyo) sin moverla, la plancha se apagará automáticamente al cabo de 15 minutos. El indicador de encendido titilará para hacerle saber que la plancha ha dejado de calentar. IMPORTANTE: El indicador de encendido continuará titilando hasta que la plancha sea desenchufada o reiniciada. PARA REINICIAR LA PLANCHA: Mueva la plancha hacia atrás y hacia adelante. Permita que vuelva a calentar durante 2 minutos. El indicador dejará de titilar y la plancha comenzará a calentar nuevamente. ADVERTENCIA: La función patentada de apagado automático Motion Smart® es una función de seguridad, no una forma recomendada de apagar su plancha. Consulte en "Cuidado de Su Plancha Después del Uso", la información sobre cómo apagar su plancha y almacenarla con seguridad después del uso. CUIDADO DE SU PLANCHA DESPUÉS DEL USO APAGADO DE SU PLANCHA 1. Ponga la palanca de vapor en (Dry) ( [Seco]) y la perilla de selección de telas en Off (Apagado). 2. Desenchufe la plancha del tomacorriente. ADVERTENCIA: NUNCA tire del cable para desenchufar la plancha. Esto puede dañar el cable. ALMACENAMIENTO DE SU PLANCHA 1. Deje enfriar la plancha. 2. Si no usa la plancha diariamente, vacíe el reservorio de agua después de cada uso para que la misma tenga una mayor vida útil. Para hacerlo, desenchufe la plancha, inviértala, abra la tapa del orificio para cargar agua y deje que salga el agua por el orificio. Sacuda la plancha suavemente para eliminar las gotas de agua retenidas. 3. Si su plancha no tiene cordón retractable, enrolle el cable alrededor del talón de apoyo y almacene la plancha parada sobre su talón de apoyo. IMPORTANTE: Si se enrolla el cable de manera muy ajustada alrededor de la plancha se puede dañar el cable. CONSEJO: Cuando no esté planchando, siempre ponga la palanca de vapor en (Dry) ( [Seco]) y la perilla de selección de telas en Off (Apagado). MANTENIENDO DE SU PLANCHA LIMPIEZA DE LA BASE Limpie la base si se acumula almidón o algún otro residuo. PARA LIMPIAR LA BASE: 1. No sumerja la plancha. Deje enfriar la plancha y luego pásele un paño suave y húmedo. ADVERTENCIA: No use limpiadores abrasivos, esponjas de metal ni vinagre para limpiar la base. Esto dañará el acabado. 2. Pase la plancha por un paño de puro algodón para eliminar cualquier residuo. USO DE LA FUNCIÓN DE AUTO-LIMPIEZA Debe usar la función de Auto-Limpieza una vez al mes para mantener el desempeño óptimo de su plancha. Para usar la función de Auto-Limpieza: 1. Mueva la Palanca de Vapor para atrás y adelante varias veces para quitar los restos y los minerales de la Válvula de Vapor. Esto mantiene el agua fluyendo en el compartimiento del vapor. 2 Llene el depósito del agua con agua del grifo hasta la línea MAX. 3. Enchufe la plancha, ponga el Disco Selector de Telas en Linen (Lino). Y permita que la plancha se caliente durante 2 minutos. 4. Desenchufe la plancha. 5. Sostenga la plancha sobre un fregadero en una posición horizontal. CUIDADO: Tenga cuidado de no tocar las superficies calientes de la plancha. 6. Presione y mantenga apretado el botón de auto-limpieza. El agua comenzará a gotear de los respiraderos del vapor. Balancee la plancha lentamente de lado a lado y de adelante para atrás por 30 segundos. Al balancear la plancha, ponga la nariz de la plancha levemente más baja que la parte posterior para asegurarse de que el agua circule totalmente. Suelte el botón de auto-limpieza después de un minuto. 7. Abra la tapa del depósito de agua, invierta la posición de la plancha al revés y deje que el agua restante fluya afuera por el orificio de llenado. 8. Seque la base con una toalla. 9. Enchufe la plancha, ponga el Disco Selector de Telas en Linen (Lino). Deje calentar la plancha por 2 minutos para secar la plancha completamente. 10. Ponga el Disco Selector de Telas en la posición Off, desenchufe la plancha, y déjela enfriar. SISTEMA ANTISARRO (modelos selecionados únicamente) La plancha contiene un filtro antisarro en el reservorio, que elimina las impurezas del agua. Este es un sistema permanente ubicado dentro del tanque de agua. PARA PROLONGAR LA EFICIENCIA DE ESTE FILTRO SIGA ESTOS PASOS OCASIONALMENTE: 1. Desenchufe la plancha y déjela enfriar. 2. E ncuentre la taza para agua que vino con la plancha. Llene ≤ de taza con agua Agregue 1 cucharadita de sal al agua y llene el reservorio de agua con esta solución. 3. Deje la solución en el reservorio de agua durante 15 minutos sacudiendo ocasionalmente y luego vacíelo. 4. Llene el reservorio de agua por segunda vez con la solución de agua salada, sacudiendo ocasionalmente, y vacieló nuevamente al cabo de 15 minutos. 5. Llene el tanque con agua fresca para enjuagar y vacíelo.
-
 1
1 -
 2
2
 |
 |
