Symphonic SC309D Owner's Manual - Page 7
Operating Controls And Functions
 |
View all Symphonic SC309D manuals
Add to My Manuals
Save this manual to your list of manuals |
Page 7 highlights
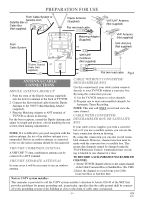
OPERATING CONTROLS AND FUNCTIONS - TV/VCR FRONT PANEL - VIDEO AUDIO REC POWER STOP/EJECT REW PLAY F.FWD REC/OTR VOLUME CHANNEL EARPHONE 1 2 3 4 5 6 7 8 9 10 11 12 13 14 - REMOTE CONTROL - 25 WAKE-UP POWER /SLEEP EJECT 5 6 CHANNEL RETURN 1 2 3 24 15 4 5 6 CHANNEL 12 7 8 9 0 +100 MENU DISPLAY MUTE VOLUME 11 16 17 7 23 PLAY 8 REW F.FWD 9 6 STOP RECORD 10 SPEED PAUSE/STILL 22 18 T-PROG. CLEAR GAME TIME SEARCH 21 19 COUNTER RESET 20 1 VIDEO input jack- Connect to the video output jack of your video camera or another VCR. 2 AUDIO input jack- Connect to the audio output jack of your audio equipment, video camera or another VCR. 3 RECORD indicator- Flashes during recording. Lights up in the Stand-by mode for Timer Recording. 4 Remote Sensor Window- Receives the infrared signals from the remote control. 5 POWER button- Press to turn TV/VCR on and off. Press to activate timer recording. 6 STOP button- Press to stop the tape motion. EJECT button- Press in the Stop mode to remove tape from TV/VCR. L button- • Press to select setting modes from the on screen menu. • Press to enter digits when setting program. (for example: setting clock or timer program) 7 REW button- Press to rewind the tape, or to view the picture rapidly in reverse during playback mode. (Rewind Search) s button- • Press to select a mode from a particular menu. (for example: LANGUAGE or USER'S SET UP) 8 PLAY button- Press to begin playback. K button- • Press to select setting modes from the on screen menu. • Press to enter digits when setting program. (for example: setting clock or timer program) 9 F.FWD button- Press to rapidly advance the tape, or to view the picture rapidly in forward during playback mode. (Forward Search) B button- • When setting program (for example: setting clock or timer program), press to determine your selec- tion and proceed to the next step you want to input. • Press to determine setting modes from on screen menu. • Press to select a mode from a particular menu. (for example: LANGUAGE or USER'S SET UP) -7- EN 9J27
-
 1
1 -
 2
2 -
 3
3 -
 4
4 -
 5
5 -
 6
6 -
 7
7 -
 8
8 -
 9
9 -
 10
10 -
 11
11 -
 12
12 -
13
-
14
-
15
-
16
-
17
-
18
-
19
-
20
-
21
-
22
-
23
-
24
-
25
-
26
-
27
-
28
-
29
-
30
-
31
-
32
 |
 |
