Symphonic SC313C Owner's Manual - Page 7
Operating Controls And Functions - remote codes
 |
View all Symphonic SC313C manuals
Add to My Manuals
Save this manual to your list of manuals |
Page 7 highlights
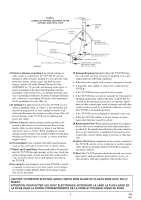
OPERATING CONTROLS AND FUNCTIONS This manual covers 13" and 19". The operation of the two models are exactly the same except the appearance. 19" model is illustrated in this manual. NOTE: • We do not recommend the use of universal remote controls. Not all of the functions may be controlled with a universal remote control. If you decide to use a universal remote control with this unit, please be aware that the code number given may not operate this unit. In this case, please call the manufacturer of the universal remote control. - TV/VCR FRONT PANEL - [Fig.1] VIDEO AUDIO POWER VOLUME CHANNEL STOP/EJECT REW PLAY F.FWD REC/OTR EARPHONE 1 2 3 4 5 6 7 8 9101112 13 14 - REMOTE CONTROL - [Fig.2] 1 VIDEO input jack- Connect to the video output jack of your video camera or another VCR. 2 AUDIO input jack- Connect to the audio output jack of your audio equipment, video camera or 25 another VCR. WAKE-UP POWER 3 /SLEEP EJECT 7 CHANNEL 3 POWER button- Press to turn TV/VCR on and off. Press to activate timer recording. RETURN 1 2 3 24 4 VOLUME X / Y buttons- Adjust the volume level. 15 4 5 6 5 CHANNEL K / L buttons- Press to select the CHANNEL 5 desired channels for viewing or recording. 7 8 9 You may display the main menu on the TV screen 0 +100 by pressing repeatedly this button on the MENU DISPLAY MUTE VOLUME 4 TV/VCR. 16 17 8 7 PLAY REW F.FWD STOP 23 9 TRACKING function- Press to minimize video 'noise' (lines or dots on screen) during playback 10 mode. (See page 19.) 6 Remote Sensor Window- Receives the infrared signals from the remote control. RECORD 11 SPEED PAUSE/STILL 22 7 STOP button- Press to stop the tape motion. 18 T-PROG. CLEAR GAME TIME SEARCH 21 EJECT button- Press in the Stop mode to remove tape from TV/VCR. 19 COUNTER RESET L button- 20 • Press to select setting modes from the on screen menu. • Press to enter digits when setting program. (for example: setting clock or timer program) -7- EN 9I03
-
 1
1 -
 2
2 -
 3
3 -
 4
4 -
 5
5 -
 6
6 -
 7
7 -
 8
8 -
 9
9 -
 10
10 -
 11
11 -
 12
12 -
13
-
14
-
15
-
16
-
17
-
18
-
19
-
20
-
21
-
22
-
23
-
24
-
25
-
26
-
27
-
28
-
29
-
30
-
31
-
32
 |
 |
