Synology DS1821 Synology High Availability SHA User Guide for DSM 7.0 - Page 44
Storage capacity expansion, Expand the storage capacity by adding new drives
 |
View all Synology DS1821 manuals
Add to My Manuals
Save this manual to your list of manuals |
Page 44 highlights
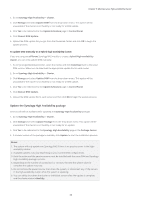
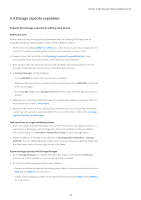
Chapter 5: Maintain your High-availability Cluster 5.4 Storage capacity expansion Expand the storage capacity by adding new drives Before you start Please note that only storage pools implemented with the following RAID types can be expanded using this method: RAID 1, RAID 5, RAID 6, RAID 10, RAID F1. 1. Perform Data Scrubbing (DSM 7.0 / DSM 6.2) to check if your volume and storage pool are normal. If the status is anything other than normal, make sure to repair it first. 2. Prepare drives that are listed on the Synology Products Compatibility List. Using incompatible drives may lower system performance or cause data loss. 3. Back up your data. The expansion process will not delete any existing data, but we still strongly recommend you to back up your data before proceeding. 4. In Storage Manager, do the following: • Go to HDD/SSD to check if the inserted drive is healthy. • Make sure the inserted drive meets the drive requirements. Go to HDD/SSD to check the drive size and type. • Go to Storage (DSM 7.0) or Storage Pool (DSM 6.2) to check if the storage pool status is healthy. 5. Make sure your Synology NAS model supports using drives located in expansion units. For more information, refer to this article. 6. Make sure the maximum total capacity of the volumes and LUNs on your high-availability cluster has not reached or exceeded 400 TB. For more information, refer to the Synology High Availability specifications. Add new drives to a high-availability cluster 1. Insert new drives into identical empty slots on both the active and the passive servers. To avoid injury or damaging your Synology NAS, make sure to follow the drive installation instructions found in the Hardware Installation Guide for your Synology device.1 2. Make sure that all of the new drives show up in Synology High Availability > Storage > HDD/SSD. You can check the status of the active or passive servers by selecting them from the drop-down menu in the top-right corner of the page. Expand storage capacity with Storage Manager 1. Go to Storage Manager to complete the final steps. Please note that the switchover function will not be available at any time during these processes. 2. Do one of the following depending on your situation: • Expand an existing storage pool by adding drives. Refer to the respective help articles for DSM 7.0 and DSM 6.2 for instructions. • Create a new storage pool. Refer to the respective help articles for DSM 7.0 and DSM 6.2 for instructions. 42
-
 1
1 -
2
-
3
-
4
-
5
-
6
-
7
-
8
-
9
-
10
-
11
-
12
-
13
-
14
-
15
-
16
-
17
-
18
-
19
-
20
-
21
-
22
-
23
-
24
-
25
-
26
-
27
-
28
-
29
-
30
-
31
-
32
-
33
-
34
-
35
-
36
-
37
-
38
-
 39
39 -
 40
40 -
 41
41 -
 42
42 -
 43
43 -
 44
44 -
 45
45 -
 46
46 -
 47
47 -
 48
48 -
 49
49 -
50
-
51
-
52
-
53
-
54
 |
 |
