TEAC AD-500 Owners Manual - Page 11
Cassette Deck Operation - cd player cassette deck
 |
View all TEAC AD-500 manuals
Add to My Manuals
Save this manual to your list of manuals |
Page 11 highlights
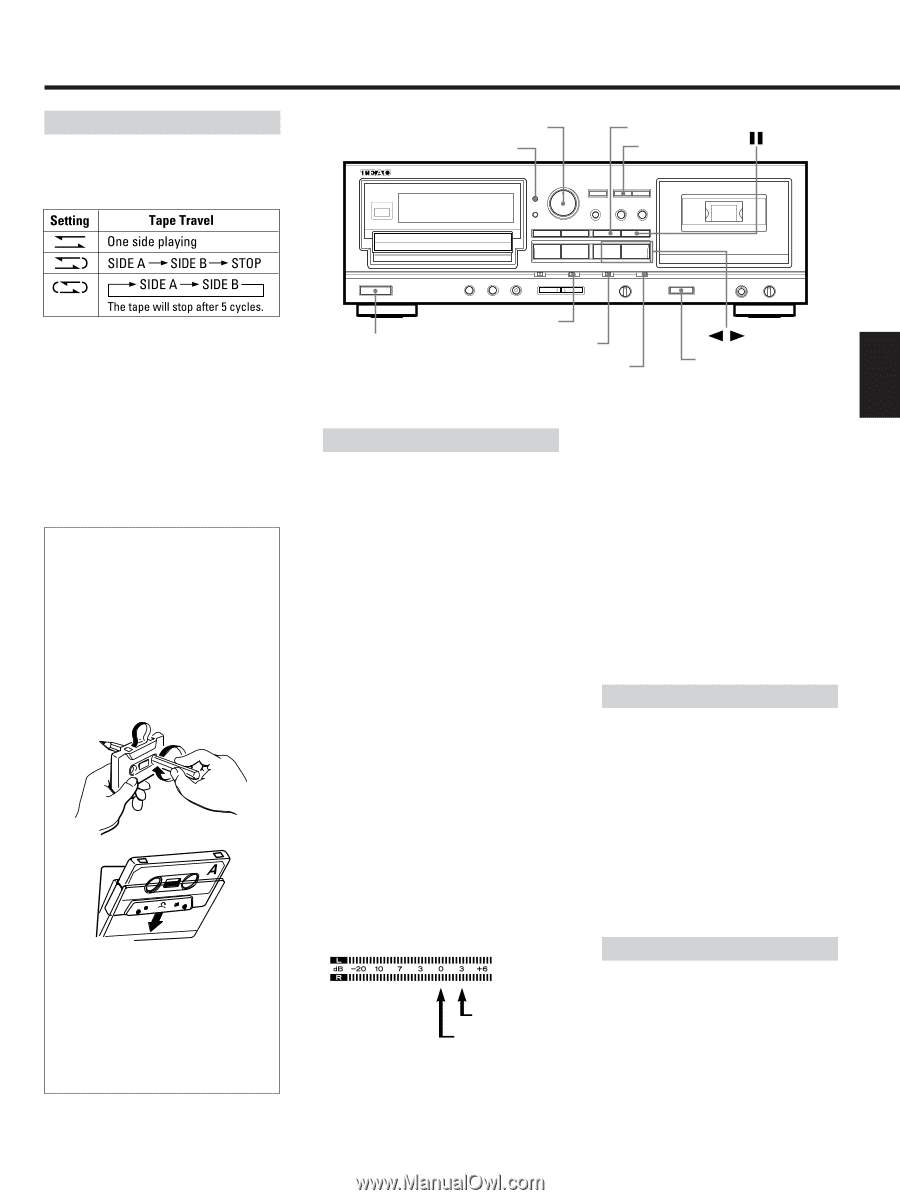
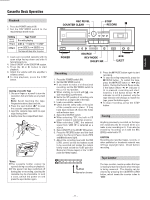
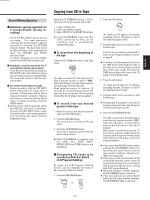
Cassette Deck Operation Playback 1. Press the POWER switch ON. 2. Set the REV MODE switch to the required tape travel mode. REC REVEL COUNTER CLEAR STOP RECORD ENGLISH 3. Load a pre-recorded cassette with its open edge facing down and side A facing toward you. 4. Select ON/OFF of the DOLBY NR system. 5. Press the " or ∏ button to start playback. 6. Adjust the volume with the amplifier's volume control. O To stop playback, press the STOP button. Loading a Cassette Tape 1. Use your finger or a pencil to turn the cassette's hub and take up any slack tape. Note: Avoid touching the tape. Fingerprints attract dust and dirt. 2. Press the eject button (∫)* to open the cassette compartment door. 3. Load the cassette tape with its open edge facing down. 4. Gently close the compartment door. *Notes: OThe cassette holder cannot be opened during recording or playback. OIf the power has been switched off during play or recording, ejecting the cassette may be impossible. In such a case, switch the power on and press the eject button again. POWER SOURCE REV MODE DOLBY NR EJECT Recording 1. Press the POWER switch ON. 2. Set the REV MODE switch. O If you want to make a bi-directional recording, set the REV MODE switch to the π or ø position. O When starting to record with ú" , one side recording is performed. O Set to the " position if recording is to be made on a single side of the tape. 3. Load a recordable cassette. O Check that the safety tabs on the spine of the cassette are in place. If they have been broken off, block the holes with adhesive tape. 4. Select the SOURCE switch. O When selecting "CD", the built-in CD player's output is selected as a source. O When selecting "LINE", the external signal from "LINE IN" is selected as a source. 5. Select ON/OFF of the DOLBY NR system. 6. Press the RECORD button and the deck enters the Record-Pause mode (REC and ƒ indicators light). 7. Adjust the recording level with the REC LEVEL control so that the loudest sound to be recorded just makes the meters briefly reach around the "0 dB" point (for Normal or Chrome tapes) or the "+3 dB" point (for Metal tapes). Metal Normal or chrome 8. Press the ƒ PAUSE button again to start recording. O To stop recording temporarily, press the ƒ PAUSE button. To restart the tape, press the ƒ PAUSE button or "∏play button. During the Record-Pause mode, if the button whose ", ∏ indicator is lit is pressed, recording will start; however, if the button whose ", ∏ indicator is not lit is pressed, only the tape direction will change; to restart the tape, press the button again. O To stop recording, press the STOP button. Erasing Anything previously recorded on the tape will automatically be erased when you make a new recording on it. It can also be erased by "recording" on it with the REC LEVEL control set to "0". CAUTION Recording pre-recorded tapes, records, or other published or broadcast material may infringe copyright laws. Check before recording. Tape Counter The tape counter counts up when the tape is moving forward and down when the tape is being rewound. The display can be cleared by pressing the COUNTER CLEAR button, which resets the counter index to "0000". _ 11 _
-
 1
1 -
2
-
3
-
4
-
5
-
 6
6 -
 7
7 -
 8
8 -
 9
9 -
 10
10 -
 11
11 -
 12
12 -
 13
13 -
 14
14 -
 15
15 -
 16
16 -
17
-
18
-
19
-
20
-
21
-
22
-
23
-
24
-
25
-
26
-
27
-
28
-
29
-
30
-
31
-
32
-
33
-
34
-
35
-
36
-
37
-
38
-
39
-
40
-
41
-
42
-
43
-
44
-
45
-
46
-
47
-
48
-
49
-
50
-
51
-
52
-
53
-
54
-
55
-
56
-
57
-
58
-
59
-
60
-
61
-
62
-
63
-
64
-
65
-
66
-
67
-
68
-
69
-
70
-
71
-
72
-
73
-
74
-
75
-
76
-
77
-
78
-
79
-
80
-
81
-
82
-
83
-
84
 |
 |