TEAC LP-R450 LP-R450 Manual - Page 12
Parts of the Turntable, RPM adaptor - turntable with cassette
 |
View all TEAC LP-R450 manuals
Add to My Manuals
Save this manual to your list of manuals |
Page 12 highlights
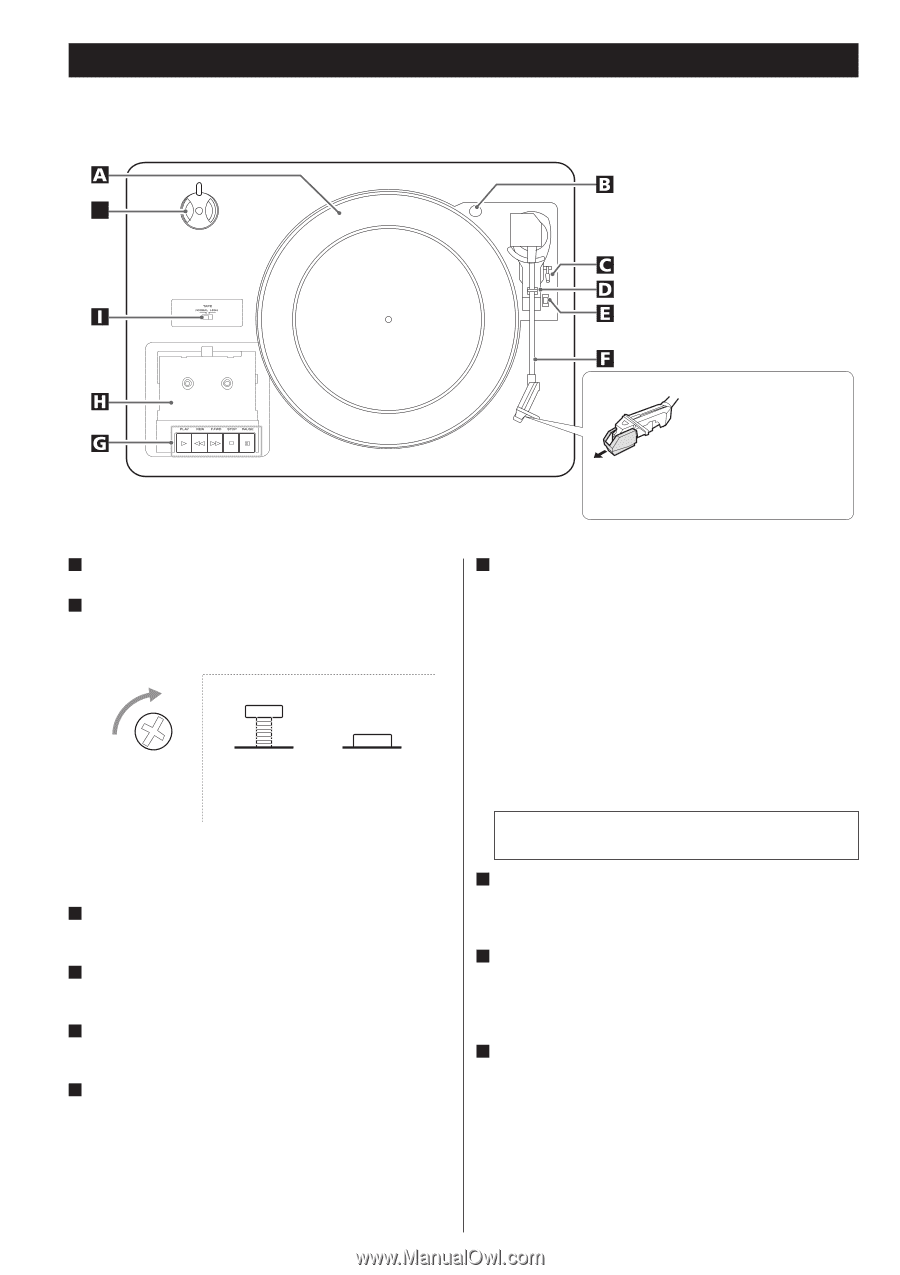
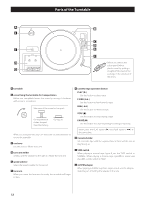
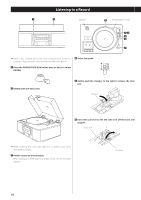
Parts of the Turntable J Before use, detach the stylus guard (white plastic cover) by pulling it straight off the front of the cartridge in the direction of the arrow. A turntable B screw fixing the turntable for transportation Before use, completely loosen the screw by turning it clockwise with a coin or screwdriver. Side view of the screw for transport During transport (when shipped from the factory) During use When you transport the unit, turn the screw counterclockwise to secure the turntable. C cue-lever Use this lever to lift the tone arm. D tone arm holder Gently push the clamper to the right to release the tone arm. E speed selector Select the speed suitable for the record. F tone arm When you move the tone arm to inside, the turntable will begin to turn. G Cassette tape operation button PLAY (y) Use this button to play a tape. F.FWD (,) Use this button to fast-forward a tape. REW (m) Use this button to rewind a tape. STOP (H) Use this button to stop playing a tape. PAUSE (J) Use this button to suspend playing/recording temporarily. Never press the PLAY button (y) and REW button (m) at the same time. H Cassette holder Set a cassette tape with the exposed tape in front and the side to play facing up. I TAPE switch When playing a normal tape (type I), set the TAPE switch to NORMAL. When playing a chrome tape (type II) or metal tape (type IV), set the switch to HIGH. J 45 RPM adaptor When playing a 45 RPM large hole single record, use the adaptor. Slide the part of holding the adapter to the side. 12
-
 1
1 -
2
-
3
-
4
-
5
-
6
-
 7
7 -
 8
8 -
 9
9 -
 10
10 -
 11
11 -
 12
12 -
 13
13 -
 14
14 -
 15
15 -
 16
16 -
 17
17 -
18
-
19
-
20
-
21
-
22
-
23
-
24
-
25
-
26
-
27
-
28
-
29
-
30
-
31
-
32
-
33
-
34
-
35
-
36
-
37
-
38
-
39
-
40
-
41
-
42
-
43
-
44
-
45
-
46
-
47
-
48
-
49
-
50
-
51
-
52
-
53
-
54
-
55
-
56
-
57
-
58
-
59
-
60
-
61
-
62
-
63
-
64
-
65
-
66
-
67
-
68
-
69
-
70
-
71
-
72
-
73
-
74
-
75
-
76
-
77
-
78
-
79
-
80
-
81
-
82
-
83
-
84
-
85
-
86
-
87
-
88
-
89
-
90
-
91
-
92
-
93
-
94
-
95
-
96
 |
 |