TEAC SR-LX5i SR-LX5i Manual - Page 5
Remote Control Unit, Display, Battery Installation
 |
View all TEAC SR-LX5i manuals
Add to My Manuals
Save this manual to your list of manuals |
Page 5 highlights
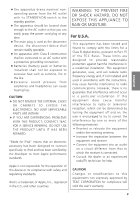
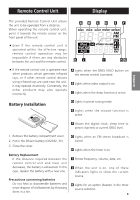
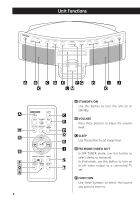
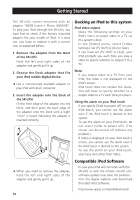
Remote Control Unit Display ENGLISH The provided Remote Control Unit allows the unit to be operated from a distance. When operating the remote control unit, point it towards the remote sensor on the front panel of the unit. AB CD E F < Even if the remote control unit is operated within the effective range, remote control operation may be impossible if there are any obstacles between the unit and the remote control. KJ I HG < If the remote control unit is operated near other products which generate infrared rays, or if other remote control devices using infrared rays are used near the unit, it may operate incorrectly. Conversely, the other products may also operate incorrectly. A Lights when the DBSS HI/LO button on the remote control is pressed. B Lights when video output is on. C Lights when the sleep function is active. Battery Installation D Lights in preset tuning mode. E Lights when the snooze function is active. F Shows the digital clock, sleep time or preset channels or current DBSS level. 1. Remove the battery compartment cover. 2. Put in the lithium battery (CR2032, 3V). 3. Close the cover. Battery Replacement If the distance required between the remote control unit and main unit decreases, the battery is exhausted. In this case, replace the battery with a new one. Precautions concerning batteries Do not heat or disassemble batteries and never dispose of old batteries by throwing them in a fire. G Lights when an FM stereo broadcast is tuned. H Lights when the timer is on. I Shows frequency, volume, date, etc. J When the unit is on, one of these indicators lights to show the current source. K Lights for an option (buzzer) in the timer source selection. 5
-
 1
1 -
 2
2 -
 3
3 -
 4
4 -
 5
5 -
 6
6 -
 7
7 -
 8
8 -
 9
9 -
 10
10 -
 11
11 -
12
-
13
-
14
-
15
-
16
-
17
-
18
-
19
-
20
-
21
-
22
-
23
-
24
-
25
-
26
-
27
-
28
-
29
-
30
-
31
-
32
-
33
-
34
-
35
-
36
-
37
-
38
-
39
-
40
-
41
-
42
-
43
-
44
-
45
-
46
-
47
-
48
-
49
-
50
-
51
-
52
-
53
-
54
-
55
-
56
-
57
-
58
-
59
-
60
-
61
-
62
-
63
-
64
 |
 |
