TP-Link Archer A20 Archer C4000US V3 Quick Installation Guide - Page 2
Need Help?, Access Point Mode, Change the Router's Settings, Set Up the Network
 |
View all TP-Link Archer A20 manuals
Add to My Manuals
Save this manual to your list of manuals |
Page 2 highlights
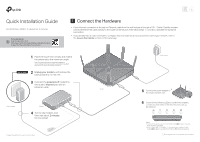
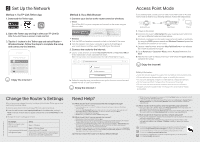
Set Up the Network Method 1: Via TP-Link Tether App 1. Download the Tether app. or Scan for Tether Tether 2. Open the Tether app and log in with your TP-Link ID. Note: If you don't have an account, create one first. 3. Tap the button in the Tether app and select Router > Wireless Router. Follow the steps to complete the setup and connect to the internet. Choose your device type Router Range Extender Archer AX11000 Archer C5400X Archer AX6000 Access Point Mode Method 2: Via a Web Browser 1. Connect your device to the router (wired or wireless). Wired Turn off the Wi-Fi on your computer and connect to the router using an Ethernet cable. Ethernet cable Wireless a Find the SSID and wireless password printed on the label of the router. b Click the network icon of your computer or go to Wi-Fi settings of your smart device, and then select the SSID to join the network. 2. Connect the router to the internet. a Launch a web browser, and enter http://tplinkwifi.net or http://192.168.0.1 in the address bar. Create a password to log in. Note: If the login window does not appear, please refer to Q1 of Need Help? in this guide. http://tplinkwifi.net If you already have a router, you can switch this new router to Access Point mode to extend your existing network. Follow the steps below. Internet Internet Ethernet1Ethernet2 Ethernet3Ethernet4 Ethernet Existing Router Ethernet4 Internet New Router Clients 1. Power on the router. 2. Connect the router's Internet port to your existing router's Ethernet port via an Ethernet cable as shown above. 3. Connect a computer to the router via an Ethernet cable or wirelessly by using the SSID (network name) and Wireless Password printed on the label at the bottom of the router. 4. Launch a web browser, and enter http://tplinkwifi.net in the address bar. Create a password to log in. 5. Go to Advanced > Operation Mode, select Access Point and click Save. 6. Wait for the router to reboot, then log in and follow the Quick Setup to complete the setup. Password Confirm Password Let's Get Started b Follow the step-by-step instructions to set up the internet connection and register for the TP-Link Cloud service. Safety Information • Keep the device away from water, fire, humidity or hot environments. • Do not attempt to disassemble, repair, or modify the device. • Do not use damaged charger or USB cable to charge the device. • Do not use any other chargers than those recommended. • Do not use the device where wireless devices are not allowed. • Adapter shall be installed near the equipment and shall be easily accessible. Change the Router's Settings After setup, you can change the router's settings via the intuitive Tether app, or via a web browser as shown below. 1. Connect your device to the router via an Ethernet cable or wirelessly. 2. Launch a web browser, enter http://tplinkwifi.net in the address bar, and log in. Note: If the login window does not appear, please refer to Q1 of Need Help? in this guide. 3. Change the router's settings as needed. To change: Wireless network name and password Login password of the web management page Go to: Basic > Wireless Basic > TP-Link Cloud (if you log in via TP-Link ID) Advanced > System Tools > Administration (if you log in via router's password) Need Help? Q1. What should I do if I cannot access the web management page? • Reboot your router and try again. • If the computer is set to a static IP address, change its settings to obtain an IP address automatically. • Verify that http://tplinkwifi.net is correctly entered in the web browser. Alternatively, enter http://192.168.0.1 or http://192.168.1.1 in the web browser and press Enter. • Use another web browser and try again. • Disable then re-enable the network adapter being used. Q2. What should I do if I cannot access the internet? • Reboot your modem and router, then try again. • Check if you have an internet connection by connecting a computer directly to the modem using an Ethernet cable. If you don't, contact your internet service provider. • Log in to the web management page of the router, and go to the Basic > Network Map page to check whether the internet IP address is valid or not. If it is not, check the hardware connection or contact your internet service provider. • For cable modem users, log in to the web management page of the router. Go to Advanced > Network > Internet > MAC Clone, click Use Current Computer MAC Address and click Save, then reboot both the modem and the router. Q3. How do I restore the router to its factory default settings? • While the router is powered on, press and hold the Reset button on the back until all LEDs go off, then release the button. • Log in to the web management page of the router. Go to Advanced > System Tools > Backup & Restore, and click Factory Restore. The router will restore and reboot automatically. Q4. What should I do if I forget my web management page password? • If you are using a TP-Link ID to log in, click Forgot password on the login page and then follow the instructions to reset the password. • Alternatively, press and hold the Reset button on the back until all LEDs go off to reset the router, and then visit http://tplinkwifi.net to create a new login password. Q5. What should I do if I forget my wireless network password? • If you haven't changed the default wireless password, it can be found on the product label at the bottom of the router. • If you have changed the default wireless password, log in to the router's web management page, and go to Basic > Wireless to obtain or reset your wireless password. For technical support, replacement services, user guides, and other information, please visit https://www.tp-link.com/support, or simply scan the QR code. To communicate with TP-Link users or engineers, please join the TP-Link Community at https://community.tp-link.com. If you have any suggestions or needs for our product guides, you are welcome to email [email protected]. ©2020 TP-Link 7106508769 REV1.1.1
-
 1
1 -
 2
2
 |
 |
