TP-Link Archer AX55 Archer AX55US V1 Quick Installation Guide - Page 1
TP-Link Archer AX55 Manual
 |
View all TP-Link Archer AX55 manuals
Add to My Manuals
Save this manual to your list of manuals |
Page 1 highlights
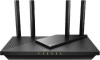
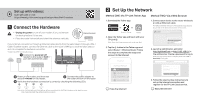
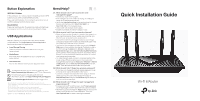
Set up with videos: Scan QR code or visit https://www.tp-link.com/support/setup-video/#wi-fi-routers 1 Connect the Hardware Unplug the power to turn off your modem, if any, and remove the backup battery if it has one. Place the router horizontally and orient the antennas vertically. Unplug the power Modem If your internet connection is through an Ethernet cable directly from the wall instead of through a DSL / Cable / Satellite modem, connect the Ethernet cable to the router's WAN port, and then follow steps 3 and 4 to complete the hardware connection. *Image may differ from actual product. 1 Connect the powered-off modem to the router's WAN port with an Ethernet cable. Internet 2 Power on the modem, and then wait about 2 minutes for it to restart. 3 Connect the power adapter to the router and turn on the router. 4 Verify that the hardware connection is correct by checking the following LEDs. Power 2.4GHz 5GHz Internet On On On On Note: If the 2.4GHz LED and 5GHz LED are off, press and hold the WPS/Wi-Fi button on the back for more than 2 seconds. Both the LEDs should turn solid on. 2 Set Up the Network Method ONE: Via TP-Link Tether App Method TWO: Via a Web Browser 1. Download the Tether app. or Scan for Tether Tether 2. Open the Tether app and log in with your TP-Link ID. Note: If you don't have an account, create one first. 1. Connect your device to the router wirelessly or with an Ethernet cable. The default wireless network names (SSIDs) and password are printed on the label at the bottom of the router. Model: Archer AX3000 AX3000 Gigabit Wi-Fi Router Wireless Password/PIN:XXXXXXXX SSID:TP-Link_XXXX SSID:TP-Link_XXXX_5G 3. Tap the button in the Tether app and select Router > Wireless Router. Follow the steps to complete the setup and connect to the internet. 2. Launch a web browser, and enter http://tplinkwifi.net or http://192.168.0.1 in the address bar. Create a password to log in. Note: If the login window does not appear, please refer to Q1 of Need Help? in this guide. http://tplinkwifi.net Choose your device type Router New Password: Confirm Password: Range Extender Archer AX6000 Let's Get Started 3. Follow the step-by-step instructions to set up the internet connection and register for the TP-Link Cloud service.
-
 1
1 -
 2
2
 |
 |