TP-Link Archer T4UH Archer T4UH V1 Quick Install Guide - Page 1
TP-Link Archer T4UH Manual
 |
View all TP-Link Archer T4UH manuals
Add to My Manuals
Save this manual to your list of manuals |
Page 1 highlights
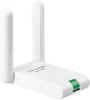
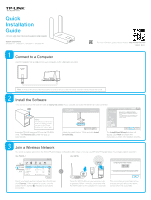
Quick Installation Guide AC1200 High Gain Wireless Dual Band USB Adapter WPS System requirement: Windows 8.1 Windows 8 Windows 7 Windows XP 1 Connect to a Computer Insert the adapter into a USB port on your computer via the USB cable provided. For more information, please visit our website: http://www.tp-link.com 7106504851 REV1.0.0 WPS B SS SS Note: In Windows XP, a Found New Hardware Wizard window will pop up after the adapter has been inserted. Please click Cancel. 2 Install the Software * You can also download the driver and Utility at www.tp-link.com/en/ if your computer can access the Internet via a wired connection. Note: If the Resource CD screen does not display, browse the files on the CD and double-click Autorun.exe. Insert the TP-LINK resource CD into the CD-ROM drive. The Resource CD screen will pop up automatically. Setup Wizard WPS Archer T4UH Install Driver&Utility User Guide Browse CD EXIT Select the model Archer T4UH and click Install Driver&Utility. TP-LINK Wireless Configuration Utility and Driver - InstallShield Wizard Welcome to the InstallShield Wizard for TP-LINK Wireless Configuration Utility and Driver The InstallShield Wizard will install TP-LINK Wireless Configuration Utility and Driver on your computer. To continue, click Next. < Back Next > Cancel The InstallShield Wizard window will appear, Click Next and follow the instructions to finish the installation process. 3 Join a Wireless Network You can join a wireless network from this TWCU (TP-LINK Wireless Configuration Utility) screen, or you can use WPS (Wi-Fi Protected Setup) if your wireless network supports it. Via TWCU: Via WPS: Network NaStatus WPS Network Name(SSID) TP-LINK_ATP-LINK_ABCDEF TP-LINK_123456 TP-LINK_ABC TP-LINK_1T2P3-LI4NK5_4656789 TP-LINK_D TP-LINK_123 Network Profile Advanced Security Channel WPA/WPA2-Personal 4 (2.4G) None 44 (5G) WPA/WPA2-Personal 13 (2.4G) None 7 (2.4G) None 149 (5G) WPA/WPA2-Personal 11 (2.4G) Signal Rescan Select your target wireless network from the list and click Connect. If the network is secure, enter its password.The symbol indicates a successful connection. or Configuring the wireless network. WPS B Press the WPS button on your wireless router or gateway. Within 2 minutes, press and hold the WPS button on the adapter for 3 seconds. Successfully connected to the network by WPS! OK The connection process takes a few minutes and you will see the above screen when it is successful.
-
 1
1
 |
 |