TP-Link RE350 RE350UN V1 Quick Install Guide - Page 2
Method TWO - login
 |
View all TP-Link RE350 manuals
Add to My Manuals
Save this manual to your list of manuals |
Page 2 highlights
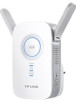
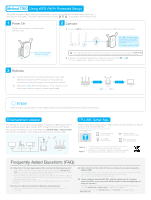
Method TWO Using WPS (Wi-Fi Protected Setup) Using WPS is an easier way to extend your host network. You are recommended to use this method if your host router has the WPS button. The button might look like one of these: WPS . If not, please refer to Method ONE. Power On Plug the extender into an electrical outlet near your router. Connect 1 Press the WPS button on your router, and then press the button on the extender. Press WPS The LED should change from blinking to a solid state, indicating a successful WPS connection. If not, please use Method ONE. Wait until the Power LED changes to solid blue. 1. Some ISP gateways disable the WPS function by default. If the WPS connection fails, please use Method ONE. 2. For more information about using WPS on your router, please refer to the router manufacturer's user guide. 2 If you are connecting the extender to a dual-band router but only or LED is on, repeat step 1 again to connect the other band. Relocate 1 Plug the extender into an electrical outlet between your router (Host Network) and the Wi-Fi "dead" zone. The location you choose must be within the range of your existing host network. 2 Wait until the LED is lit and solid blue. If not, relocate it closer to the router to achieve a good (or better) signal quality. Host Router Host Network Extended Network Extender Blue Ideal location Red Too far away Clients Enjoy! Both extended networks share the same SSIDs (network names) and passwords as those of your host networks. Entertainment Adapter The extender can be used as a wireless adapter to connect any Ethernet-only device (such as a Blu-ray player, game console, DVR, or smart TV) to your Wi-Fi network. First, connect the extender to your router referring to Method ONE or Method TWO, then connect the extender to your Ethernet-only device via an Ethernet cable. Smart TV Game Console Desktop Router TP-LINK Tether App TP-LINK Tether app provides a simple, intuitive way to access, manage your extender using your iOS or Android devices. Note: The AP mode of the extender is not supported by Tether. Tether Do initial configuration of your extender Turn off LEDs at a specific time Change the basic extended network settings Block network access from specific devices How to begin? 1. Scan the QR code or search the keywords "TP-LINK Tether" to download the app from the App Store or Play Store. 2. Ensure your smart device is wirelessly connected to the extender. 3. Launch the app and start managing your extended network. Frequently Asked Questions (FAQ) Q1. Why doesn't the login page appear after entering http://tplinkrepeater.net? · If your computer is wirelessly connected, please verify that you have connected to the extender's SSID. If your computer is connected via an Ethernet cable, please verify that the connection is stable. · Make sure your computer is set to obtain an IP address automatically. · Use the IP address to log in to the page. The default IP is 192.168.0.254. If the extender is connected to the host router, please go to the router's DHCP client list to obtain the extender's current IP address. · Please reset the extender and try again. If the problem still exists, please refer to the FAQs (NO.931&NO.504) at www.tp-link.com for detailed instructions. Q2. How do I restore the extender to its factory default settings? · While the extender is powered on, press and hold the Reset button until all the LEDs turn on momentarily. Q3. What should I do if the LED does not change to solid after completing Method ONE? · You may have entered the incorrect Wi-Fi password of your host network during the configuration. Please log into the extender's web-based interface to check the password and try again. · Reset the extender and go through the configuration again. Q4. I have enabled a wireless MAC filter, wireless access control, or access control list (ACL) on my host router. What should I do before configuring and using the extender? · If you have enabled those functions of your host router, you may need to disable them first. And then follow Method ONE or Method TWO to complete the configuration. For details, please refer to the Troubleshooting of the User Guide on the support page at www.tp-link.com.
-
 1
1 -
 2
2
 |
 |