TP-Link T1500G-10MPS T1500G-10MPSUN V1 User Guide - Page 199
History
 |
View all TP-Link T1500G-10MPS manuals
Add to My Manuals
Save this manual to your list of manuals |
Page 199 highlights
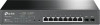
Owner: Status: Statistics Table Select: ID: Port: Owner: Status: Enter the owner name. Choose the status of statistics entry. • valid: The entry exists and is valid. • underCreation: The entry exists, but is not valid. Select the desired entry to delete the corresponding statistics entry. It's multi-optional. Displays the ID number of the statistics entry. Displays the Ethernet interface from which to collect the statistics. Displays the owner name. Displays the status of the statistics entry. 13.3.2 History On this page, you can configure the History Group for RMON. Choose the menu SNMP→RMON→History to load the following page. Figure 13-10 History Control The following entries are displayed on this screen: History Control Table Select: Select the desired entry for configuration. Index: Displays the index number of the entry. Port: Specify the port from which the history samples were taken. Interval: Specify the interval to take samplings from the port. Max Buckets: Displays the maximum number of buckets desired for the RMON 190
-
 1
1 -
2
-
3
-
4
-
5
-
6
-
7
-
8
-
9
-
10
-
11
-
12
-
13
-
14
-
15
-
16
-
17
-
18
-
19
-
20
-
21
-
22
-
23
-
24
-
25
-
26
-
27
-
28
-
29
-
30
-
31
-
32
-
33
-
34
-
35
-
36
-
37
-
38
-
39
-
40
-
41
-
42
-
43
-
44
-
45
-
46
-
47
-
48
-
49
-
50
-
51
-
52
-
53
-
54
-
55
-
56
-
57
-
58
-
59
-
60
-
61
-
62
-
63
-
64
-
65
-
66
-
67
-
68
-
69
-
70
-
71
-
72
-
73
-
74
-
75
-
76
-
77
-
78
-
79
-
80
-
81
-
82
-
83
-
84
-
85
-
86
-
87
-
88
-
89
-
90
-
91
-
92
-
93
-
94
-
95
-
96
-
97
-
98
-
99
-
100
-
101
-
102
-
103
-
104
-
105
-
106
-
107
-
108
-
109
-
110
-
111
-
112
-
113
-
114
-
115
-
116
-
117
-
118
-
119
-
120
-
121
-
122
-
123
-
124
-
125
-
126
-
127
-
128
-
129
-
130
-
131
-
132
-
133
-
134
-
135
-
136
-
137
-
138
-
139
-
140
-
141
-
142
-
143
-
144
-
145
-
146
-
147
-
148
-
149
-
150
-
151
-
152
-
153
-
154
-
155
-
156
-
157
-
158
-
159
-
160
-
161
-
162
-
163
-
164
-
165
-
166
-
167
-
168
-
169
-
170
-
171
-
172
-
173
-
174
-
175
-
176
-
177
-
178
-
179
-
180
-
181
-
182
-
183
-
184
-
185
-
186
-
187
-
188
-
189
-
190
-
191
-
192
-
193
-
 194
194 -
 195
195 -
 196
196 -
 197
197 -
 198
198 -
 199
199 -
 200
200 -
 201
201 -
 202
202 -
 203
203 -
 204
204 -
205
-
206
-
207
-
208
-
209
-
210
-
211
-
212
-
213
-
214
-
215
-
216
-
217
-
218
-
219
-
220
-
221
-
222
-
223
-
224
-
225
-
226
-
227
-
228
-
229
-
230
-
231
-
232
-
233
-
234
 |
 |
