TP-Link TL-PA4020PKIT TL-PA4020PKIT V1 Quick Install Guide 7106504568 - Page 1
TP-Link TL-PA4020PKIT Manual
 |
View all TP-Link TL-PA4020PKIT manuals
Add to My Manuals
Save this manual to your list of manuals |
Page 1 highlights
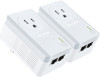
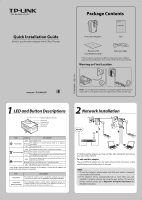
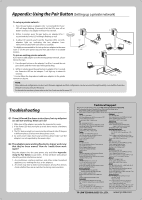
Quick Installation Guide AV500 2-port Powerline Adapter with AC Pass Through Package Contents Powerline Adapter * AV500 2-port Powerline Adapter with AC Pass Through TL-PA4020P QIG Resource CD ( For Windows Only ) Ethernet Cable * The provided power plug may di er from the picture due to di erent regional power speci cations. Here we take the EU version as an example. Warning on Final Location 7106504568 REV1.0.0 MODEL NO. TL-PA4020P NOTE: It's strongly recommended that you plug the adapter directly into the wall socket, for some power strips have surge protector which can lter data. 1 LED and Button Descriptions Integrated Electrical Socket Power LED Powerline LED Ethernet LED Pair Button Item Status Description Power LED Solid The adapter is on. Blinking The adapter is in power-saving mode or in procedure. pairing O The adapter is o . Solid The adapter is connected to a powerline network. Powerline LED Blinking The adapter is transferring data. The adapter isn't connected to any powerline network O or is in power-saving mode. * At least one Ethernet port is connected, but there is no Solid data being transferred. Ethernet LED Blinking At least one Ethernet port is transferring data. O No Ethernet port is connected. * Five minutes after the device connected to the adapter is turned o , the adapter will automatically switch to power-saving mode. Item Pair Button Integrated Electrical Socket Description Pair button is used to secure a powerline network. To secure your network, please refer to Appendix: Using the Pair Button. The integrated electrical socket allows additional devices or multiple sockets to be connected to the adapter just like to a normal wall socket. No electrical socket is lost. 2 Network Installation 5 4 2 1 3 Power LINE 1 2 3 4 TP-LINK powerline adapters are Plug and Play. After taking the steps above, you can surf the Internet. To add another adapter Plug an additional adapter into the wall socket, and the connection will be established automatically within 60 seconds. NOTE: 1. To surf the Internet, please make sure that your router is properly connected to the Internet. 2. If the adapters fail to automatically link to each other, you can establish a private network by using the pair button. To set up a private network, please go to Appendix: Using the Pair Button for detailed instructions.
-
 1
1 -
 2
2
 |
 |
