TP-Link TL-SF1024D User Guide - Page 11
Mounting Switch
 |
View all TP-Link TL-SF1024D manuals
Add to My Manuals
Save this manual to your list of manuals |
Page 11 highlights
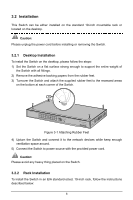
1) Secure the supplied rack-mounting brackets to each side of the Switch with supplied screws, as illustrated in the following figure. Figure 3-2 Attaching Brackets 2) After the brackets are attached to the Switch, use suitable screws (not provided) to secure the brackets to the rack, as illustrated in the following figure. Figure 3-3 Mounting Switch 3) Connect the Switch to network devices. 4) Supply power to the Switch with the provided power cord. Note: TL-SF1016DS and TL-SF1024D do not support rack installation. 7
-
 1
1 -
2
-
3
-
4
-
5
-
 6
6 -
 7
7 -
 8
8 -
 9
9 -
 10
10 -
 11
11 -
 12
12 -
 13
13 -
 14
14 -
 15
15 -
 16
16
 |
 |

7
1) Secure the supplied rack-mounting brackets to each side of the Switch with
supplied screws, as illustrated in the following figure.
Figure 3-2 Attaching Brackets
2) After the brackets are attached to the Switch, use suitable screws (not
provided) to secure the brackets to the rack, as illustrated in the following
figure.
Figure 3-3 Mounting Switch
3) Connect the Switch to network devices.
4) Supply power to the Switch with the provided power cord.
Note:
TL-SF1016DS and TL-SF1024D do not support rack installation.