TP-Link TL-SG1008D User Guide - Page 9
Installation - 8 port
 |
UPC - 845973020262
View all TP-Link TL-SG1008D manuals
Add to My Manuals
Save this manual to your list of manuals |
Page 9 highlights
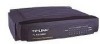
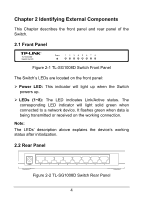
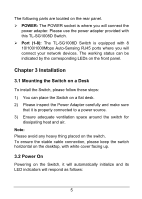
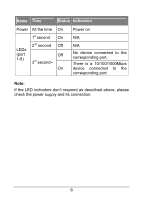
The following parts are located on the rear panel. ¾ POWER: The POWER socket is where you will connect the power adapter. Please use the power adapter provided with this TL-SG1008D Switch. ¾ Port (1-8): The TL-SG1008D Switch is equipped with 8 10/100/1000Mbps Auto-Sensing RJ45 ports where you will connect your network devices. The working status can be indicated by the corresponding LEDs on the front panel. Chapter 3 Installation 3.1 Mounting the Switch on a Desk To install the Switch, please follow these steps: 1) You can place the Switch on a flat desk. 2) Please inspect the Power Adapter carefully and make sure that it is properly connected to a power source. 3) Ensure adequate ventilation space around the switch for dissipating heat and air. Note: Please avoid any heavy thing placed on the switch. To ensure the stable cable connection, please keep the switch horizontal on the desktop, with white cover facing up. 3.2 Power On Powering on the Switch, it will automatically initialize and its LED indicators will respond as follows: 5
-
 1
1 -
2
-
3
-
 4
4 -
 5
5 -
 6
6 -
 7
7 -
 8
8 -
 9
9 -
 10
10 -
 11
11 -
 12
12
 |
 |