TP-Link TL-SG105 User Guide - Page 10
Installation
 |
View all TP-Link TL-SG105 manuals
Add to My Manuals
Save this manual to your list of manuals |
Page 10 highlights
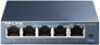
2.2 Rear Panel Figure 2-2 TL-SG108 Switch Rear Panel The following parts are located on the rear panel: Kensington Security Slot: The switch provides one security slot. Power socket: The power socket, located at the right side of the rear panel, is where you will connect the power adapter. Please use the power adapter provided with the TL-SG108 switch. Chapter 3 Installation The switch can be either located on a desktop or mounted on a wall. 3.1 Mounting the Switch on a Desk To locate the switch on a desktop, please follow these steps: 1) Place the switch on a flat desk. 2) Inspect the Power Adapter carefully and make sure that it is properly connected to a power source. 3) Ensure adequate ventilation space around the switch for dissipating heat and air. Note: Please avoid any heavy thing placed on the switch. 5
-
 1
1 -
2
-
3
-
4
-
 5
5 -
 6
6 -
 7
7 -
 8
8 -
 9
9 -
 10
10 -
 11
11 -
 12
12 -
 13
13 -
 14
14 -
 15
15 -
16
 |
 |
