TP-Link TL-WPA4220NET TL-WPA4220 V1 QIG EU - Page 1
TP-Link TL-WPA4220NET Manual
 |
View all TP-Link TL-WPA4220NET manuals
Add to My Manuals
Save this manual to your list of manuals |
Page 1 highlights
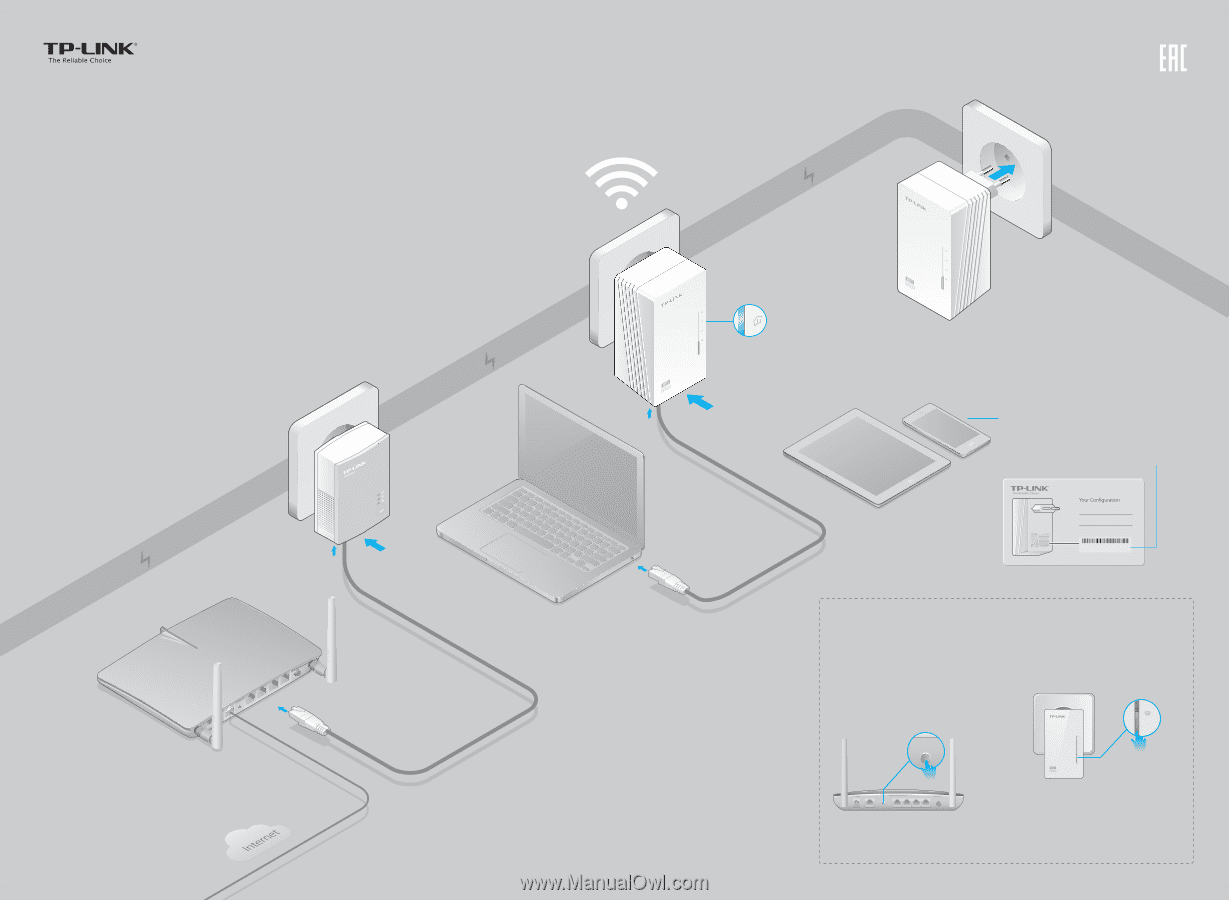
Quick Installation Guide Wi-Fi Powerline Extender Applicable to TL-WPA4220 and its multiple-pack kits (This QIG uses the powerline adapter TL-PA4010 as an example to work with TL-WPA4220.) 7106504934 REV4.0.2 Plug and Play Set Up a New Wireless Network Powerline Router TL-PA4010 2 LAN WAN 1 TL-WPA4220 Wait until the powerline LED turns on. 3 More: To add additional Wi-Fi powerline device (TL-WPA4220 or others), use the same setup procedure as the TL-WPA4220. 4 Enjoy! Select Wi-Fi Name (SSID): TP-LINK_XXXXXX Enter Wi-Fi Password: XXXXXXXX Customized Wireless Network Name: Customized Wireless Password: Model No. TL-WPA4220 Default Wireless Settings Wi-Fi Name(SSID): TP-LINK_XXXXXX Wi-Fi Password: XXXXXXXX Wi-Fi Information Card included in the package Unify Your Wireless Network via Wi-Fi Clone (Optional) Set your extender(s) settings to your router's wireless network name and password. 1 Plug in your extender next to your router (with WPS enabled). 3 Press the Wi-Fi Clone button. 2 Press the WPS button. WAN WPS LAN Will blink slowly for a few seconds WAN WPS LAN 4 Done. The extender's wireless network name and password will now be the same as your router's. Note: If Wi-Fi Clone succeeds, relocate the extender to your chosen position. If it fails, use "Customize the Extender's Wireless Settings" on the back instead.
-
 1
1 -
 2
2
 |
 |