TRENDnet TE100-MP2U User's Guide - Page 60
NetUSB Scanning
 |
UPC - 710931204209
View all TRENDnet TE100-MP2U manuals
Add to My Manuals
Save this manual to your list of manuals |
Page 60 highlights
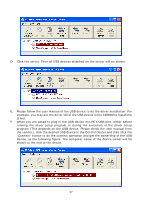
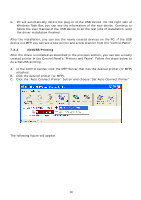
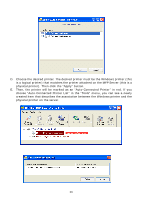
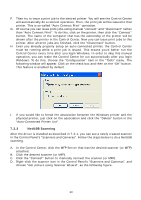
F. Then try to issue a print job to the desired printer. You will see the Control Center will automatically do a connect operation. Then, the print job will be issued to that printer. This is so-called "Auto Connect Print" operation. G. Of course you can issue print jobs using manual "connect" and "disconnect" rather than "Auto Connect Print". To do this, click on the printer, then click the "Connect" button. The name of the computer that has the ownership of the printer will be shown after the printer in the Control Center. Now you can issue print jobs to this printer. After all print jobs are finished, click the "Disconnect" button. H. Even you already properly setup an auto-connected printer, the Control Center must be running while a print job is issued. This means you'd better run the Control Center every time after you login Windows. In order to skip this manual operation, you can make the Control Center be run automatically after you login Windows. To do this, choose the "Configuration" item in the "Tools" menu. The following window will appear. Click on the check box and then on the "OK" button. This feature is enabled by default. I. If you would like to break the association between the Windows printer and the physical printer, just click on the association and click the "Delete" button in the "Auto-Connected Printer List". 7.3.3 NetUSB Scanning After the driver is installed as described in 7.3.1, you can see a newly created scanner in the Control Panel's "Scanners and Cameras". Follow the steps below to do a NetUSB scanning. A. In the Control Center, click the MFP Server that has the desired scanner (or MFP) attached. B. Click the desired scanner (or MFP). C. Click the "Connect" button to manually connect the scanner (or MFP). D. Right-click the scanner icon in the Control Panel's "Scanners and Cameras", and choose "Get picture using Scanner Wizard", as the following figure. 60
-
 1
1 -
2
-
3
-
4
-
5
-
6
-
7
-
8
-
9
-
10
-
11
-
12
-
13
-
14
-
15
-
16
-
17
-
18
-
19
-
20
-
21
-
22
-
23
-
24
-
25
-
26
-
27
-
28
-
29
-
30
-
31
-
32
-
33
-
34
-
35
-
36
-
37
-
38
-
39
-
40
-
41
-
42
-
43
-
44
-
45
-
46
-
47
-
48
-
49
-
50
-
51
-
52
-
53
-
54
-
 55
55 -
 56
56 -
 57
57 -
 58
58 -
 59
59 -
 60
60 -
 61
61 -
 62
62 -
 63
63 -
 64
64 -
 65
65 -
66
-
67
-
68
-
69
-
70
-
71
-
72
-
73
-
74
-
75
-
76
-
77
-
78
-
79
-
80
-
81
-
82
-
83
-
84
-
85
-
86
-
87
-
88
-
89
-
90
-
91
 |
 |
