TRENDnet TE100-MP2U Quick Installation Guide - Page 10
Printing - setup
 |
UPC - 710931204209
View all TRENDnet TE100-MP2U manuals
Add to My Manuals
Save this manual to your list of manuals |
Page 10 highlights
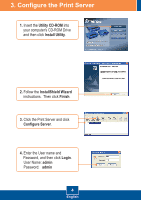
5. Printing Note: 1. For LPR, IPP and Manual connect printing instructions, please refer to the User Guide. The User Guide is included on the Utility CD-ROM. 2. A computer using LPR or IPP printing and a computer using NetUSB printing can not print documents to the same printer simultaneously. Setup for Auto Connect Printing Note: Only one user can print at a time in Auto Connect mode. Once a user has finished printing, another user can print or scan to the printer. 1. Select the printer. Click AutoConnect Printer and click Set AutoConnect Printer 2. Select the desired printer or fax and click Apply. 3. The USB MFP Server Control Center will now show the printer as an AutoConnected Printer. 8 English
-
 1
1 -
2
-
3
-
4
-
 5
5 -
 6
6 -
 7
7 -
 8
8 -
 9
9 -
 10
10 -
 11
11 -
 12
12 -
 13
13 -
 14
14 -
 15
15 -
16
-
17
-
18
-
19
 |
 |

English
8
5. Printing
Note:
1.
For LPR, IPP and Manual connect printing instructions, please refer to the
User Guide.
The User Guide is included on the Utility CD-ROM.
2.
A computer using LPR or IPP printing and a computer using NetUSB printing
can not print documents to the same printer simultaneously.
Setup for Auto Connect Printing
1.
Select the printer.
Click
AutoConnect Printer
and click
Set AutoConnect Printer
2.
Select the desired printer or fax
and click
Apply
.
Note: Only one user can print at a time in Auto Connect mode.
Once a user
has finished printing, another user can print or scan to the printer.
3.
The USB MFP Server Control
Center will now show the printer as
an
AutoConnected Printer
.