TRENDnet TEG-240WS Quick Installation Guide - Page 4
Hardware Installation - password
 |
UPC - 710931501575
View all TRENDnet TEG-240WS manuals
Add to My Manuals
Save this manual to your list of manuals |
Page 4 highlights
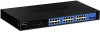
2. Hardware Installation Note: After hardware installation is complete, use the Web-based Smart Utility to configure the TEG-160WS/TEG-240WS. To access the Web-based Smart Utility, open your web browser, and enter the default IP Address http://192.168.0.1 and default password "admin". Make sure your computer and the TEG-160WS/TEG-240WS are configured to the same network segment. 1. Connect the Power Cord to the rear of the TEG-160WS/ TEG-240WS and then to a power outlet. 2. Connect a CAT-5 RJ-45 network cable from the computer to an available Ethernet port of the TEG-160WS/TEG-240WS. 2 English
-
 1
1 -
 2
2 -
 3
3 -
 4
4 -
 5
5 -
 6
6 -
 7
7 -
 8
8 -
 9
9
 |
 |

2. Hardware Installation
English
2
2.
Connect a CAT-5 RJ-45 network
cable from the computer to an
available Ethernet port of the
TEG-160WS/TEG-240WS.
1.
Connect the
Power Cord
to the
rear of the TEG-160WS/
TEG-240WS
and then to a power
outlet.
Note: After hardware installation is complete, use the Web-based Smart Utility
to configure the TEG-160WS/TEG-240WS. To access the Web-based Smart
Utility, open your web browser, and enter the default IP Address
and default password "admin". Make sure your computer
and the TEG-160WS/TEG-240WS are configured to the same network
segment.