TRENDnet TEW-821DAP2KAC Users Guide - Page 6
Basic Installation & Setup, Access Point Compatibility, A. Initial Controller Setup
 |
View all TRENDnet TEW-821DAP2KAC manuals
Add to My Manuals
Save this manual to your list of manuals |
Page 6 highlights
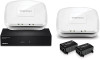
TRENDnet User's Guide Basic Installation & Setup Important Note: Make sure your existing network is using a DHCP server to distribute IP addresses to the access points. By default, TRENDnet access points listed below will obtain an IP address automatically through DHCP or otherwise default back to 192.168.10.100 / 255.255.255.0 if a DHCP server is not available on your network. Each access point must be assigned a unique IP address on the same network. The wireless controller and access points must be connected to the same IP subnet on your network. (e.g. 192.168.10.x / 255.255.255.0) Access Point Compatibility By default, the access points included in this kit are controller ready. For any additional access points, please refer to the access point model compatibility list below and controller compatible firmware version. You can download the access point's firmware from http://www.trendnet.com/support which include instructions on how to upgrade the firmware. Before any additional access points are added to the wireless controller, make sure to reset the access points to factory default. Access Point Model TEW-755AP TEW-821DAP TEW-825DAP Description N300 PoE Access Point AC1200 Dual Band PoE Access Point AC1750 Dual Band PoE Access Point Controller Compatible Firmware Version 1.03 or above 1.05 or above 1.01 or above TEW-755AP2KAC / TEW-821DAP2KAC A. Initial Controller Setup Note: Before connecting the wirele4ss controller to the network and connecting other devices such as PoE injectors or access points, follow the steps to set up your controller IP address settings and administrator password first. 3. Assign a static IP address to your computer's network adapter in the subnet of 192.168.10.x (e.g. 192.168.10.25) and a subnet mask of 255.255.255.0. 4. Open your web browser, and type in the default IP address of the controller in the address bar, and then press Enter. The default IP address is 192.168.10.200. © Copyright 2017 TRENDnet. All Rights Reserved. 4
-
 1
1 -
 2
2 -
 3
3 -
 4
4 -
 5
5 -
 6
6 -
 7
7 -
 8
8 -
 9
9 -
 10
10 -
 11
11 -
 12
12 -
13
-
14
-
15
-
16
-
17
-
18
-
19
-
20
-
21
-
22
-
23
-
24
-
25
-
26
-
27
-
28
-
29
-
30
-
31
-
32
-
33
-
34
-
35
-
36
-
37
-
38
-
39
-
40
-
41
-
42
-
43
-
44
-
45
-
46
-
47
-
48
-
49
-
50
-
51
-
52
 |
 |
