TRENDnet TEW-MP2U Quick Installation Guide - Page 7
Print Server configuration is now complete. - setting up a
 |
UPC - 710931600162
View all TRENDnet TEW-MP2U manuals
Add to My Manuals
Save this manual to your list of manuals |
Page 7 highlights
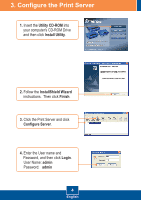
5. Click TCP/IP. Assign the Print Server a Static IP address and then click Apply. Note: The IP Address must match the same network segment as your computer. 6. Click Yes to restart the Print Server. 7. Cllick Close. Note: For the TEW-MP2U, proceed to section 5. Print Server configuration is now complete. For detailed information regarding the TE100-MP1U/TE100-MP2U configuration and advanced settings, please refer to the User's Guide on the Utility CD-ROM or TRENDnet's website at www.trendnet.com Register Your Product To ensure the highest level of customer service and support, please take a moment to register your product Online at: www.TRENDnet.com/register Thank you for choosing TRENDnet 5 English
-
 1
1 -
 2
2 -
 3
3 -
 4
4 -
 5
5 -
 6
6 -
 7
7 -
 8
8 -
 9
9 -
 10
10 -
 11
11 -
 12
12 -
13
-
14
-
15
-
16
-
17
-
18
-
19
 |
 |

Print Server configuration is now complete.
For detailed information regarding the TE100-MP1U/TE100-MP2U
configuration and advanced settings, please refer to the User's Guide on the
Utility CD-ROM or TRENDnet's website at www.trendnet.com
5.
Click
TCP/IP
.
Assign the Print
Server a Static IP address and
then click
Apply
.
Note: The IP Address must match
the same network segment as your
computer.
7.
Cllick
Close
.
6.
Click
Yes
to restart the Print
Server.
Note: For the TEW-MP2U, proceed to section 5.
Register Your Product
To ensure the highest level of customer service and support, please take a moment to
register your product Online at:
www.TRENDnet.com/registe
r
Thank you for choosing TRENDnet
English
5