TRENDnet TV-IP314PI Quick Installation Guide - Page 11
Mounting the camera
 |
View all TRENDnet TV-IP314PI manuals
Add to My Manuals
Save this manual to your list of manuals |
Page 11 highlights
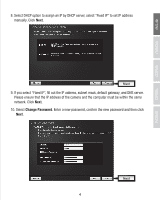
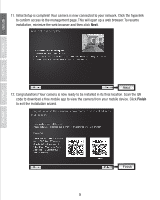
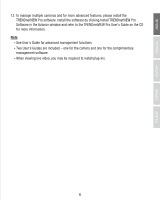
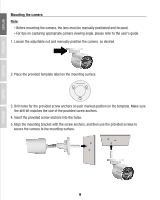
ENGLISH FRANÇAIS DEUTSCH Mounting the camera Note: Ÿ Before mounting the camera, the lens must be manually positioned and focused. Ÿ For tips on capturing appropriate camera viewing angle, please refer to the user's guide. 1. Loosen the adjustable nut and manually position the camera as desired. 2. Place the provided template label on the mounting surface. Ceiling Mounting Hole Hole Hole 3. Drill holes for the provided screw anchors at each marked position on the template. Make sure the drill bit matches the size of the provided screw anchors. 4. Insert the provided screw anchors into the holes. 5. Align the mounting bracket with the screw anchors, and then use the provided screws to secure the camera to the mounting surface. ESPAÑOL 9
-
 1
1 -
2
-
3
-
4
-
5
-
 6
6 -
 7
7 -
 8
8 -
 9
9 -
 10
10 -
 11
11 -
 12
12 -
 13
13 -
 14
14 -
 15
15 -
 16
16
 |
 |

ENGLISH
FRANÇAIS
DEUTSCH
ESPAÑOL
РУССКИЙ
9
Note:
1. Loosen the adjustable nut and manually position the camera
as desired.
2. Place the provided template label on the mounting surface.
Ceiling Mounting
Hole
Hole
Hole
3. Drill holes for the provided screw anchors at each marked position on the template. Make sure
the drill bit matches the size of the provided screw anchors.
4. Insert the provided screw anchors into the holes.
5. Align the mounting bracket with the screw anchors, and then use the provided screws to
secure the camera to the mounting surface.
Mounting the camera
Ÿ
Before mounting the camera, the lens must be manually positioned and focused.
Ÿ
For tips on capturing appropriate camera viewing angle, please refer to the user's guide.