TRENDnet TV-IP320PI Quick Installation Guide - Page 9
Insert the provided screw anchors into the holes.
 |
View all TRENDnet TV-IP320PI manuals
Add to My Manuals
Save this manual to your list of manuals |
Page 9 highlights
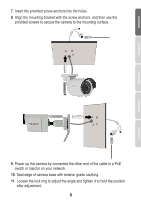
7. Insert the provided screw anchors into the holes. 8. Align the mounting bracket with the screw anchors, and then use the provided screws to secure the camera to the mounting surface. 9. Power up the camera by connected the other end of the cable to a PoE switch or injector on your network. 10. Seal edge of camera base with exterior grade caulking. 11. Loosen the lock ring to adjust the angle and tighten it to hold the position after adjustment. 8
-
 1
1 -
2
-
3
-
 4
4 -
 5
5 -
 6
6 -
 7
7 -
 8
8 -
 9
9 -
 10
10 -
 11
11 -
 12
12 -
 13
13 -
 14
14
 |
 |

8
9
. Power up the camera by connected the other end of the cable to a PoE
switch or injector on your network.
10
. Seal edge of camera base with exterior grade caulking.
11
. Loosen the lock ring to adjust the angle and tighten it to hold the position
after adjustment.
7
. Insert the provided screw anchors into the holes.
8
. Align the mounting bracket with the screw anchors, and then use the
provided screws to secure the camera to the mounting surface.