Tanaka HTS-2530PF Parts List - Page 15
Technical Service, Bulletin Number Pi 3119
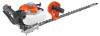 |
View all Tanaka HTS-2530PF manuals
Add to My Manuals
Save this manual to your list of manuals |
Page 15 highlights
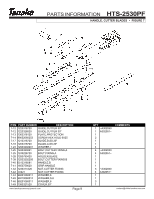
TECHNICAL SERVICE BULLETIN NUMBER PI 3119 Date: January, 2002 Model & Serial: All THT, HTD, HTS, TPH hedgetrimmer models. All units after serial number Y004401 Reason: All future production of hedgetrimmer models will utilize a blade-retaining nut that is of the locking variety. These nuts are oblong on one side to prevent loosening during use, but can be removed and re-installed without losing their locking ability. When adjusting blade-fastening hardware, thread the bolt (18) through the blades and guide bar from the bottom, to a point where the flat washer (17), is still able to rotate, (usually to seat, and then backed off between 1⁄4 and 1⁄2 revolution). Then install the lock nuts on the topside, tightening them while holding the bolt in place. Tighten all nuts, and then re-check for adjustment prior to operation. A lubricating agent, such as WD-40 should also be used to prevent sap build-up and premature wear. Part Number Changes: Old Part # New Part # Description 123-33202-200 123-3317A-20 Lock Nut Remarks Reference #19 Nikko Tanaka Engineering U.S.A. ,Ltd.• 1028 4th Street SW, Bldg B • Auburn, WA 98001 • Phone: (253) 333-1200 • Fax: (253) 333-1212
-
 1
1 -
2
-
3
-
4
-
5
-
6
-
7
-
8
-
9
-
 10
10 -
 11
11 -
 12
12 -
 13
13 -
 14
14 -
 15
15 -
 16
16 -
 17
17
 |
 |
