Tanaka TPH-210 Owner's Manual - Page 2
Introduction, WARNING, DANGER, Assembly, procedures, Trimming, techniques
 |
View all Tanaka TPH-210 manuals
Add to My Manuals
Save this manual to your list of manuals |
Page 2 highlights
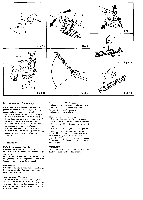
En Meanings of symbols or labels. 8 Les significatoins des symboles ou des etiquettes. O I significati dei simboli o delle etichette. O Die Bedeutungen der Kurzzeichen oder der Bezeichnungsschilder. 0 Los significados de los simbolos o del las etiquetas. Q Betydelser av symboler eller etiketter (Ow S It is important that you read, fully understand and observe the following safety precautions and warnings. Careless or improper use of the unit may cause serious or fatal injury. 8 II est essentiel que vous lisiez et compreniez parfaitement les consignes de securites suivantes et autres avertissements et que vous les observiez strictement. L'utilisation inattentive ou inadequate de cette unite risque de provoquer des blessures graves ou fatales. 0 E importante leggere, comprendere a fondo e osservare le seguenti precauzioni di sicurezza e awertenze. Disattenzione o un uso improprio dell'unita possono causare lesioni gravi o fatali. Es importante que usted lea, entienda totalmente y observe las siguientes precauciones y advertencias de seguridad. El uso descuidado o incorrecto de la unidad podra causarle lesiones serias o fatales. Det ar viktigt att du noggrant laser i bruksanvisningen far att fullt forsta och folja farsiktighetsmatten for sakerhet och varningarna. Om apparaten anvands slarvigt eller pa nagot olampligt salt kan det medfora en allvarlig skada. CD Es ist wichtig, daB Sie sich mit den nachfolgenden VorsichtsmaBnahmen und Warnungen vertraut machen und diese befolgen. Unvorsichtige oder unsachgemaBe Handhabung dieses Gerates kann zu schweren oder sogar lebensgefahrlichen Verletzungen fuhren. 1. Introduction It is important that you read and understand your TANAKA brush cutter owner's manual as well as this manual. Please carefully review and observe ail safety precautions and warnings. Careless or improper use of the unit may cause serious or fatal injuries. This pole trimmer attachment has been designed for certain TANAKA brush cutters. NOTE! Do not use this attachment on the brush cutters with over 26 ml (cc) engines. SAFE OPERATION WARNING A DANGER All overhead electrical conductors and communications wires can have electricity flow with high voltages. Never touch wires directly or indirectly when trimming, otherwise serious injury or death may result. CAUTION! • Always wear gloves during operation or maintenance. • Review the area to be trimmed. Look for hazards that could contribute to unsafe conditions. DO NOT operate unit if any wires(power, telephone, cable, etc.) are closer than 15M (50ft.) to any part of the operator or unit. (Fig.1-1) • Spectator and fellow workers must be warned, and children and animals prevented from coming nearer than 15M (50ft.) while the pole trimmer is in use. (Fig.1-2) • Avoid all power lines. This unit is not insulated against electrical current. • Always wear head protection with full face shield to help protect against falling branches and debris. (Fig.1-2) 2. Assembly procedures Installation of cutting attachment (Fig. 2-1) 1. Remove angle transmission from your brush cutter. 2. Join the attachment in place of it. NOTE! If your brush cutter tube is 26mm diameter, remove bracket collar B (4) from the attachment. 3. Make sure the locking bolt (1) fits in the location hole (2) of tube and that the tube will not come off. 4. Tighten the clamp bolt (3) securely. Installation of support handle (1) (Fig.2-2) 1. Remove 2pcs of hex. hole screw (2) from gear case. 2. Install support handle (1) onto gear case by removed hex. hole screws (2). Then tighten hex. hole screws securely. 71\ WARNING! During operation, hold the unit firmly with both hands. A single hand operation may cause serious injury. Adjustment of blade angle (Fig. 2-3, 4) 71.\ WARNING! Always stop engine before making adjustments. Never touch the blade when adjusting blade angle. Hold the support handle (3) instead. I. Stop the engine. 2. Loosen handle knob (1) slightly so that the support handle (3) slides. 3. Adjust the blade angle to desired position by holding the support handle (3). 4. Then, finger-tighten the handle knob (1) securely. 3. Trimming techniques This attachment is designed for trimming hedges and small branches. Follow these tips for successful operation. • Plan cut carefully. Check direction branch will fall. • Long branches should be trimmed in several pieces. • Do not stand directly beneath branch being cut. • Apply a light cutting pressure. • Ease cutting pressure when nearing end of cut to maintain control.
-
 1
1 -
 2
2 -
 3
3 -
 4
4 -
 5
5 -
 6
6 -
 7
7 -
 8
8
 |
 |
