Tecumseh Products LV148EA Operator Manual - Page 21
Servicing Paper Filters, Removal and Installation-Type A Air Cleaner, Removal and Installation-
 |
View all Tecumseh Products LV148EA manuals
Add to My Manuals
Save this manual to your list of manuals |
Page 21 highlights
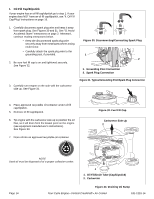
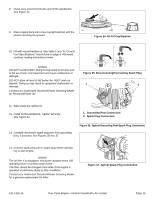
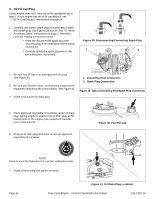
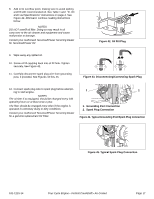
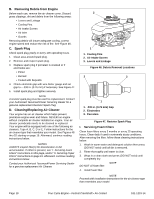
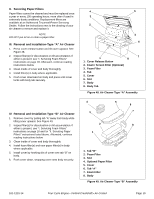
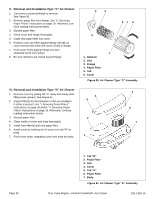
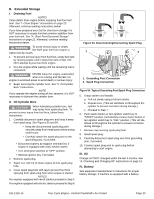
II. Servicing Paper Filters Paper filters cannot be cleaned and must be replaced once a year or every 100 operating hours; more often if used in extremely dusty conditions. Replacement filters are available at an Authorized TecumsehPower Servicing Dealer. Follow the instructions next to the drawing of your air cleaner to remove and replace it. NOTE DO NOT put oil on or clean a paper filter. III. Removal and Installation-Type "A" Air Cleaner 1. Press cover release button and lift cover upward. See Figure 48. 2. Inspect filter(s) for discoloration or dirt accumulation. If either is present, see "I. Servicing Foam Filters" instructions on page 18. Afterward, continue reading instructions below. 3. Clean inside of cover and body thoroughly. 4. Install filter(s) in body where applicable. 5. Push cover downward on body and press until cover locks with body tab securely. IV. Removal and Installation-Type "B" Air Cleaner 1. Remove cover by pulling tab "A" away from body while lifting cover upward. See Figure 49. 2. Inspect filter(s) for discoloration or dirt accumulation. If either is present, see "I. Servicing Foam Filters" instructions on page 18 and /or "II. Servicing Paper Filters" instructions listed above. Afterward, continue reading instructions below. 3. Clean inside of cover and body thoroughly. 4. Install foam filter(s) and new paper filter(s) in body where applicable. 5. Install cover by hooking slot of cover over tab "B" on body. 6. Push cover down, snapping cover onto body securely. 4 5 3 2 4 6 1 1. Cover Release Button 7 8 2. Foam / Screen Filter (Optional) 3. Foam Filter 4. Tab 5. Cover 6. Slot 7. Body 8. Body Tab Figure 48. Air Cleaner Type "A" Assembly 4 5 6 3 7 2 8 1 1. Tab "B" 2. Foam Filter 3. Slot 4. Optional Paper Filter 5. Cover 6. Tab "A" 7. Foam Filter 8. Body Figure 49. Air Cleaner Type "B" Assembly 181-1215-14 Four-Cycle Engine • Vertical Crankshaft • Air-Cooled Page 19
-
 1
1 -
2
-
3
-
4
-
5
-
6
-
7
-
8
-
9
-
10
-
11
-
12
-
13
-
14
-
15
-
 16
16 -
 17
17 -
 18
18 -
 19
19 -
 20
20 -
 21
21 -
 22
22 -
 23
23 -
 24
24 -
 25
25 -
 26
26 -
27
-
28
-
29
-
30
-
31
-
32
 |
 |
