Tecumseh Products TM049 Operator Manual - Page 7
Filling Fuel Tank, Check the Following Equipment - tm049xa engine
 |
View all Tecumseh Products TM049 manuals
Add to My Manuals
Save this manual to your list of manuals |
Page 7 highlights
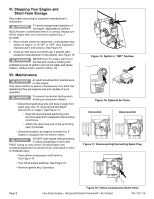
B. Filling Fuel Tank WARNING An adult should fuel this engine. NEVER allow children to refuel this engine. Gasoline (fuel) vapors are highly flammable and can explode. Fuel vapors can spread and be ignited by a spark or flame many feet away from engine. To prevent injury or death from fuel fires, follow these instructions: 1. Stop engine and allow it to cool before refueling. 2. Be sure engine is outdoors and in a well-ventilated area. 3. Clean area around fuel fill cap and remove fuel fill cap. See Figure 7. NOTE For recommended mixture ratios of fuel and oil, see Tables 1, 2 and 3. See "A. Mixing Fuel and Oil" instructions on page 4. 4. Using an approved red GASOLINE container, add fuel mixture slowly, being careful to avoid spilling. DO NOT overfill fuel tank. Leave space in the tank to allow fuel to expand without overflowing. 5. Replace fuel fill cap securely and wipe up spilled fuel mixture before starting engine. If fuel mixture is spilled DO NOT start engine. Move machine away from area of spillage. Avoid creating any source of ignition until fuel vapors are gone. NOTE Replace a damaged or missing fuel fill cap only with a genuine Tecumseh replacement fuel fill cap. Failure to do so may VOID YOUR WARRANTY. See Figure 8. C. Check the Following Equipment 1. Be sure any ignition switch on engine or equipment is in "ON", "RUN", or "START" position. See Figure 7 and Figure 9. 2. Be sure you push yellow compression relief valve in. See Figure 12, on page 6. 3. Be sure air vent on fuel cap is free of debris. Be sure air vent screw, if present (see equipment manufacturer's instructions), on fuel cap is open. See Figure 8. 5 2 3 4 1 10 9 8 7 6 1. Muffler 2. Muffler Guard 3. Starter Cord Handle 4. Fuel Tank 5. Fuel Fill Cap 6. Air Cleaner 7. Optional ON/OFF Switch 8. Yellow Compression Relief Valve 9. Spark Plug Cap 10. Spark Plug Wire Figure 7. Engine Model TM049XA I + Figure 8. Optional Air Vents 181-1277-14 Figure 9. Optional ON/OFF Switch Two-Cycle Engine • Horizontal/Vertical Crankshaft • Air-Cooled Page 5
-
 1
1 -
 2
2 -
 3
3 -
 4
4 -
 5
5 -
 6
6 -
 7
7 -
 8
8 -
 9
9 -
 10
10 -
 11
11 -
 12
12 -
13
-
14
-
15
-
16
-
17
-
18
-
19
-
20
-
21
-
22
-
23
-
24
 |
 |
