Thermador CIT36YWBB Installation Instructions - Page 9
Checking the installation, Removing the appliance, Customer service
 |
View all Thermador CIT36YWBB manuals
Add to My Manuals
Save this manual to your list of manuals |
Page 9 highlights
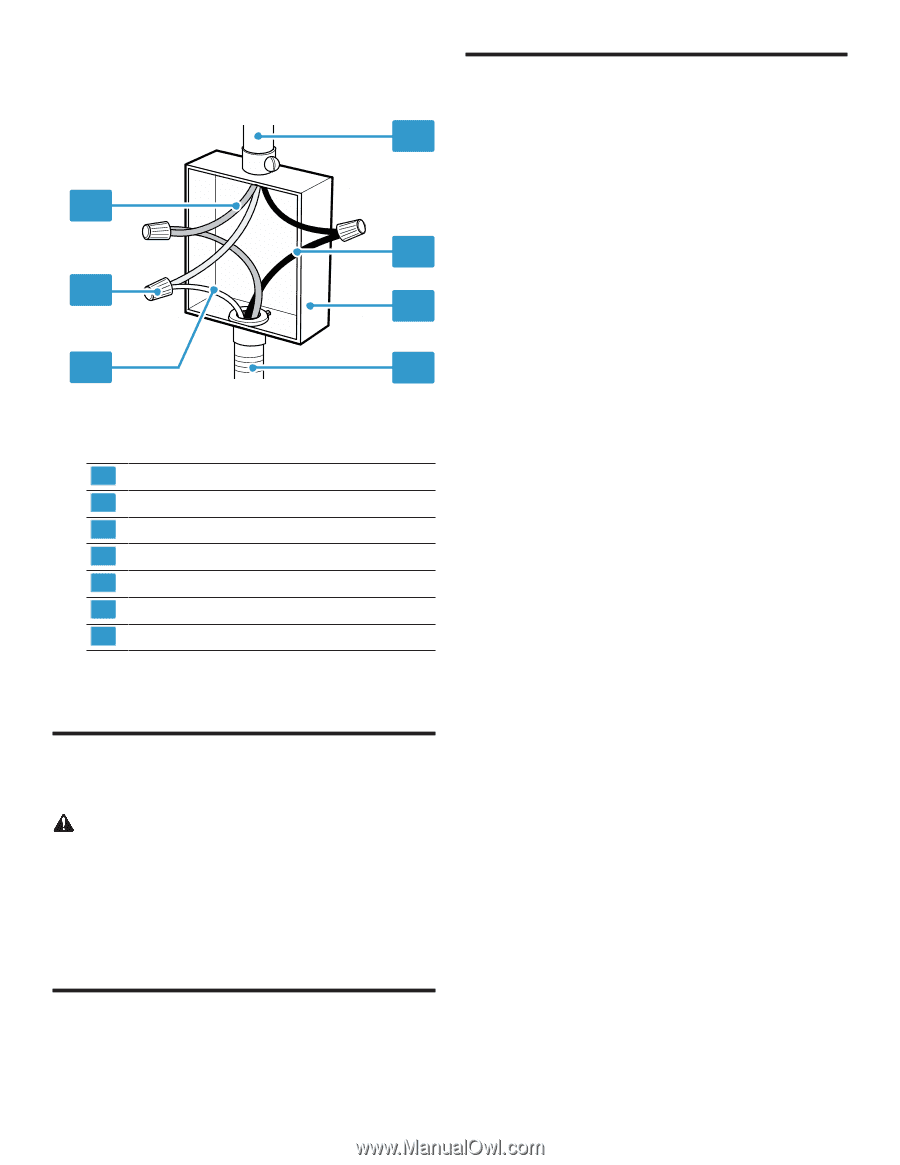
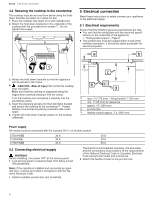
3. Connect the lead wires to the junction box supply wires in proper phase. 4 1 5 2 6 3 7 1 Red wires 2 UL listed wire connectors 3 Green (or bare) ground wire (from appliance) 4 Cable from home power supply 5 Black wires 6 Junction box 7 Flexible conduit from appliance - Black (L1) to black - Red (L2) to red - Green or bare to ground Checking the installation 6 Checking the installation Checking the installation Check if your unit is working properly after you have completed the installation steps. WARNING Before you turn on power supply, make sure all controls are in the OFF position. 1. Remove everything from the cooktop surface including stickers. 2. Clean the cooktop surface with cooktop cleaning cream. 3. Switch on the circuit breaker. 4. Verify that all cooking zones function properly. Checking the installation en-us Customer service 8 Customer service Customer service If you have any questions on use, are unable to eliminate an issue in the appliance yourself, or the appliance needs to be repaired, please contact our Customer Service. We will work to find an appropriate solution for you thereby avoiding unnecessary visits by a service provider. With any warranty repair, we will make sure your appliance is repaired by a trained authorized service provider using genuine replacement parts. We use only genuine replacement parts for all repairs. Detailed information on the warranty period and terms of warranty can be found in the Statement of Limited Product Warranty, from your retailer, or on our website. If you contact the Customer Service, you will require the model number (E-Nr.) and the production number (FD) of your appliance. USA: 1-800-735-4328 www.thermador.com/support www.store.thermador.com/us CA: 1-800-735-4328 www.thermador.ca For assistance with connecting to Home Connect™, you can also view instructions here: www.home-connect.com/us/en/help-support/set-up 8.1 Model number (E-Nr.) and production number (FD) You can find the model number (E-Nr.) and the production number (FD) on the appliance's rating plate. The rating plate can be found: ¡ On the appliance certificate. ¡ on the underside of the cooktop. The model number (E-Nr.) can also be found on the glass ceramic. You can also display the customer service index (KI) and the production number (FD) in the Basic settings. Making a note of your appliance's details and the Customer Service telephone number will enable you to find them again quickly. 8.2 Rating plate location Refer to this section to see where the rating plate of your appliance is located. ¡ on the underside of the appliance ¡ in the appliance pass ¡ You can also check the Customer Service Index (CSI) and the FD number in the basic settings. Removing the appliance 7 Removing the appliance Removing the appliance 1. Disconnect the appliance from the power supply. 2. NOTICE: Do not lever the appliance out from above at the frame. Push out the appliance from below. 9
-
 1
1 -
2
-
3
-
 4
4 -
 5
5 -
 6
6 -
 7
7 -
 8
8 -
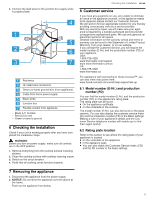 9
9 -
 10
10 -
 11
11 -
 12
12 -
 13
13 -
 14
14 -
15
-
16
-
17
-
18
-
19
-
20
-
21
-
22
-
23
-
24
 |
 |