Thermador HPWB48FS User Manual - Page 5
Care And Cleaning - parts
 |
View all Thermador HPWB48FS manuals
Add to My Manuals
Save this manual to your list of manuals |
Page 5 highlights
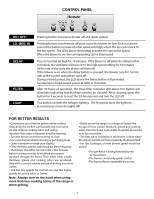
CARE AND CLEANING The efficiency of the range hood system depends on the cleanliness of the intake and filters. The frequency of cleaning depends on the amount and type of cooking. • Do not use the ventilating system without the filters in place or with grease-laden filters or surfaces. WARNING: To avoid risk of fire and explosion do not use flammable liquids or solvents. Always unplug or disconnect the appliance from the power supply before servicing. WARNING: Be sure the entire hood (including the filters and light bulbs) has cooled and grease has solidified before attempting to clean any part of the appliance. Filters and drip trays These hoods have reusable metal grease filters and drip trays. The metal filters also help prevent flaming foods on the cooktop from damaging the inside of the hood. For this reason, the metal filters must ALWAYS be in place when the hood is used. To Clean Filters and Drip Trays •The metal filters and drip trays should be cleaned once a month, or as needed. •To clean the metal filters and drip trays, drain and wipe all excess grease with a dry paper towel. Soak them and then swish them around in hot water and detergent. Don't use ammonia or ammonia products because they will darken the metal. •Do not use abrasives or oven cleaners. Rinse, shake and let them dry before replacing. They may also be cleaned in an automatic dishwasher. To Remove The Metal Grease Filters and the Drip Trays • Turn the fan and lights off. • Push each handle towards the back and pull downwards. Figure 1 • Unscrews the knobs that fix the drip trays holding brakets. Figure 2 • Grasp the drip tray and carefully lift it up and out of the hood track. Figure 2. To Replace The Metal Grease • Reverse procedure. To replace the Drip Trays Figure 2-3: 1. Place and seat the drip tray into the hood track. 2. Slide them left or right until all trays are side by side in place in the track. 3. Block firmly in place side drip trays with the the drip trays holding brakets. Figure 3 Figure 1 Figure 2 5
-
 1
1 -
 2
2 -
 3
3 -
 4
4 -
 5
5 -
 6
6 -
 7
7 -
 8
8 -
 9
9 -
 10
10 -
 11
11 -
12
-
13
-
14
-
15
-
16
-
17
-
18
-
19
-
20
-
21
-
22
-
23
-
24
-
25
-
26
-
27
-
28
 |
 |
