Thermador PRG486GDH Installation Instructions - Page 11
Step 4: Installing Anti-Tip, Device - installation instructions
 |
View all Thermador PRG486GDH manuals
Add to My Manuals
Save this manual to your list of manuals |
Page 11 highlights
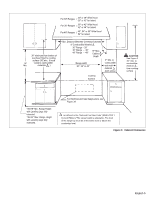
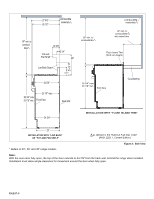
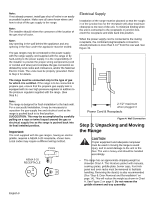
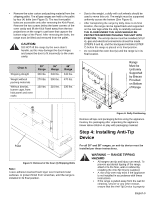
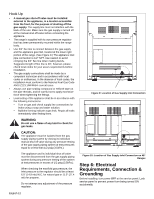
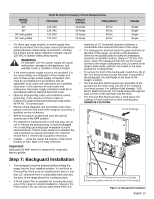
• Remove the outer carton and packing material from the shipping pallet. The all gas ranges are held to the pallet by four (4) bolts (see Figure 5). The two front pallet bolts are accessible only after removing the Kick Panel. Remove the two screws below the lower corners of the oven cavity and lift the Kick Panel away from the two projections on the range's cast base that capture the bottom edge of the Panel. After removing the bolts, the range must be lifted and removed from the pallet. CAUTION: DO NOT lift the range by the oven door's handle, as this may damage the door hinges and cause the door to fit incorrectly to the oven cavity. • Due to the weight, a dolly with soft wheels should be used to move this unit. The weight must be supported uniformly across the bottom (See Figure 6). • After transporting the range by dolly close to its final location, the range can be tipped back and supported on the rear legs while the dolly is carefully removed. THE FLOOR UNDER THE LEGS SHOULD BE PROTECTED BEFORE PUSHING THE UNIT INTO POSITION. The anti-tip device must be installed (STEP 4), gas and electrical connections should be made (STEPS 5 and 6), and the backguard installed (STEP 7) before the range is placed in its final position. • Do not install the oven door(s) until the range is in its final location. Chart A Shipping Weight Weight without packing materials Without door(s), burner caps, front kick panel and oven racks 30" Range 300 lbs. 270 lbs. 150 lbs. 36" Range 340 lbs. 300 lbs. 210 lbs. 48" Range 540 lbs. 470 lbs. 330 lbs. Must be Uniformly Supported by Braces Provided on Bottom of Range Figure 6: Dolly Positioning Remove all tape and packaging before using the appliance. Destroy the packaging after unpacking the appliance. Never allow children to play with packaging material. Step 4: Installing Anti-Tip Device Pallet Figure 5: Removal of the Four (4) Shipping Bolts Note: Leave adhesive-backed foam layer over brushed-metal surfaces, to protect finish from scratches, until the range is installed in its final position. For all 30" and 36" ranges, an anti-tip device must be installed per these instructions. WARNING - RANGE TIPPING HAZARD • All ranges can tip and injury can result. To prevent accidental tipping of the range, attach it to the floor, wall or cabinet by installing the Anti-Tip Device supplied. • A risk of tip-over may exist if the appliance is not installed in accordance with these instructions. • If the range is pulled away from the wall for cleaning, service or any other reason, ensure that the Anti-Tip Device is properly English 9
-
 1
1 -
2
-
3
-
4
-
5
-
 6
6 -
 7
7 -
 8
8 -
 9
9 -
 10
10 -
 11
11 -
 12
12 -
 13
13 -
 14
14 -
 15
15 -
 16
16 -
17
-
18
-
19
-
20
-
21
-
22
-
23
-
24
-
25
-
26
-
27
-
28
-
29
-
30
-
31
-
32
-
33
-
34
-
35
-
36
-
37
-
38
-
39
-
40
-
41
-
42
-
43
-
44
-
45
-
46
-
47
-
48
-
49
-
50
-
51
-
52
-
53
-
54
-
55
-
56
-
57
-
58
-
59
-
60
-
61
-
62
-
63
-
64
 |
 |
