Thermador VTN1DZ Installation Instructions - Page 5
Installing the integral blower
 |
View all Thermador VTN1DZ manuals
Add to My Manuals
Save this manual to your list of manuals |
Page 5 highlights
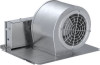
Installing the integral blower NOTE: Blower and hood image views will vary depending on model. 1. Thread one (x1) 4m flange nut (included with the hood) half-way down each of the two weld studs indicated. 2. Slide the blower mounting plate behind the nuts on the weld studs. 3. Install two (x2) 4m flange nuts (included with hood) to the top weld studs and tighten. 4. Tighten the two (x2) nuts from step 1 to fully secure the blower to the hood. 5. Connect the blower's plug connector to the connector present inside the hood. 4
-
 1
1 -
 2
2 -
 3
3 -
 4
4 -
 5
5 -
 6
6 -
 7
7 -
 8
8 -
 9
9 -
 10
10 -
 11
11 -
12
-
13
-
14
-
15
-
16
 |
 |

4
Installing the integral blower
NOTE:
Blower and hood image views will vary depending
on model.
1.
Thread one (x1) 4m flange nut (included with the
hood) half-way down each of the two weld studs
indicated.
2.
Slide the blower mounting plate behind the nuts on
the weld studs.
3.
Install two (x2) 4m flange nuts (included with hood) to
the top weld studs and tighten.
4.
Tighten the two (x2) nuts from step 1 to fully secure
the blower to the hood.
5.
Connect the blower’s plug connector to the connector
present inside the hood.