Toshiba 19SL400 User Manual - Page 26
Setting the HDMI, audio mode, Setting AV Input mode
 |
View all Toshiba 19SL400 manuals
Add to My Manuals
Save this manual to your list of manuals |
Page 26 highlights
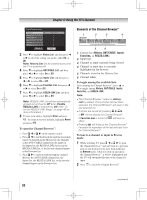
Chapter 5: Setting up your TV Setting AV Input mode This setting determines the configuration of the shared AV input on your TV. You can set this input for either ColorStream HD or Video. 1無 From the Preferences menu, highlight AV Input. 2無 Press t or u to select your desired setting. Note: If you select the wrong setting, picture will have no color or be fuzzy. Setting the HDMI® audio mode To set the HDMI audio mode: 1無 Press and open the Sound menu. 2無 Highlight Audio Setup and press . 3無 Press p or q to select HDMI 1 Audio and then press t or u to select the HDMI 1 audio mode (Auto, Digital, or Analog). (Auto is the recommended mode.) See "Connecting an HDMI or DVI device to the HDMI input" ( page 16). Mode Description Auto When viewing the HDMI 1 input, if digital audio from the HDMI input is available, it will be output. If not, the TV will automatically detect and output analog audio from the PC Audio input. Digital When viewing the HDMI 1 input, digital audio from the HDMI input will be output. Analog When viewing the HDMI 1 input, analog audio from the PC Audio input will be output. 4無 To save your settings, highlight Done and press . Note: Because the PC and HDMI-1 inputs share the same set of analog audio inputs, the PC Audio menu setting influences the HDMI 1 Audio menu setting. If PC Audio is set to "No," the HDMI 1 Audio setting changes to "Auto." If PC Audio is set to "Yes," the HDMI 1 Audio setting is set to "Digital" and is grayed out in the menu. (Also see item 2 on page 12 and "Setting the PC Audio" on page 43.) (continued) 26
-
 1
1 -
2
-
3
-
4
-
5
-
6
-
7
-
8
-
9
-
10
-
11
-
12
-
13
-
14
-
15
-
16
-
17
-
18
-
19
-
20
-
 21
21 -
 22
22 -
 23
23 -
 24
24 -
 25
25 -
 26
26 -
 27
27 -
 28
28 -
 29
29 -
 30
30 -
 31
31 -
32
-
33
-
34
-
35
-
36
-
37
-
38
-
39
-
40
-
41
-
42
-
43
-
44
-
45
-
46
-
47
-
48
-
49
-
50
-
51
-
52
-
53
-
54
-
55
-
56
-
57
-
58
-
59
-
60
-
61
-
62
 |
 |
