Toshiba 32C100U User Manual - Page 6
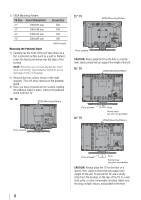
TV Size, Hole PatternHxV, Screw Size, CAUTION - 32
 |
View all Toshiba 32C100U manuals
Add to My Manuals
Save this manual to your list of manuals |
Page 6 highlights
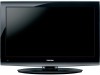
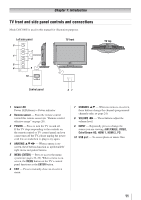
7) VESA Mounting Pattern TV Size Hole Pattern(HxV) 19" 100x100 mm 22" 100x100 mm 26" 200x100 mm 32" 200x200 mm Screw Size M4 M4 M4 M6 (unit in mm) Removing the Pedestal Stand 1) Carefully lay the front of the unit face down on a flat, cushioned surface such as a quilt or blanket. Leave the stand protruding over the edge of the surface. Note: Extreme care should always be used when removing the pedestal stand to avoid damage to the LCD panel. 2) Remove the four screws shown in the right diagram. This will allow removal of the pedestal stand. 3) Once you have removed all four screws, holding the pedestal stand in place, remove the pedestal stand from the TV. 19" TV VESA Mounting Pattern 22" TV VESA Mounting Pattern Four screws CAUTION: Always place the TV on the floor or a sturdy, level, stable surface that can support the weight of the unit. 26" TV VESA Mounting Pattern Four screws 32" TV Hook Sturdy strap (as short as possible) VESA Mounting Pattern Four screws Four screws Hook Sturdy strap (as short as possible) CAUTION: Always place the TV on the floor or a sturdy, level, stable surface that can support the weight of the unit. To secure the TV, use a sturdy strap from the hook(s) on the rear of the TV to a wall stud, pillar, or other immovable structure. Make sure the strap is tight, secure, and parallel to the floor. 6
-
 1
1 -
 2
2 -
 3
3 -
 4
4 -
 5
5 -
 6
6 -
 7
7 -
 8
8 -
 9
9 -
 10
10 -
 11
11 -
 12
12 -
13
-
14
-
15
-
16
-
17
-
18
-
19
-
20
-
21
-
22
-
23
-
24
-
25
-
26
-
27
-
28
-
29
-
30
-
31
-
32
-
33
-
34
-
35
-
36
-
37
-
38
-
39
-
40
-
41
-
42
-
43
-
44
-
45
-
46
-
47
-
48
-
49
-
50
-
51
-
52
-
53
-
54
-
55
-
56
-
57
-
58
-
59
-
60
-
61
-
62
 |
 |
